Showing posts with label Foil. Show all posts

Wednesday, September 02, 2020

Amazing Paper Grace: Introducing the Cascade Christmas Collection with Holiday Waterfall Card


We all love interactive and kinetic cards! Introducing the Christmas Cascade Collection!

This holiday collection allows you to make a Cascading Card inside of a Shadowbox Frame, mounted on a card base, or unmounted. Don't worry, these motifs make great conventional cards as well.


We listened to you, and we heard loud and clear that our community loves dynamic and purposeful cards. In previous collections, we gave you 3D Vignettes in a Christmas way.  Now we've found a way to merge a Collection favorite, Shadowbox Vignettes, in a new format.   


Becca Feeken with Amazing Paper Grace sent me these lovely dies to start my Christmas Cardmaking!


Hi there, today our Creative Team is sharing our makes from the Christmas Cascade Collection.  Let's take a second to sort this out...

What's a Christmas Cascade?

Amazing Paper Grace takes a spin on Christmas by building a new collection around something you already have in your stash - the Shadowbox Dies.  Becca loves building upon what you already have and making it new again. 


Christmas Cascade is made up of sets of 3" motif dies where each set has 3 motifs.  That's enough for each leaf of your waterfall but again, you could make them the center of your A2 or your A7 card. These, paired with the Waterfall base will allow you to use any dies to make your next Waterfall Card.


The Inspiration behind Christmas Cascade

The inspiration for Christmas Cascade was to produce a motif to use from an enclosure card all the way up to full A7 card with background layers.  This "cardlet" size has been a favorite in our stash because the elements can easily transition into all of the Amazing Paper Grace Collections and to all size cards.  Hint:  This is not the last time you will see "Cardlets"


Each of our Creative Team members will show you how to make a Christmas Cascade Card that is a waterfall card and a Christmas Cascade Card that is a flat card.


My Projects For Today

First up is my From our Family Waterfall Card using S5-428 Holly Frame Gala, GLP-194 Elegant Holiday Glimmer Sentiment Hot Foil PlatesS4-960 Cinch and Go Poinsettia, S5-399 Candlewick Rectangle, and S6-166 Christmas Cascade Card Base.


Here is what the dies look like:


S5-428 Holly Frame Gala


S5-399 Candlewick Rectangle


S6-166 Christmas Cascade Card Base

I used a combination of navy, white, silver, red, and green colors in my two projects. The Holly frame inspired me to do an inlay technique in the front cover of the waterfall card. I embossed the die into the front panel. Using the same die, I cut a green frame and insert it into the embossed area for a perfect fit. In the center, I added a Poinsettia blossom using the Cinch and Go Poinsettia.


The sentiments were all foiled with the Elegant Holiday Glimmer Sentiment Hot Foil Plates. I love the look! These pages came together so easily in one wonderful set! Pictured below are all the pages are shown before assembling the waterfall to be adhered on to the Candlewick Rectangle card.


My Second Project


My flat card features the Holly Frame Gala. It is a sweet shaped notecard measuring 3". But it packs a punch inside with a beautiful foiled sentiment from the Elegant Glimmer Sentiment. 


The holly leaf die cuts and berries were placed around the Holly Frame. I love the embossed details of the leaves. Striking against the navy background! Plus all those die cuts give the front interest and dimension. Used the Cinch and Go Poinsettia in the center with a brad to secure all the layers and accented with glitter on top of it. 


Designer Tip: Use your thin metal dies not only to cut paper but to emboss into the paper for a deep impression. Next, die-cut with that same die and a piece of cardstock. Adhere the cut shape into the embossed paper for an inlay technique. 


Here is the Spellbinders video showing amazing new samples as well as a tutorial showing you how to put the Cascade Card together:


Christmas Cascade Availability:

These dies and plates are available from Spellbinders right now! Click here: Amazing Paper Grace Cascading Christmas.


Christmas Cascade Inspiration Hop!

Click on the links to each member to be inspired across a broad range of talent:

Visit Margie Higuchi {{You Are Here!}}


Giveaway!  

You could win an Amazing Paper Grace Die of the Month! Enter to win on our new Instagram Account https://www.instagram.com/amazingpapergrace_creates/. All the entry details are there - just look for this image below:


Supplies:

Etched Dies: Amazing Paper Grace by Becca Feeken from Spellbinders Paper Arts (S5-428 Holly Frame GalaGLP-194 Elegant Holiday Glimmer Sentiment Hot Foil PlatesS4-960 Cinch and Go PoinsettiaS5-399 Candlewick Rectangle, and S6-166 Christmas Cascade Card Base), Glimmer Hot Foil System and Platinum 6 Machine


Other: Glitter: Ranger Ink (Stickles in Lime Green and Candy Cane); Adhesives: Scrapbook Adhesives by 3L (E-Z Runner Grand Ultra Strong, E-Z Runner Grand Permanent Dots, Adhesive Dots 3D, 3D Foam Strips, Metallic Transfer Foil Sheets Holographic Colors, and Dual Tip Glue Pen); Red, Green, Navy, White, and Silver Mirror Cardstock; Brads


I love your comments! Tell me what kinds of holiday cards you like to create? 


Thanks for stopping by! 

MargieH


Thursday, April 30, 2020

DIY Paper May Day Basket Tutorial

My friends inspired me to do this May Day project. The paper basket tutorial was shared by my talented Japanese paper crafter friend, Kimiko, in her Instagram Live. Friend Vicki Chrisman is doing a series of May Day-themed basket so I thought I'd join in.

**I receive products from PhotoPlay Paper Co. and Scrapbook Adhesives by 3L® for use in my projects. The opinions are completely my own based on my experience and doing so I can share what I personally love to use.**


Paper May Day Basket Basics

From a 12 x 12-inch patterned paper, I cut a 9-inch square piece.


On each side, I scored at 3-inch and 6-inch which gives you a tic-tack-toe scored lines or a hashtag :)


On one side, cut three one-inch strips on the first and last scored square. This is the B-side (backside) of the patterned paper - may be easier to see?


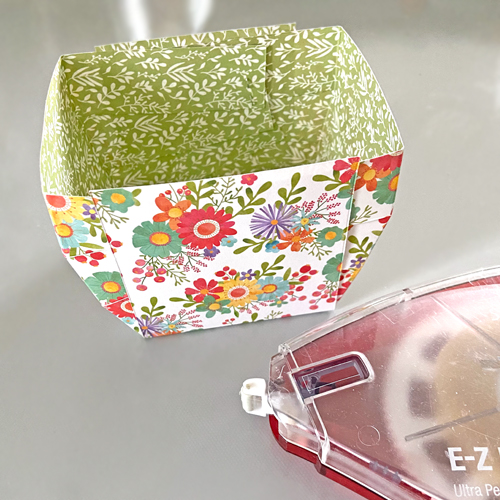
I gather the three strips together on the upper-left corner and stapled them. This causes it to curve to make the sides of the basket. Repeat the step on the lower-left corner.


Bring the ends together to form one straight edge on the top. If there is excess when it overlaps, trim them off. Secure the ends with a couple of Adhesive Dots Large on each stapled side. Repeat these steps on the opposite side to form the walls.


Now let's finish the base by adhering the middle panel to the sides with the E-Z Runner Grand Dispenser and E-Z Runner Grand Ultra Strong Refill. If it's over the edge like mine, you can either fold over and adhere or I just trimmed mine off with scissors. Set aside.


Basket Handle

From the leftover patterned paper, cut a 1.5 x 12-inch strip and from pink cardstock, cut a 1 x 12-inch strip. Adhere the pink strip on top of the patterned paper strip with the E-Z Runner Grand Ultra Strong.

Designer's Note: curl the strips before adhering - it makes it easier to adhere and to work with.


Now to embellish! First, I marked a line where the basket sides will meet the handle (I will adhere to the inside of the basket). Using a variety of small and regular size 3D Foam Circles, I randomly placed them between the lines. Keep the top liners on for now.


Once I was happy with the placement, I can start to foil them one by one. Using the Metallic Transfer Foil Sheets Variety set, I picked out three colors: turquoise, purple, and magenta. Take the top liner off, place the foil on top with color side UP, and then gently burnish with your fingertips to transfer the color. It doesn't take much pressure. Lift the foil off to see the beautiful results!


Lastly, erase the lines with an eraser and apply with the E-Z Runner Grand Ultra Strong below the line before adhering to the inside of the basket.


Embellishing the Basket Front

Let me show you a fast and easy way to make a shaker feature for the front. A layered base is created first, cut a 3-inch square from green patterned paper, 2.75-inch square in pink cardstock, 2.5-inch square floral patterned paper, and 2-inch square green patterned paper. Note that all the patterned paper is from the leftover basket base.

Place a Creative Photo Corner in White on each corner of the 2.75-inch square pink cardstock and adhere on top of the 3-inch square green patterned paper.


Apply a strip of E-Z Runner Grand Ultra Strong on the back of the 2.5-inch square floral patterned paper before slipping into the Creative Photo Corner.


Take the smallest Keepsake Envelope and slip the 2-inch square green patterned paper inside. Next, add sequins inside the envelope and in front of the patterned paper. Remove the flap liner and close the envelope. Remove the back liner of the envelope and center on top of the layered base.


Place a 3D Foam Butterfly on top of the envelope to permanently seal the flap. Using the foiling steps mentioned, foil the butterfly. Add a white pearl in its center. Set aside.


Final Touches

To finish off the edges of the basket, I added a pretty lace trim with Extreme Double-Sided Tape 1/8-inch.


Next, adhere the layered shaker panel with Crafty Foam Tape to lift and to give some dimension. Fill it with candy! Well, really flowers but didn't have any to add...you get the point. LOL!


Thanks for stopping in and Happy May Day!
MargieH


Creative Time: 30 minutes
Skill Level: Intermediate

Materials Needed:
Scrapbook Adhesives by 3L®
E-Z Runner® Grand Refillable Dispenser
E-Z Runner® Grand Ultra Strong Refill
3D Foam Butterflies
3D Foam Circles White Mix
Metallic Transfer Foil Sheets in Variety Colors
Keepsake Envelopes
Adhesive Dots Large
Crafty Foam Tape White
Creative Photo Corners White

Home Hobby by 3L®
Extreme Double-Sided Tape 1/8-inch

Other
Patterned Paper: PhotoPlay Paper Co. (Spring in My Garden Collection); Pink Cardstock: My Color Cardstock (Pink Petal); Scoring Tool and Board; White Self-Adhesive Pearl; Sequins; Lace Trim; Staples; Pencil; Eraser; Candy

Save It to Pinterest!


Thursday, September 26, 2019

Scrapbook Adhesives by 3L: Foiled Frame Thanks for Everything Card

Super excited to be up on the Scrapbook Adhesives by 3L® Blog! I created a Clean And Simple (CAS) style card to feature foiling, layering stamps and dimension. A great combination for cardmaking!

**I receive products from Altenew, Waffle Flower and Scrapbook Adhesives by 3L® for use in my projects. The opinions are completely my own based on my experience and doing so I can share what I personally love to use.**


Tutorial Sneak Peek

You'll have to visit the Scrapbook Adhesives by 3L® Blog for the complete photo tutorial but I'll share a little...shhh, don't tell!


Here's a video I am sharing from Altenew that I think will be helpful in understanding visually. See below...


I loved how it turned out - simple design with dimension and sparkle. Hope you will try these elements in your next project!

Thanks for stopping by!
MargieH

Pin It!


Monday, October 22, 2012

ScraPerfect: Fancy 2012 Heirloom Ornament Card

Today I'm up on the ScraPerfect Blog's Fancy 2012 Heirloom Ornament post! I'm a little bit early but I created a holiday card :0)

Fancy 2012 Heirloom Ornament Card by Margie Higuchi
Supplies – Stamp: JustRite® Papercraft (Lattice Background Stamp); Ink: TSUKINEKO (VersaMark); Embossing Powder: Stampendous (Detail White); Dies, Embossing Folder & Craft Foil: Spellbinders™ Paper Arts (S5-116 2012 Heirloom Ornament, S5-131 A-2 Matting Basics A, S5-132 A-2 Matting Basics B, EL-014 Holiday Magic M-Bossabilities™ Folder and F-012 Precious Metal Premium Craft Foils Assortment); Tools & Adhesive: ScraPerfect (Embellie Gellie, Perfect Crafting Pouch, Perfect Cleaning Cloth and Best Glue Ever); Other: Black, White Cardstock, Red Tinsel Trim

Swipe the Perfect Crafting Pouch over the black cardstock before stamping image. I also swipe the Perfect Crafting Pouch over the sheet of paper to catch the embossing in…don’t want to miss any powder! LOL!


Next I cut/embossed all my pieces with Spellbinders Card Creator series – all the die cuts layer perfectly on to an A-2 (4 ¼ x 5 ½”) card. Using the Best Glue Ever, I can even apply glue on the narrowest of edges.


When placing all the pieces together, you will get a card front that is shown below...


Next I embossed the craft foil with M-Bossabilities Folder and cut/emboss it with 2012 Heirloom Ornament. I wanted to highlight the beautiful embossing so I used sandpaper and wipe it clean with the Perfect Cleaning Cloth.

 
Then I assembled all the pieces together to create the finished card...here's a second look.


Hope you enjoyed the process and how these ScraPerfect products are a "must have" in your basic tool kit! LIKE what you see? Bookmark ScraPerfect's Blog and LIKE them on ScraPerfect FaceBook Page!

Thanks for stopping by!
MargieH