Tuesday, February 14, 2017

Scrapbook Adhesives by 3L: Creating a Woven Heart Valentine Scrapbook Page

Happy Valentine's Day, everyone!! I'm on Scrapbook Adhesives by 3L Blog today :) Excited to share an 8.5 x 11" scrapbook page with a combination of E-Z Runner® Ultra, Creative Photo Corners and 3D Foam Hearts to create this woven heart page!

**As a part of Scrapbook Adhesives by 3L® Design Team and Spellbinders® Paper Arts, I receive products for use in my projects. The opinions are completely my own based on my experience and doing so I can share what I personally love to use :) **


I start by cutting 0.75 x 6.0" of patterned papers. Line eight strips side by side and then weave one strip across (back and forth) to create one row. Repeat until you get to the top for a woven 6.0 x 6.0" piece. Set aside.


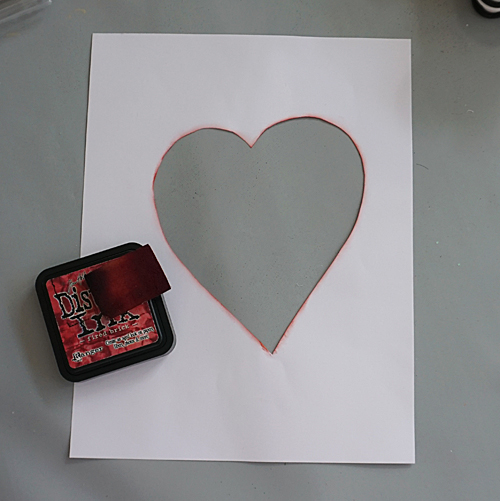
Take a piece of 8.5 x 11" white cardstock and hand drawn a heart shape. Then with a pair of scissors, fussy cut the shape out to create an open heart in the paper. If you used a pen or marker like me, cut outside the line.


With red ink and applicator, ink the edges of the heart to give it depth.


Using the E-Z Runner® Ultra, I followed the curves of the heart to place my woven paper piece on top to adhere. Trim off excess and adhere any loose ends.


I cut pictures from my leftover Happy New Year photo card (it had a collage design). I matted with patterned paper and secured two with Creative Photo Corners White and one with E-Z Runner® Ultra.


To layer the background, I swiped my ink pad across my mat and misted water. Loaded my paint brush and flicked in the areas where I will place my sequins. My cut out heart was used to protect the woven area. Set aside to dry.


For my title, I grabbed my 3D Foam Hearts and foiled a large heart (with the shiny side up). See How to Use 3D Foam Hearts and Other Shapes video below.


Next, for the letters, I placed a patterned paper on top of my 3D Foam Creative Sheet (remove top liner first) and die-cut my dimensional letters. See How to Use 3D Foam Creative Sheets video below.


For the background, I placed my sequins randomly using the new Adhesive Dots Micro. An 1/8 inch clear double-sided adhesive circles, they are PERFECT for my small embellies like these sequins. I also added a couple of small 3D Foam Hearts :)


Lastly, I adhered all my photos on the page with E-Z Runner® Ultra and inked the edges of my page with ink.


Had a blast creating this page - was able to do this in an afternoon.


Skill Level: Intermediate
Creative Time: 45 minutes

Materials Needed
Scrapbook Adhesives by 3L®

E-Z Runner® Ultra Refillable Dispenser
Creative Photo Corners White
3D Foam Hearts
Adhesive Dots Micro

Other
Alpha Steel Rule Die: Spellbinders® Paper Arts (Type-Oh! Contour™ Steel Rule Die)
Patterned Papers: Authentique Paper (6 x 6" Beloved Collection)
Ink: Ranger Inks (Distress Ink Fired Brick by Tim Holtz)
White Cardstock; Paint Brush; Water Mister; Crafting Mat; Sequins

Pin It!


Saturday, February 04, 2017

Scrapbook Adhesives by 3L: You're A Star Shaker Card from Creativation 2017

Hello everyone! I am so excited to share a window shaker card created with Keepsake Envelope Mix as an easy shaker feature on Scrapbook Adhesives by 3L® Blog! I had the honor of designing all three make and take projects for Creativation 2017 (formerly CHA - Craft & Hobby Assoc.) trade show in Phoenix AZ last month. Let me show how to create this fun interactive card!

**As a part of Scrapbook Adhesives by 3L® Design Team, I receive products for use in my projects. The opinions are completely my own based on my experience and doing so I can share what I personally love to use :) **


To make the card base, die-cut a square on an A2 (4.25 x 5.5 in) size card front to create a window/opening. Stamp banner and sentiment. Color the banner with watercolor pencils (or coloring pencils). Set aside.


To make the shaker feature, cut patterned paper to fit inside a large Keepsake Envelope. Scoop enough sequins to fill the spoon’s bottom and place in front of patterned paper, inside the envelope.


Take out four sequins to use on the card front later. Take the liner off from the envelope and close the flap. Set aside.


Apply the E-Z Runner® Micro Refillable Dispenser close to the edge of the window as possible (to secure in place).


Curl the ends of the Keepsake Envelope liner together to make a “handle” for easy placement over the window. DO NOT REMOVE THE LINER YET – use it to adhere the adhesive edges together to secure.


Add white cardstock panel to cover shaker by applying E-Z Runner® Grand Dispenser on the edges of cardstock. Remove liner of Keepsake Envelope and place white cardstock over to cover the entire back cover of card.


Now for the fun part, embellish card front! Pull out the points of largest 3D Foam Star FIRST gently with a tooth pick WITH LINER ON (helps keep its shape). Place on top of the shaker in any way (straight, angle, etc.).


Remove the liner from the 3D Foam Star and place the foil shiny side up. Gently burnish into the star with your finger and lift the foil. For the finishing touch, add your sequins to accent the card front with a combination of Adhesive Dots Mini and new Adhesive Dots Micro.


Thanks for stopping by!
MargieH

Supply List:
Scrapbook Adhesives by 3L®:

Keepsake Envelopes Mix
E-Z Runner® Micro Refillable Dispenser
E-Z Runner® Grand Dispenser
3D Foam Stars
Adhesive Dots Mini
Adhesive Dots Micro (coming soon!)
Other:
Stamps: Lawn Fawn (Lucky Star and Plan On It: Holidays Sets)
Patterned Paper: Photo Play Paper Co. (Fun with Friends Collection) and Bo Bunny Designs (You're Invited Collection)
Ink: Tsukineko (Memento Ink - Black Tuxedo)
Tool: My Sweet Petunia (MISTI)
White Cardstock; Sequins; Watercolor Pencils; Gold Foil