Tuesday, March 31, 2015

Michaels Stores Spring Time in Paris Contest: Petite Monarch Crown

Michaels Store is having a Spring Time in Paris Contest and I thought I would give it a try! I worked on this crown off and on for the last couple of weeks...always wanted to play with my A Gilded Life die templates and what a perfect motivator! LOL! This collection and the Paris I envisioned reminds me of elegant European luxury!


What do you think? I was inspired by the artwork using the same dies from Spellbinders® 2015 Winter Catalog...theirs is more elegant, mine is more girly? LOL!! Let me show you how I created this.


Build the Crown Base:

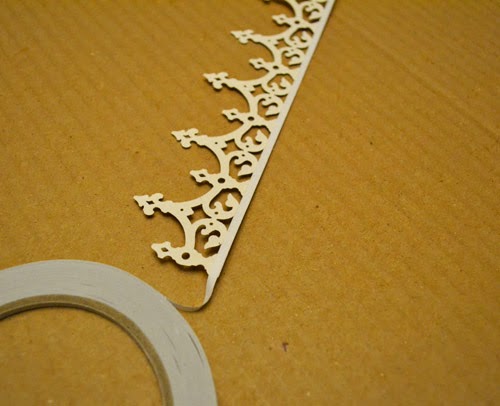
First, cut/emboss Imperial Border Die three times with Gold Textured Cardstock, using the Artisan X-Plorer™ Machine. Adhere the ends of three die cuts using DODZ™ Small to form a ring. Set aside.

Cut/emboss Petite Monarch Die six times with Gold Mirror Cardstock. Adhere the ends of three die cuts using DODZ™ Small to form a ring. Set aside the other three die cuts.

Using Home & Hobby by 3L® Premium Double-Sided Tape ⅛" (coming soon!), adhere the Petite Monarch ring on top of the Imperial Border ring to create a two-tier crown base.


Decorate the Bottom Crown Base:

Fold in half the ½" width white organza ribbon (I used about 18" in length) and thread through the bottom base of the crown. Then I threaded 1/4" width Lavender ribbon on top of the organza ribbon. Tie ends. Add medium purple rhinestones on each of the embossed circle designs.


Decorate the Top Crown Base:

Behind the high peak of the crown, I adhered a leaf trinket pin, using the DODZ™ Small on top and DODZ™ Medium in middle. Cover the top circle opening of the high peak with a large purple rhinestone (see image). Repeat until all are decorated. Using gold glitter paste, rub over white flower and let dry. Adhere it with DODZ™ 3D to cover the pin in opening at bottom. (see image). Repeat until all are decorated. Add clear rhinestones to the smaller peak crown design. Repeat until all are decorated. Cover the back side of the three Petite Monarch die cuts with Adhesive Sheets - 6 x 12" and place on the inside of the crown. This will finish the crown, making it look like metal verses paper.

Embellishment:

Add bow and ribbon tails to back and secure with DODZ™ 3D. Trim any excess. Add beads to ends of ribbon tails. Add purple rhinestones to ½" button and secure to the center of bow with DODZ™ 3D.

And there you have it! Ready to wear for a sweet 16 birthday girl, a bride-to-be or just because! LOL!


Supplies:
Specialty Papers: Michaels Stores Recollections (Gold Mirror Cardstock and Gold Textured Cardstock)
Dies: Spellbinders® Creative Arts (Petite Monarch, Imperial Border and Artisan X-Plorer Machine)
Rhinestones: KaiserCraft and Want2Scrap©
Ribbon: Offray
Pins: Maya Road
Flowers: Prima Marketing Inc.
Gold Glitter Paste: Bo Bunny Designs
Adhesive: Scrapbook Adhesives by 3L® (Home & Hobby by 3L® Premium Double-Sided Tape ⅛", Adhesive Sheets - 6 x 12", DODZ™ 3D, DODZ™ Medium and DODZ™ Small)
Other: Beads, Button

Thanks for stopping by! Fingers crossed for me :)
MargieH xo

Wednesday, March 18, 2015

Scrapbook Adhesives by 3L: 3D Foam Happy Easter Card Tutorial

Today I am excited to be on Scrapbook Adhesives by 3L Blog featuring their adorable 3D Foam Easter Shapes set, 3D Foam Squares - Black, Regular, Pigment Powder - Brown and Pink, Adhesives Sheets - 4 x 6" and E-Z Runner® Permanent Strips - Refillable adhesive to create this sweet Happy Easter card.


Just a few peeks of my step outs...


For a detailed tutorial and full list of supplies, please check out 3D Foam Happy Easter Card Tutorial

Happy (early) Easter :)
MargieH

Friday, March 06, 2015

Faber-Castell Design Memory Craft: Texture Gems™ Contemporary Happy Birthday Card

Hello all! First of MANY THANKS for those of you who voted for my Beautiful Moments Chalkboard Tray DIY Wall Decor on FaveCrafts Best Blogger Craft 2015 Contest! If you haven't heard, please click on the link for more details. If you like it, I hope I can count on your vote - please share with others :)

OK..today I am on Faber-Castell® Design Memory Craft® Blog using their newest release from CHA (Craft & Hobby Assoc.) Mega Trade Show. It is mixed media in CAS (Clean And Simple) design to come up with this...Texture Gems™ Contemporary Happy Birthday Card...


Just a few peeks but be sure to visit for a full step out tutorial and supplies list...


Thanks for visiting and don't forget to visit my Texture Gems™ Contemporary Happy Birthday Card post!
Margie Higuchi (MargieH)

Thursday, March 05, 2015

JustRite Papercraft: Celebrate Your Day With Good Friends Card

I am thrilled to be playing with the uber talented designers over at JustRite Papercrafts to help introduce JustRite® PaperCraft’s March 2015 Release!


I am using A2 Woodgrain Upcycle Frame Cling Background Stamp set and Stacking Sentiments Clear Stamp Set, with Spellbinders® Card Creator series of die templates to create a masculine card.


I stamped the A2 Woodgrain Upcycle Frame Cling Background Stamp in Rich Cocoa Ink onto white cardstock. Then I placed my A2 Matting Basics B Die #7 (the smallest die size is #1) over the image and cut/embossed with my Grand Calibur® Machine. Color the frame with watercolor pencils and soften the colors with a waterbrush and water.


Next I used my Stacking Sentiments Clear Stamp to create my sentiment. I love that I can combine and create longer sentiments for whatever occasion I choose! Here I put two sets together to create my greeting. After stamping, I placed my A2 Matting Basics A Die #3 over the it and cut/embossed.


For the card front, I wanted a textured look so I took out my Memento Luxe Rich Cocoa ink and swiped across my Bricks and Bark Em-bossing Fold'er™ on one side. Then Placed the card on the other side of folder, closed and embossed it through the Grand Calibur Machine.


Touch up the edges with Memento Luxe Rich Cocoa ink on the card panel and card base for a finished look...


Assemble the card panel by adhering the sentiment onto the frame background using 3D Foam Squares.


Next add the panel to the card front with E-Z Runner® Permanent Strips. Thread twine through twice, make a knot. Thread through the button, end with a bow and secure the back with DODZ™ - Small.


Add three brown pearls on top and it's ready to be sent! Here's another look...


Project Supplies:
JustRite Papercraft Stamps: A2 Woodgrain Upcycle Frame Cling Background Stamp and Stacking Sentiments Clear Stamp
Die Templates and Embossing Folder: Spellbinders® Creative Arts (S5-131 A2 Matting Basics A, S5-132 A2 Matting Basics B and Bricks and Bark Em-bossing Fold'er)
Inks: IMAGINE Craft®/TSUKINEKO® (Memento Ink - Rich Cocoa and Memento Luxe - Rich Cocoa)
WaterColor Pencils and WaterColor Brush: Faber Castell® Design Memory Craft® (Art Grip Aquarelle WaterColor Pencils #105, #108, #111#139 and #147)
Cardstock and Card Base - Darice and Core'dinations ColorCore Cardstock®
Adhesives - SCRAPBOOK ADHESIVES BY 3L® (E-Z Runner® Permanent Strips, DODZ - Small and 3D Foam Squares)
Twine: May Arts Ribbon
Wood Button: Maya Road
Brown Pearls: Want2Scrap©

Also, JustRite is kicking off a Save 25% off all JustRite Cling Stamps sale today!!!! Hurry to get your best selection before it ends March 15th at Midnight EST!


Get more inspiration from these talented designers created with today’s wonderful release:

JustRite Inspiration

Debbie Olson

Becca Feeken

Eva Dobilas

Kristi Schurr

Marisa Job

Michele Kovack

Darsie Bruno

Heidi Blankenship

Margie Higuchi --ME~!!

Thanks for stopping by to visit!
MargieH

Wednesday, March 04, 2015

Scrapbook Adhesives by 3L: Wish You Were Here Travel Book Tutorial Lawn Fawn Blog Hop - Day 3

Today I'm hopping on Scrapbook Adhesives by 3L® Blog with Lawn Fawn! Come SEE and ENTER for a chance of a wonderful giveaway! VISIT: Wish You Were Here Travel Book Tutorial Lawn Fawn Blog Hop - Day 3!

But in the meantime I am excited to share with you peeks on how I created this cute little book...


Like what you see? VISIT: Wish You Were Here Travel Book Tutorial Lawn Fawn Blog Hop - Day 3 for a detailed tutorial and full list of supplies....and of course, the giveaway!

Many thanks for stopping by :)
MargieH xo