Showing posts with label Contest. Show all posts

Wednesday, April 11, 2018

FaveCrafts Best Blogger Contest 2018: DIY Hello Chalkboard Sign

UPDATE + CLOSED: THANK YOU x 3!!! I placed 6th in the contest :) Thanks to all who voted every day or constantly!!

ETA: I'm in the FINAL 20! SQUEAL! If you like my project, please VOTE DAILY (til 4/16). USE DIFFERENT DEVICE. SHARE + THANK YOU!!


Back in January, I attended Creativation (the largest craft trade show in the U.S. hosted by Association For Creative Industries, AFCI formerly Craft & Hobby Assoc./CHA) in Phoenix AZ.


A bloggers' event was held by Prime Publishing where influencers and manufacturers meet to seek social media opportunities and brand awareness. Participating manufacturers were kind enough to send or offer their products for bloggers to create with and enter into a contest. My project is a home decor piece, DIY Hello Chalkboard Sign.

**I receive products from Sakura America, Uchida Marvy, DecoArt, Plaid, Spellbinders Paper Arts and Scrapbook Adhesives by 3L® for use in my projects. The opinions are completely my own based on my experience and doing so I can share what I personally love to use.**


Getting Our DIY On!

The black chalkboard tin sign was picked up in a big box craft chain store for under $2.00 and right away I knew what I wanted to do with it!

Using white glittered cardstock, I applied 3D Foam Creative Sheet on the back by taking off the liner and placing the cardstock on top. Next, die-cut a heart shape. To add more sparkle and interest, I foam brushed Intense Glitter Brillance Paint. Once dried, it gave a more sparkly effect to my die cut.


Using the Gelly Roll® Classic™ White Pen (10 Bold), I hand drew circles with my heart die cut in the middle as a guide. The circles don't have to be perfect because no one will know after I draw my leaves ;) This pen is fantastic - it writes on metal...painted metal! After drawing in the leaves, set aside.


Let's start with the flowers. Let me just say I love Plaid's FolkArt® Color Shift™ Paint in Pink Flash!! It's a thick paint that creates metallic lusters with colors that sift in changing light. Really cool and dries fast. Perfect for my flowers! I used white cardstock as my painting surface.


I got so excited about how the flowers turned out I forgot to take a picture - oops! LOL! The etched die set I used was Rolled Flowers in small and medium size. This is a clever set designed by talented + sweet friend, Marisa Job. All you have to do is roll the flower - it includes the stamens, petals and leaf.


But before rolling the die cut, I colored the stamens with DecoColor Liquid Gold. Goodness, I wanted to paint EVERYTHING in gold. This paint marker goes on smoothly and it leaves a beautiful gold color behind. LOVE!


Using the leftover from cutting the heart die cut, I cut Hello Geo Heart's hello die and painted it gold. After it dried, I center the sentiment onto the heart shape.


Next die-cut the Layered Leaf Vines' small and large outline vine dies with white cardstock and paint in gold. I cut two sets to layer. Set aside to dry.


While the vines are drying, I rolled my flower die cuts and secured with E-Z Runner® Micro. Perfect adhesive for narrow areas! Fluff up the flowers - the petals have a coating to them so they are protected and sturdy but not stiff. I used an Adhesive Dot 3D for the bottom of each flower to adhere to the tray. Keep the liner on them for now until placement.


Place an Adhesive Dot 3D in two areas where the vine tips will be attached. Shape the vines first for dimension. Place the larger vine first and then layer the smaller one. Repeat in the second area.


Next, take the Adhesive Dot 3D liners off the flowers and place them between the two sets of vines. Adjust the petals and vines until you achieve your look.


For the finishing touch, take the bottom liner off of the glittered heart and center it inside the wreath. It's ready to be displayed! Here's another look at the DIY Hello Chalkboard Sign.


Thanks for stopping by! I hope I earn your vote :)
Margie Higuchi

Supplies List:
Testors®: Intense Glitter Brillance Paint in Silver
Sakura® of America: Gelly Roll® Classic™ White Pen (10 Bold)
Marvy® Uchida: DecoColor™ Liquid Gold
Plaid®: Plaid's FolkArt® Color Shift™ Paint (Pink Flash)
Scrapbook Adhesives by 3L®: Adhesive Dots 3D, E-Z Runner® Micro and 3D Creative Foam Sheets
Spellbinders® Creative Arts: Classic Hearts, Rolled Flowers, Layered Leaf Vines and Hello Geo Heart
Chalkboard Tray Sign
White Glittered Cardstock
White Cardstock
Foam Brush

Wednesday, June 29, 2016

Gel Press: Patriotic Tags Trio Tutorial


More and more I see makers using the gel presses to create beautiful projects in the paper crafting world (think mono-printing plate). I was at a consumer show last month where I met/saw Sally Lynn McDonald from Gel Press® by PolyGel® showcasing their plates. I was intrigued :) AND it didn't help that she was demo-ing right next to me! LOL!!!


So what did I do? I bought one! LOL! The one I purchased was the 8 x 10" Plate - perfect for art journaling and for card making. They also have other sizes from 12 x 14" to petite sizes (click Featured Products for size information). This is what I ended up making...


I started with two colors of Testors Craft® Acrylic 2 oz. Craft Paints in Stop Sign (red) and Island Breeze (blue) both in matte finish. You just need a little and a brayer to spread the colors across - just enough to cover my tags.


For one tag, I just press down for a trio color look. The second one, after I rolled on color, I drew my texture card across to make strips. The third, I pressed excess paint from the other two and make a tie-dyed background. I love each one of them :)


To create my fireworks design (the tie-dyed background tag), I cut Make a Wish die, trimmed off the stem and colored with red glitter. I repeated for the blue one. This idea was inspired by my talented friend Debi Adams (thanks Debi xo)!!


For "USA" I cut Font One Uppercase with 3D Foam Creative Sheets (cuts like butter!) and took off the top liner to rub Pigment Powder Gold for shimmer. Then I centered the letters on the tag by taking off the back liner. SO EASY!


Used Dodz Adhesives Dots Small to make those fireworks stick! Love that the adhesive dots have liners...so much easier to handle and no tearing of my die cuts.


For my stars and stripes tag, I used a bunch of 3D Foam Stars all over and colored them using a combination of Pigment Powder Gold and Blue.


The Happy Birthday tag, I placed patterned paper on top of a piece of 3D Creative Foam Sheet (after removing the top liner). Then put the die on top covered foam sheet to cut with a manual die cutting machine.


I used the America the Beautiful die to cut patterned paper and applied adhesive on the back using Adhesive Sheets 4 x 6". You can also apply the adhesive sheet on the back of the patterned paper and die-cut (won't damage the die).


After I assembled the pieces, I stamped the sentiments and added sequins with Dodz Adhesive Dots Small to the tag. Here's another look at each one...


I hope you enjoyed my process and thanks for sticking with me till the end - LOL!!
MargieH

Supplies:
Gel Press® by PolyGel®: 8 x 10" Plate
Scrapbook Adhesives by 3L®: 3D Foam Stars, 3D Foam Creative Sheets, Adhesive Sheets 4 x 6" and Dodz Adhesive Dots Small
Donna Salazar with Scrapbook Adhesives by 3L®: Pigment Powder Gold and Pigment Powder Blue
Testors Corp: Acrylic 2 oz. Craft Paints (Stop Sign and Island Breeze)
Spellbinders® Creative Arts: Font One Uppercase and Make a Wish
SugarPea Designs: America The Beautiful
DoodleBug Designs Inc™: Patriotic Picnic Collection
JustRite PaperCraft: Extra Grand Sentiments Clear Stamps
Ranger Inks: Stickles (Red and Blue)
Faber-Castell® Design Memory Craft®: Texture Card #8
Others: Brayer; Tags; Sequins; Red, White and Blue Cardstock


Thursday, March 24, 2016

FaveCraft CHA Bloggers Event: Craft 2016: Dream DIY Gold Altered Clipboard

This Gold Dream DIY Clipboard is entered in FaveCraft Best Blogger Crafts 2016 (until 4/6). I would love your support by voting for my project


Today I am sharing a clipboard that I created from scratch using chipboard, metallic gold material, coloring book page, black cardstock and a word sticker! Lots of materials but love the end result. Let me share my process...


Die-cut three rectangles from Spellbinders® Grand Rectangle Die #5 (the smallest sized die is #1): one each of chipboard, Fairfield™ World Oly-Fun™ Metallic Gold material and black cardstock.


Apply Scrapbook Adhesives by 3L® Girlie Grunge Art Medium with a foam brush and adhere the rectangle chipboard and gold metallic material die cuts together.


While the clipboard base dries, die-cut another rectangle out of Leisure Arts Floral Wonders Color Art coloring book page.


Color the page with Testors® .25 oz acrylic paints and a paint brush for a vibrant accent to the clipboard.


After the paints dried, trim the page to the desired size and added the "dream" sticker in the center.


Trim the black cardstock rectangle to the desired size and adhere with Scrapbook Adhesives by 3L® Extreme Double-Sided Tape 1/2".


Use the gold metallic material scraps to cut strips to create a border on the top and bottom of the coloring piece. Secured with Extreme Double-Sided Tape 1/2".


Die-cut Sizzix® Easel Die with chipboard and secure with Extreme Double-Sided Tape 1/2" on the back. Add the clip on top and it's ready to be displayed!


Thanks for stopping by :)
MargieH

Materials List:
Fairfield™ World (Oly-Fun™ Metallic Gold)
Leisure Arts (Floral Wonders Color Art For Everyone Coloring Book)
Testors® (0.25 oz Acrylic Paints)
Sizzix® (Easel Die)
Core'dinations ColorCore Cardstock® (Black Cardstock)
Scrapbook Adhesives by 3L® (Girlie Grunge Art Medium and Extreme Double-Sided Tape 1/2")
Spellbinders® Creative Arts (LF-132 Grand Rectangle Die #5)
American Crafts (Dream Thickers by Amy Tangerine)
Chipboard; Foam Brush; Clip

Tuesday, March 31, 2015

Michaels Stores Spring Time in Paris Contest: Petite Monarch Crown

Michaels Store is having a Spring Time in Paris Contest and I thought I would give it a try! I worked on this crown off and on for the last couple of weeks...always wanted to play with my A Gilded Life die templates and what a perfect motivator! LOL! This collection and the Paris I envisioned reminds me of elegant European luxury!


What do you think? I was inspired by the artwork using the same dies from Spellbinders® 2015 Winter Catalog...theirs is more elegant, mine is more girly? LOL!! Let me show you how I created this.


Build the Crown Base:

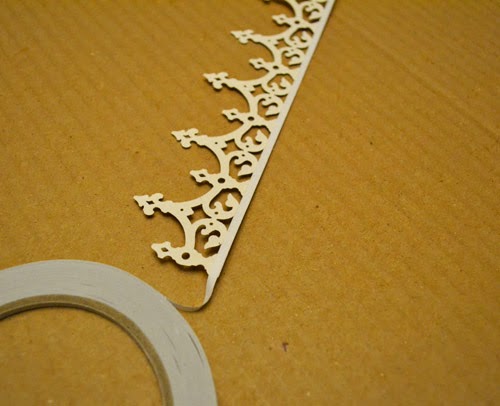
First, cut/emboss Imperial Border Die three times with Gold Textured Cardstock, using the Artisan X-Plorer™ Machine. Adhere the ends of three die cuts using DODZ™ Small to form a ring. Set aside.

Cut/emboss Petite Monarch Die six times with Gold Mirror Cardstock. Adhere the ends of three die cuts using DODZ™ Small to form a ring. Set aside the other three die cuts.

Using Home & Hobby by 3L® Premium Double-Sided Tape ⅛" (coming soon!), adhere the Petite Monarch ring on top of the Imperial Border ring to create a two-tier crown base.


Decorate the Bottom Crown Base:

Fold in half the ½" width white organza ribbon (I used about 18" in length) and thread through the bottom base of the crown. Then I threaded 1/4" width Lavender ribbon on top of the organza ribbon. Tie ends. Add medium purple rhinestones on each of the embossed circle designs.


Decorate the Top Crown Base:

Behind the high peak of the crown, I adhered a leaf trinket pin, using the DODZ™ Small on top and DODZ™ Medium in middle. Cover the top circle opening of the high peak with a large purple rhinestone (see image). Repeat until all are decorated. Using gold glitter paste, rub over white flower and let dry. Adhere it with DODZ™ 3D to cover the pin in opening at bottom. (see image). Repeat until all are decorated. Add clear rhinestones to the smaller peak crown design. Repeat until all are decorated. Cover the back side of the three Petite Monarch die cuts with Adhesive Sheets - 6 x 12" and place on the inside of the crown. This will finish the crown, making it look like metal verses paper.

Embellishment:

Add bow and ribbon tails to back and secure with DODZ™ 3D. Trim any excess. Add beads to ends of ribbon tails. Add purple rhinestones to ½" button and secure to the center of bow with DODZ™ 3D.

And there you have it! Ready to wear for a sweet 16 birthday girl, a bride-to-be or just because! LOL!


Supplies:
Specialty Papers: Michaels Stores Recollections (Gold Mirror Cardstock and Gold Textured Cardstock)
Dies: Spellbinders® Creative Arts (Petite Monarch, Imperial Border and Artisan X-Plorer Machine)
Rhinestones: KaiserCraft and Want2Scrap©
Ribbon: Offray
Pins: Maya Road
Flowers: Prima Marketing Inc.
Gold Glitter Paste: Bo Bunny Designs
Adhesive: Scrapbook Adhesives by 3L® (Home & Hobby by 3L® Premium Double-Sided Tape ⅛", Adhesive Sheets - 6 x 12", DODZ™ 3D, DODZ™ Medium and DODZ™ Small)
Other: Beads, Button

Thanks for stopping by! Fingers crossed for me :)
MargieH xo