Thursday, April 30, 2020

DIY Paper May Day Basket Tutorial

My friends inspired me to do this May Day project. The paper basket tutorial was shared by my talented Japanese paper crafter friend, Kimiko, in her Instagram Live. Friend Vicki Chrisman is doing a series of May Day-themed basket so I thought I'd join in.

**I receive products from PhotoPlay Paper Co. and Scrapbook Adhesives by 3L® for use in my projects. The opinions are completely my own based on my experience and doing so I can share what I personally love to use.**


Paper May Day Basket Basics

From a 12 x 12-inch patterned paper, I cut a 9-inch square piece.


On each side, I scored at 3-inch and 6-inch which gives you a tic-tack-toe scored lines or a hashtag :)


On one side, cut three one-inch strips on the first and last scored square. This is the B-side (backside) of the patterned paper - may be easier to see?


I gather the three strips together on the upper-left corner and stapled them. This causes it to curve to make the sides of the basket. Repeat the step on the lower-left corner.


Bring the ends together to form one straight edge on the top. If there is excess when it overlaps, trim them off. Secure the ends with a couple of Adhesive Dots Large on each stapled side. Repeat these steps on the opposite side to form the walls.


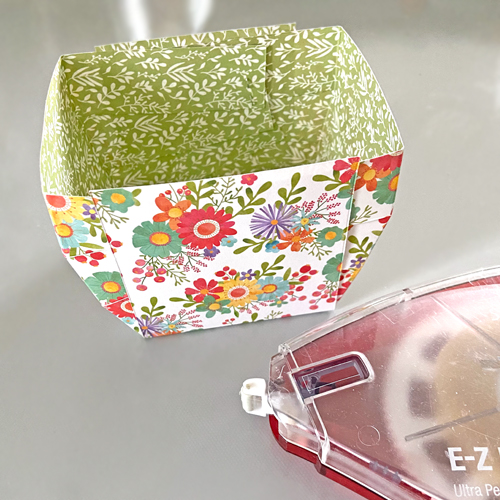
Now let's finish the base by adhering the middle panel to the sides with the E-Z Runner Grand Dispenser and E-Z Runner Grand Ultra Strong Refill. If it's over the edge like mine, you can either fold over and adhere or I just trimmed mine off with scissors. Set aside.


Basket Handle

From the leftover patterned paper, cut a 1.5 x 12-inch strip and from pink cardstock, cut a 1 x 12-inch strip. Adhere the pink strip on top of the patterned paper strip with the E-Z Runner Grand Ultra Strong.

Designer's Note: curl the strips before adhering - it makes it easier to adhere and to work with.


Now to embellish! First, I marked a line where the basket sides will meet the handle (I will adhere to the inside of the basket). Using a variety of small and regular size 3D Foam Circles, I randomly placed them between the lines. Keep the top liners on for now.


Once I was happy with the placement, I can start to foil them one by one. Using the Metallic Transfer Foil Sheets Variety set, I picked out three colors: turquoise, purple, and magenta. Take the top liner off, place the foil on top with color side UP, and then gently burnish with your fingertips to transfer the color. It doesn't take much pressure. Lift the foil off to see the beautiful results!


Lastly, erase the lines with an eraser and apply with the E-Z Runner Grand Ultra Strong below the line before adhering to the inside of the basket.


Embellishing the Basket Front

Let me show you a fast and easy way to make a shaker feature for the front. A layered base is created first, cut a 3-inch square from green patterned paper, 2.75-inch square in pink cardstock, 2.5-inch square floral patterned paper, and 2-inch square green patterned paper. Note that all the patterned paper is from the leftover basket base.

Place a Creative Photo Corner in White on each corner of the 2.75-inch square pink cardstock and adhere on top of the 3-inch square green patterned paper.


Apply a strip of E-Z Runner Grand Ultra Strong on the back of the 2.5-inch square floral patterned paper before slipping into the Creative Photo Corner.


Take the smallest Keepsake Envelope and slip the 2-inch square green patterned paper inside. Next, add sequins inside the envelope and in front of the patterned paper. Remove the flap liner and close the envelope. Remove the back liner of the envelope and center on top of the layered base.


Place a 3D Foam Butterfly on top of the envelope to permanently seal the flap. Using the foiling steps mentioned, foil the butterfly. Add a white pearl in its center. Set aside.


Final Touches

To finish off the edges of the basket, I added a pretty lace trim with Extreme Double-Sided Tape 1/8-inch.


Next, adhere the layered shaker panel with Crafty Foam Tape to lift and to give some dimension. Fill it with candy! Well, really flowers but didn't have any to add...you get the point. LOL!


Thanks for stopping in and Happy May Day!
MargieH


Creative Time: 30 minutes
Skill Level: Intermediate

Materials Needed:
Scrapbook Adhesives by 3L®
E-Z Runner® Grand Refillable Dispenser
E-Z Runner® Grand Ultra Strong Refill
3D Foam Butterflies
3D Foam Circles White Mix
Metallic Transfer Foil Sheets in Variety Colors
Keepsake Envelopes
Adhesive Dots Large
Crafty Foam Tape White
Creative Photo Corners White

Home Hobby by 3L®
Extreme Double-Sided Tape 1/8-inch

Other
Patterned Paper: PhotoPlay Paper Co. (Spring in My Garden Collection); Pink Cardstock: My Color Cardstock (Pink Petal); Scoring Tool and Board; White Self-Adhesive Pearl; Sequins; Lace Trim; Staples; Pencil; Eraser; Candy

Save It to Pinterest!


Saturday, April 25, 2020

Just Saying Hello Shaped Card

Just Saying Hello! I created this card when I was making another similar to this one for Scrapbook Adhesives by 3L blog. It's so fun to make! If you're ever at Craft Fancy (Arlington Hts, IL), you'll be able to see it there. It's another good all-occasion card. Let me show you how!

**I receive products from Spellbinders® Paper Arts and Scrapbook Adhesives by 3L® for use in my projects. The opinions are completely my own based on my experience and doing so I can share what I personally love to use.**


Just Saying Hello Shaped Card Base

Die-cut black and white cardstock with my one thin metal die set. By using two contrasting cardstock colors, I create a simple and elegant look. For this card, I used two white squares, one black intricate cut card panel, one black circle shape and its coordinating intricate circle design in white.


The two square shapes will be the card base. Score 1/2-inch on the top of the solid square. This scored area will become the hinge on top of the card.


Using the E-Z Runner® Grand Refillable Dispenser, I took out the E-Z Runner® Grand Permanent Strips Refill cartridge and replaced it with the E-Z Runner® Grand Permanent Dots Refill. This is such an easy step to replace. OR use our newly released E-Z Runner® Grand Permanent Dots Refillable Dispenser (I did not have one when I created this card).

Visit the quick How to Use and Refill the E-Z Runner Grand Dispensers video below.


Now that you have your E-Z Runner® Grand Refillable Dispenser with the E-Z Runner® Grand Permanent Dots Refill set up, apply it on the decorative edge square about 1/2-inch on the top. I use this adhesive on die cuts because it only covers the cut areas. If there is any residue, simply rub it off! Once applied, put the two squares together to make one square card base.


Card Front Layers

For the black intricate cut card panel, I placed 3D Foam Strips to the narrow areas. It lifts the layers to create dimension and interest to the card design. Place all the pieces on the card front.


Designer Tip: Color your 3D Foam Strips to match your card panel color. I colored mine with a black marker and the excess white foam disappeared!

Cottage Flower Steps

Die-cut three each of the S4-1025 Sweet Cottage Flowers Die Set Blossom 1 and 2 dies. Mist with water and crim them with tweezers to give a realistic look.


Add an Adhesive Dot Large on the bottom of each die cut and stack them. Shape the blossom into the desired shape. Place a couple of Adhesive Dots Large on the left side of the circle on the card front and add the leaves before adhering the blossom.


Lastly, stamp a sentiment from the SDS-166 All Occasion Sentiments Stamp and Die Set on white cardstock and cut with the matching Center Insert die. I cut a fishtail at the end. Adhere with an Adhesive Dot Large on the left end and center before tucking it under the blossom.


Thanks for stopping in and craft yourself something fun!
MargieH

Creative Time: 30 minutes
Skill Level: Intermediate

Materials Needed:
Spellbinders Paper Arts
S4-1047 Richelieu Square Die Set
S4-1025 Sweet Cottage Flowers Die Set
S4-795 Layered Leaf Vines Die Set (retired)
SDS-166 All Occasion Sentiments Stamp and Die Set
T-001 Tool 'n One

Scrapbook Adhesives by 3L®
E-Z Runner® Grand Refillable Dispenser
E-Z Runner® Grand Permanent Dots Refill
3D Foam Strips
Adhesive Dots Large

Other
Pink Cardstock: My Color Cardstock (Pink Petal); Ink: Tsukineko (Jet Black StazOn); Stamp Positioning Tool: My Sweet Petunia (MISTI); Vellum; Forest Green, Black and White Cardstock; Scoring Tool and Board

Save It to Pinterest!


Thursday, April 23, 2020

Scrapbook Adhesives by 3L: Joyful Day Mixed Media Card

This Joyful Day Mixed Media Card is featured over at Scrapbook Adhesives by 3L Blog today! YAY! Days are getting warmer and flowers are starting to bloom where I am. Using watercolors with a little bit of mixed media sets the mood for this card.

**I receive products from Jane Davenport/Spellbinders® Paper Arts and Scrapbook Adhesives by 3L® for use in my projects. The opinions are completely my own based on my experience and doing so I can share what I personally love to use.**


Sneak Peeks!

Just a couple of images so if you want the FULL TUTORIAL, go and click HERE: Joyful Day Mixed Media Card.


This is all I can show! For a full photo tutorial on this as well as a supply list, CLICK: Joyful Day Mixed Media Card.

See there!
MargieH

Save It to Pinterest!

Friday, April 10, 2020

Easter Blessings Mixed Media Tag

Wishing you all peace and happiness during these extraordinary times. As we are under the "Shelter in Place" mandate in IL, I decompress by playing with my art supplies during my free time.

Today I am sharing an Easter Blessings tag created with colors from Jane Davenport with Spellbinders® Paper Arts. Using die cuts and patterned papers on my desk, this is what I came up with...let me show you!

**I receive products from Memory Palette Co., Spellbinders® Paper Arts, and Scrapbook Adhesives by 3L® for use in my projects. The opinions are completely my own based on my experience and doing so I can share what I personally love to use.**


Easter Blessings Tag Basics

I covered a manila shipping tag with white paint front and back - couldn't find my gesso! LOL!


Fussy cut little tags from the MP-60140 Peter's World C-7-13 patterned paper. Then using a leftover piece of Adhesive Sheets 12 x 12-inch, I applied the adhesive on the back of each little tag. Then place them on the painted tag. Refer to the image for my placement. Trim off excess.


Next cover the front with white paint and paint brush. Let Dry.


Coloring the Background

Color the tag with three colors, I used from the bottom: Eccentric, Deep Vain, and French Kiss from the ColorStick Silky Skin set. Blend the colors with a moist Blend in Blender sponge. Layer more color until you get the desired look. Let Dry.


After the layer dried, I used a dot stencil with the Ocean Eyes DramaStick Waterproof Pencil Crayons in Spark (White) color. Make sure the dry time is long since it's an oil base. I dried it overnight. The next day, I created splatters by flicking a couple of Mermaid Markers in BlueBottle and Deep Sea colors for added interest.


Embellishing the Tag

Now the fun part, layering die cuts and paper cuts! First I started with a frame that I fussed cut a while ago from the MP-60263 A4 So Sweet One pattern paper. Adhere it with 3D Foam Strips - it's perfect for narrow areas to adhere to. Secured on a tilted angle in the center of the tag.


Add the leaves and vine sprigs die cuts to the left inside of the frame with Adhesive Dots Small.


I had a rolled blue spiral flower so I added it between the leaves and sprigs with an Adhesive Dot Large. Even on a painted surface, these adhesive dots work well!


Using 3D Foam Strips, I secured a little tag under the flower and added a blue rhinestone on top.


I stamped and die-cut an Easter sentiment on white cardstock. Then placed a pink rhinestone and 3D Foam Strip before adding it to the bottom of the tag.


Next, I adhered a butterfly die cut on the frame with an Adhesive Dot Small and added three pink rhinestones on the body. I also added blue and pink rhinestones randomly around the tag for more sparkle!


Lastly, I didn't like the ribbons I had so I colored a 10-inch white ribbon in Deep Sea, JellyFish, and StarFish from the Mermaid Markers set with water. Add more layers of color for the desired look. Let dry, thread through the opening and tie a bow. Done!


Creative Time: 60 minutes
Skill Level: Intermediate

Materials Needed:
Scrapbook Adhesives by 3L®:
Adhesive Sheets 12 x 12-inch
3D Foam Strips
Adhesive Dots Small
Adhesive Dots Large

Spellbinders® Paper Arts:
ColorSticks Silky Skin Set
Mermaid Makers
Blend in Blender Sponge Set
Ocean Eyes DramaStick Waterproof Pencil Crayons (Spark/White)
S4-1025 Sweet Cottage Flowers (leaves)
S4-795 Layered Leaf Vines (Sprigs)
S4-357 Spiral Blossom Three
Tool 'n One™ and Quilling Tip
Deep Sea Die-Cutting and Embossing Machine fm Artomology by Jane Davenport

Memory Palette Company:
MP-60140 Peter's World C-7-13 (Little Tags/Peter's World Collection by Memory Place)
MP-60263 A4 So Sweet One (Frame/So Sweet Collection by Asuka Studio)
MP-59129 Rhinestone Light Pink
MP-59015 Rhinestone Light Blue

Other:
Stencil: Art Anthology (Dot Matrix Stencil); Sentiment Stamp and Die: Taylored Expression; Shipping Tag; White Paint; White Ribbon; Paint Brush

Love It? Save It to Pinterest!