**I receive products from PhotoPlay Paper Co. and Scrapbook Adhesives by 3L® for use in my projects. The opinions are completely my own based on my experience and doing so I can share what I personally love to use.**
Paper May Day Basket Basics
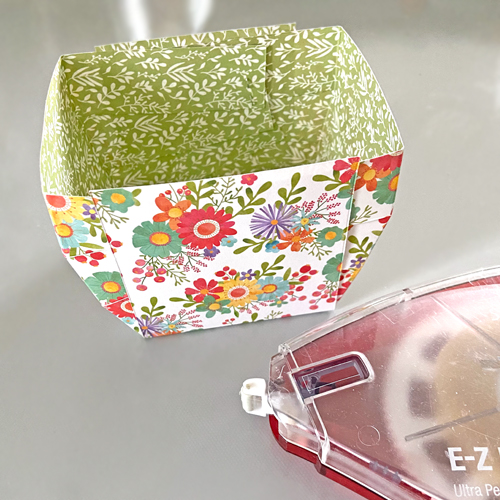
From a 12 x 12-inch patterned paper, I cut a 9-inch square piece.On each side, I scored at 3-inch and 6-inch which gives you a tic-tack-toe scored lines or a hashtag :)
On one side, cut three one-inch strips on the first and last scored square. This is the B-side (backside) of the patterned paper - may be easier to see?
I gather the three strips together on the upper-left corner and stapled them. This causes it to curve to make the sides of the basket. Repeat the step on the lower-left corner.
Bring the ends together to form one straight edge on the top. If there is excess when it overlaps, trim them off. Secure the ends with a couple of Adhesive Dots Large on each stapled side. Repeat these steps on the opposite side to form the walls.
Now let's finish the base by adhering the middle panel to the sides with the E-Z Runner Grand Dispenser and E-Z Runner Grand Ultra Strong Refill. If it's over the edge like mine, you can either fold over and adhere or I just trimmed mine off with scissors. Set aside.
Basket Handle
From the leftover patterned paper, cut a 1.5 x 12-inch strip and from pink cardstock, cut a 1 x 12-inch strip. Adhere the pink strip on top of the patterned paper strip with the E-Z Runner Grand Ultra Strong.Designer's Note: curl the strips before adhering - it makes it easier to adhere and to work with.
Now to embellish! First, I marked a line where the basket sides will meet the handle (I will adhere to the inside of the basket). Using a variety of small and regular size 3D Foam Circles, I randomly placed them between the lines. Keep the top liners on for now.
Once I was happy with the placement, I can start to foil them one by one. Using the Metallic Transfer Foil Sheets Variety set, I picked out three colors: turquoise, purple, and magenta. Take the top liner off, place the foil on top with color side UP, and then gently burnish with your fingertips to transfer the color. It doesn't take much pressure. Lift the foil off to see the beautiful results!
Lastly, erase the lines with an eraser and apply with the E-Z Runner Grand Ultra Strong below the line before adhering to the inside of the basket.
Embellishing the Basket Front
Let me show you a fast and easy way to make a shaker feature for the front. A layered base is created first, cut a 3-inch square from green patterned paper, 2.75-inch square in pink cardstock, 2.5-inch square floral patterned paper, and 2-inch square green patterned paper. Note that all the patterned paper is from the leftover basket base.Place a Creative Photo Corner in White on each corner of the 2.75-inch square pink cardstock and adhere on top of the 3-inch square green patterned paper.
Apply a strip of E-Z Runner Grand Ultra Strong on the back of the 2.5-inch square floral patterned paper before slipping into the Creative Photo Corner.
Take the smallest Keepsake Envelope and slip the 2-inch square green patterned paper inside. Next, add sequins inside the envelope and in front of the patterned paper. Remove the flap liner and close the envelope. Remove the back liner of the envelope and center on top of the layered base.
Place a 3D Foam Butterfly on top of the envelope to permanently seal the flap. Using the foiling steps mentioned, foil the butterfly. Add a white pearl in its center. Set aside.
Final Touches
To finish off the edges of the basket, I added a pretty lace trim with Extreme Double-Sided Tape 1/8-inch.Next, adhere the layered shaker panel with Crafty Foam Tape to lift and to give some dimension. Fill it with candy! Well, really flowers but didn't have any to add...you get the point. LOL!
Thanks for stopping in and Happy May Day!
MargieH
Creative Time: 30 minutes
Skill Level: Intermediate
Materials Needed:
Scrapbook Adhesives by 3L®
E-Z Runner® Grand Refillable Dispenser
E-Z Runner® Grand Ultra Strong Refill
3D Foam Butterflies
3D Foam Circles White Mix
Metallic Transfer Foil Sheets in Variety Colors
Keepsake Envelopes
Adhesive Dots Large
Crafty Foam Tape White
Creative Photo Corners White
Home Hobby by 3L®
Extreme Double-Sided Tape 1/8-inch
Other
Patterned Paper: PhotoPlay Paper Co. (Spring in My Garden Collection); Pink Cardstock: My Color Cardstock (Pink Petal); Scoring Tool and Board; White Self-Adhesive Pearl; Sequins; Lace Trim; Staples; Pencil; Eraser; Candy


2 comments:
I love the basket you made.
This is so cool and pretty Margie! I love all of the beautiful touches you added, including the very clever way you added foiling to the pop dots!
Post a Comment