**I receive products from Jillibean Soup Designs and Scrapbook Adhesives by 3L® for use in my projects. The opinions are completely my own based on my experience and doing so I can share what I personally love to use.**
Using the Farmhouse Stew Collection from Jillibean Soup, I have created a sweet page of my college friends at a recent gathering. This was so easy to create because the collection pack had everything I needed.
Showing some peeks of what is on the Scrapbook Adhesives by 3L blog today :) I'll link at the bottom.
OOops! Can't show anymore because what's the fun in that? LOL! See my tutorial and giveaway details on the Company Blog, CLICK: Memories Scrapbook Page with Jillibean Soup.
Although I am not officially starting until next month, I thought I'd used the supplies I purchased when I was in Japan at Memory Place store (Zoshigaya, Tokyo). Since today is also World Card Making Day, I created a different kind of card using two pieces of the Perfume Bottle Chipboard as my card base. What do you think?
**I receive products from Scrapbook Adhesives by 3L® and Memory Palette Co. (patterned paper) for use in my projects. The opinions are completely my own based on my experience and doing so I can share what I personally love to use.**
Making Moments Basics
Score one of the Perfume Bottle Chipboard at 4-inches. Note: the bottom edge of the chipboard should be level on the left side of the score board. This will be your back piece.
Cover both sides of the Perfume Bottle Chipboards with Gesso to give the chipboard "teeth." Let dry.
To adhere the cut patterned papers onto the chipboard pieces, I used Adhesive Sheets 4 x 6 inch to give them an edge-to-edge coverage. Just transfer the adhesive to the chipboard.
Paint the back facing sides of the chipboard with a combination of green and pink acrylic paints. Note: edge the front-facing sides to bring the colors together.
Of course, I had to add another layer of sparkle! Mist with Glimmer Mist in Silver and let it sit for a few seconds before dabbing off with a paper towel. Repeat the process until you get your desired look. Do the same with the patterned paper sides too.
Details of the Moment
Fussy cut the elements from the Forest Friends Cut Outs and will be attached to the card front. SO CUTE!!
The other pieces were popped up with 3D Foam Circles White Mix. The basket was with two regular sizes. But the cute mole has two regular sizes stacked for more dimension to give a variety of layers. LOVE!!
Lastly, let's put these two pieces of chipboard together to form a card! Apply E-Z Runner Ultra Strong Refillable Dispenser to the scored area (circled in green) of the back piece. Match up the two pieces and firmly press the adhered area. Done!
SO EXCITED to share good news!! I am one of the members of Asuka Studio Design Team in Japan!!! My Japanese is rusty so this is a good motivator in brushing up the language - HA! I will be sharing projects throughout the year so stay tuned.
Here's the rest of my teamies for the year, along with the product designer herself - Asuka Miyamoto. I've known her for years and am thrilled to be a part of this creative adventure with her :)
To see what products I'll be using, VISIT: Asuka Studio.
Also, there is a blog so take a look HERE: Asuka Studio Blog (coming soon).
Today I wanted to share a card project that I have been wanting to do for a long time. When my local craft store, Craft Fancy (Arlington Hts, IL), had Spellbinders® Grand Cabinet 3D Card Etched Dies by Becca Feeken in stock, I grabbed one! LOL! You will agree with me that it is one you have to make!
**I receive products from Scrapbook Adhesives by 3L® and Memory Palette Co. for use in my projects. The opinions are completely my own based on my experience and doing so I can share what I personally love to use.**
Also in my stash, I had a bunch of items that I purchased in Japan (and some were gifted to me) created by a sweet friend of mine, Asuka Miyamoto. It might look complicated but trust me, Becca made it so easy to make!
How to Create Happiness
Nest the following three etched dies from outside in: Grand Cabinet Outline, Grand Cabinet Inlay and Inner Cabinet Outline as shown in the image below. You will need to cut a total of five pieces. The light grey die cuts will be the inside layers. The white die cut is the front layer.
For the back panel of the card, take out the Grand Cabinet Inlay and Inner Cabinet Outline from the Grand Cabinet Outline. Die cut with your choice of patterned paper. Nest the Side Panel Etched Die with the Side Panel Insert die. Then die cut two pieces in white cardstock. Fold the side score lines.
Aren't these Cut-Outs by Asuka Studios adorable? These sweet designs were fussy cut and will embellish the front of the card.
The tabs must be trimmed off of the front and back of a card. They will adhere to the side panels so tabs aren't needed.
On the score lines, I applied a line of adhesive from my E-Z Runner® Micro Refillable Dispenser. This tape adhesive is about a 1/8-inch in width - perfect for narrow areas.
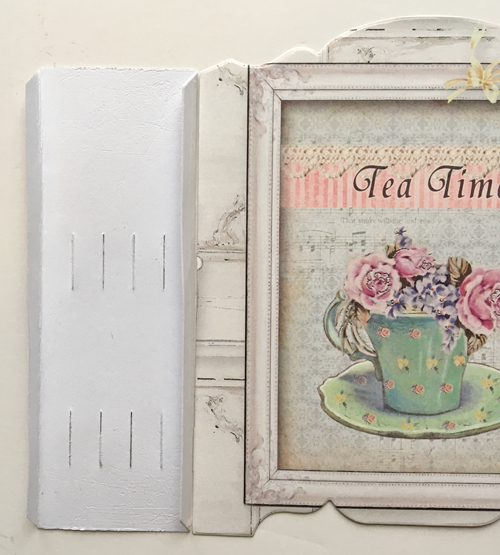
Make sure the slits are located at the bottom before lining up your card front to attach.
Repeat on the other side with the back card panel. The pattern you want showing should be facing up like the Tea Time design.
Now to add in your first layer (start from the back and work your way to the front) by threading the tab through the slit.
Once it goes through make sure to give the layer a gentle tug to "lock" into place. See the "before" and "after" position.
So when you're done, they should like this. Neat, huh?
These are the layers that you'll be working with. Cool! Almost done :)
To get rid of the stickiness from the exposed adhesives between the intricate cut, I dusted a bit of powder and it works like a charm!
To close up the card to complete the dimensional tunnel effect, apply a line of adhesive from my E-Z Runner® Micro Refillable Dispenser to the second side panel die cut. Remember to make sure the slits are at the bottom before connecting to the back card panel.
Then place all the layer panel tabs into the side panel and add the last line of adhesive from the E-Z Runner® Micro Refillable Dispenser to line up against the front card panel edge.
The finishing touch was to add the Sparkly Bubbles in Light Pink to the card front. Just loved how this card turned out!
Give a try! She has other shapes as well in an arch and circle (dome) format. Hope you enjoyed this tutorial as much as I have made it! Thanks for stopping by!!
MargieH