Showing posts with label Ranger Ink. Show all posts

Saturday, December 23, 2023

PinkFresh Studio DEC23 Challenge: Winter Greetings Scrapbook Layout


Hi, friends! I'm back with another project created from the recently purchased Folk Snowflake set which I fell in love with. The main component was to create a background using the layering stencil sheets. For the title, I used one of the sentiments from the Folk Snowflake Clear Stamp Set and die-cut it with its coordinating die set.

I'm submitting this page as a part of the PinkFresh Studio December 2023 Holiday Vibes Challenge using the color palette shown.

The picture was from an Alaskan Cruise with the glacier behind us...lots of snow and ice. So this set was perfect to showcase this picture. LOL! Also, I wanted to create a CAS-style (Clean and Simple style) page. I loved how this turned out :)


First I randomly stenciled the snowflakes with different colored inks to create a soft background. Then on a separate piece of white cardstock, I stenciled one more to stamp and die-cut as a stunning accent by the picture.


Next, I die-cut and inked rectangle frames and mat panels. Also, die-cut a vellum snowflake for added interest.


The picture was double-matted with the inked panel and the gold mirror cardstock panel using the E-Z Runner® Permanent Strips Refillable Dispenser. Set aside to work on the rectangle frames.


Apply the E-Z Runner® Micro Refillable Dispenser to the rectangle frames. It has the perfect 1/8" width to cover the narrow areas. I've added an extra strip of adhesive to the corners for extra security.


Using the matted image and the T-ruler as a guide, determine the placement of the rectangle frames. 


The picture was popped up with the Crafty Foam Tape in Black 108ft. for a subtle 1/32" lift (half of 1/16"). The snowflake shape was popped up with a regular size 1/2" 3D Foam Circles White Mix which has a 1/16" height.


Stamp and die-cut the sentiment from white cardstock. This will be the title. Add a combination of 3D Foam Strips in White and 3D Foam Squares Micro White to make it stand out.


Tuck the snowflake vellum shape behind the picture in the upper right corner and secure it with the E-Z Runner® Permanent Fine (aka the Vellum Runner). Then add the title.


Lastly, add the half-back golden nuggets with the Adhesive Dots Mini.


I hope you enjoyed my photo tutorial! Wanna join in? Click PinkFresh Studio December 2023 Holiday Vibes Challenge. Good Luck!

Thanks for stopping by!
MargieH

Skill Level: Intermediate
Creative Time: 40 mins

Materials Needed:
Stamps, Thin Metal Dies, Stencils and Stamping Tool: PinkFresh Studio (Folk Snowflake Clear Stamp SetThin Metal Dies and Stencils and Stamp Press Tool); Inks: Ranger Ink (Distress Oxide Ink in Spun Sugar, Peeled Paint and Broken China); Adhesives: Scrapbook Adhesives by 3L® (E-Z Runner® Permanent Fine, E-Z Runner® Permanent Strips Refillable DispenserE-Z Runner® Micro Refillable Dispenser, 3D Foam Circles White Mix, 3D Foam Squares Micro White, 3D Foam Strips in White, Adhesive Dots Mini, and Crafty Foam Tape in Black 108ft.); Stamp Positioner: MISTI (My Sweet Petunia); Embellishments: Buttons Galore and More; Rectangle Thin Metal Dies; Embellishment Picker Tool; Black Ink; Paper Trimmer; Gold Mirror Cardstock; White Cardstock


Save to Pinterest!


Monday, November 14, 2022

Coffee Lovers Fall/Winter 2022: Choose JOY Holiday Card

The Coffee Lovers Community is having its Fall/Winter 2022 event and I thought I would jump in on the fun! Using mostly Distress Oxide in Salvaged Patina and Flamingo Pink with the Dots Stencil, I created a holiday card with a whimsy touch!

**I receive products from Scrapbook Adhesives by 3L® and Kraft n Creativity for use in my projects. The opinions are completely my own based on my experience and by doing so I can share what I personally love to use.**

Choose JOY Holiday Card Panel

Cut a 3.75 x 5-inch white card panel and stencil the Dots Stencil for a dotted background with Distress Oxide Ink in Salvaged Patina. Let dry. On the upper left corner and lower right corner, add a combination of  Adhesive Dots Mini and Micro. Cover with teal glitter, press to secure, and tap off excess. 

With the 4 x 5.25-inch pink cardstock, ink its edges with Distress Oxide Ink in Kitsch Flamingo. Adhere the panels together with the E-Z Runner® Grand Ultra Strong adhesive.

Embellish the Mug

Die-cut the mug, its insert, candy cane, its insert, and marshmallow shapes from white cardstock. Ink and shade the mug with Distress Oxide Ink in Salvaged Patina. The white cardstock was inked with Distress Oxide Ink in Kitsch Flamingo, and Frayed Burlap before die-cutting the candy cane and mug insert, respectively.


Place the 3D Foam Snowflake onto the mug. Remove the top liner, cover with teal glitter, press to secure, and tap off the excess. So pretty!

Die-cut marshmallows in a combination of white cardstock, vellum, and 3D Foam Creative Sheets. Adhere the vellum shape to the top of the white cardstock shape. Cover white glitter on top of the foam shape, using the same glitter steps as the 3D Snowflake.

Assemble the mug pieces, and place the assembled mug on the card panel with a combination of the E-Z Runner® Grand Ultra Strong adhesive and the Dual Tip Glue Pen (for candy cane and mug handle).

Choose JOY Everyday Sentiment

Stamp the sentiment on pink cardstock with black ink. Cut it into a dual ribbon tail strip, and ink the edges with Distress Oxide Ink in Kitsch Flamingo. Then secure it on the card front with 3D Foam Strips.

I had such a wonderful time playing with this new die set inspired by all the items I had in my stash. What a fun start to my holiday cardmaking! Hope you enjoyed my process. Wanna join in? Click: Coffee Lovers Fall/Winter 2022 Event!

Have a great week!
MargieH

Skill Level: Intermediate
Creative Time: 40 mins

Materials Needed:
Adhesives: Scrapbook Adhesives by 3L® (E-Z Runner® Grand Ultra Strong, 3D Foam Snowflakes, 3D Foam Creative SheetsAdhesive Dots MicroAdhesive Dots Mini, 3D Foam Strips, and Dual Tip Glue Pen); Stencil: Kraft n Creativity (Dots Stencil); Thin Metal Dies: Pretty Pink Posh (Winter Mug Dies Set); Stamp: Blue Knight Rubber Stamps (Friends Rock Set by Connie Mercer); Ink: Ranger Ink (Distress Oxide in Salvaged Patina, Kitsch Flamingo, and Frayed Burlap); Ink Blending Brushes: CraftFancy; Pink and White Cardstock; Vellum; Teal and White Glitter


Save to Pinterest!


Monday, April 04, 2022

Amazing Paper Grace April 2022 Die of the Month Blog Hop: Spring Thanks 3D Vignette Ensemble


This sweet watering can with flowers bursting is a great reminder of spring! What a way to say thanks to someone special that included a wonderful dimensional element to display for all to see!

Today's ensemble was created with thin metal dies provided by Amazing Paper Grace designed by Becca Feeken!

There are 15 dies included in the Pop Up 3D Vignette Watering Can Bouquet.


My Projects for Today's Hop: Pop Up 3D Vignette Watering Can Bouquet Display

Let's start with this sweet display! What a wonderful way to decorate your home with a watering can full of spring flowers. It can be popped up when taken out of the envelope. The embossed design was inked first before die-cutting and then inked a little bit more.


Using up scraps of patterned papers and cardstock, I assembled eight blossoms. Many ways to create these flowers and I lifted the embossed centers with foam adhesives for more dimension. Added pearls for more embellishing including the heart from the S5-484 Primrose Heart Facade Etched Dies which is part of the Garden Shutters Collection.


7 x 5-inch Eyelet Thanks Card

What's a gift without a card?! I wanted the watering can to stand out so I made the background all white with cardstock. Isn't this S6-184 Eyelet Lace Frame Etched Dies beautiful? It is also from the Garden Shutters Collection. To tie in the pearls, I accented the centers of the flower patterns.


The watering can and spring flowers were assembled the same way but without tall stems. Some of the flowers were lifted with foam adhesives for varying heights. Using foam adhesive sheets and patterned paper, I die-cut Thanks from S4-1148 Sweet Sayings Notecard Sentiments Etched Dies which is from the Sweet Serenade Notecards Collection. I love the font and the size. Now it's ready to send!


Supplies:

Amazing Paper Grace April 2022 Die of the Month – Pop Up 3D Vignette Watering Can Bouquet
S6-184 Eyelet Lace Frame Etched Dies and S5-484 Primrose Heart Facade Etched Dies from the Garden Shutters Collection
S4-1148 Sweet Sayings Notecard Sentiments Etched Dies from the Sweet Serenade Notecards Collection
Other: Patterned Papers: Kraft n Creativity (Romance and Color of Life Collection); Ink: Ranger Ink (Distress Oxide in Fossilized Amber); Pearls: Want2Scrap; Adhesives: Scrapbook Adhesives by 3L (3D Foam Strips Small in White, 3D Foam Squares Small in White, 3D Foam Creative Sheets in White, and Dual Tip Glue Pen); White, Yellow, and Green Cardstock; Twine

For more Pop Up 3D Vignette Watering Can Bouquet Inspiration

Visit each Creative Team blog linked below for their take on creative paper crafting ideas with Pop Up 3D Vignette Watering Can Bouquet, the Amazing Paper Grace April 2022 Die of the Month!

Visit Patricia Manhire
Visit Agnieszka Posluszny
Visit Anita Kejriwal
Visit Katarzyna Bobrowska
Visit Tracey Sabella
Visit Robin Clendenning
Visit Rajni Chawla
Visit Kate Skonieczna
Visit Joanna Wisniewska
Visit Margie Higuchi (ME!)

The Amazing Paper Grace Die of the Month is available exclusively at Spellbinders Paper Arts during April 2022, Pop Up 3D Vignette Watering Can Bouquet along with other membership perks.

View this month’s Amazing Paper Grace Die of the Month!

Follow Me on Instagram: ILscraps!

Save to Pinterest!


Thursday, May 06, 2021

Amazing Paper Grace: Garden of Gwen Scrapbook Layout


Hello! I have a wonderful layout to share with you. My sweet friend is celebrating her first Mother's Day with her adorable little girl. What great timing that I create this scrapbook page for her! When I saw this Mini 3D Vignette Garden GateDie of the Month from Amazing Paper Grace by Becca Feeken. I knew what I wanted to create. I am so excited to share with you, Garden of Gwen!

Becca Feeken with Amazing Paper Grace sent me this wonderful die set to create my scrapbook page - love it! Photo credit to Ken Berry (aka grandpa) and child release permission by mom (Ally Ward).

Garden of Gwen Scrapbook Page Base

I wanted a cloud edge on the top of my page but knew I needed to support my patterned papers from behind. Recently I purchased a pack of 12 x 12 acetate sheets so I used one as the base. Next, I fussy cut two patterned papers (Bubbly Paper Side B + that would fit my garden theme.


For the second patterned paper, I drew a bottom cloud edge across the paper and then cut it out. Then I applied Crafty Foam Tape 108ft. in white. The height on this tape is 1mm (a lower profile than your regular foam squares). Remember, this has to fit into a scrapbook album. LOL! 


With the first patterned paper secured about 0.25 inches above the bottom edge of the acetate with the E-Z Runner Ultra, I placed the cloud border on top. Make sure the top edge is as close to the top of the acetate as possible.The page base is done!


The Garden Gate

There are many ways to use this Mini 3D Vignette Garden Gate. I used mine as a border across the page. The gate base, its insert, and the arch element were used for the border. Then the flowers and foilage pieces were cut for accents.

Cut four of the gate base, its insert, and one arch with cream cardstock and attach together with the E-Z Runner Ultra. Place the border to the bottom edge of the layout with the E-Z Dots Permanent. I used this runner as it hits the areas of the border and leaves no film between the die cut spaces. Trim excess off.


Design Details

For the bottom edge, I used the grass that I fussy cut from the first patterned paper which I lifted up with Crafty Foam Tape 108ft in White. The cute sign was lifted up with 3D Foam Strips.


The arch needed some flowers - it is a garden, after all. LOL! I cut some foliage from light sage cardstock and flowers from various scraps of patterned papers in purple and pink. For the foliage, I used Adhesive Sheets because they are intricate and wanted edge-to-edge coverage.


The flowers were randomly placed and in clusters with a combination of Adhesive Dots Micro and 3D Foam Square Micro. Rhinestones were flower centers and for sparkle.


A close up...

One cloud was hand cut and inked on the edges with Stormy Sky ink for added dimension using the Crafty Foam Tape 108ft in White.

I die-cut letter to spell out GWEN in vellum, and using the same ink, I edged around it for a subtle outline. Looks like clouds - love it! Secure the letters with the E-Z Runner Permanent Fine...perfect for adhering vellum.


Next, I added some foliage and flowers...a cute touch!


Add a picture of the owner of this lovely garden and done! 


Intro Video on Mini 3D Vignette Garden Gate:

See how this wonderful die set works! Becca Feeken walks you through her process in her Mini 3D Vignette Garden Gate Video.

I hope you enjoyed this project. If you haven't already, please follow me on the blog or my ILscraps Instagram.

I appreciate you stopping by! Thank You!
MargieH

Creative Time: 90 minutes
Skill Level: Intermediate

Materials Needed:

Spellbinders® Paper Arts
Mini 3D Vignette Garden Gate May 2021 Die of the Month from Amazing Paper Grace by Becca Feeken
Platinum 6 Die-Cutting and Embossing Machine

Kawaii Paper Goods
Dreamland Collection (Bubbly Paper Side B)
Sparkly Sky Collection (Blue Sparkly Sky)
Various Sparkling Bubble and Rhinestones in purple, pink, clear and yellow

Scrapbook Adhesives by 3L®
E-Z Runner® Ultra Refillable Dispenser E-Z Dots Permanent
Crafty Foam Tape 108ft in White
E-Z Runner® Permanent Fine
Adhesive Dots Micro
3D Foam Strips
3D Foam Squares Micro in White
Adhesive Sheets 4 x 6-inches

Other
Ink: Ranger Ink (Stormy Sky Distress Ink); Blending Brushes; Cream and Sage Cardstock; 12 x 12-inch Clear Acetate; Vellum; Paper Trimmer; Scissors


Save It!


Thursday, September 24, 2020

InkyStamper: Creepin' It Real Treat Box and Friend

Halloween is next month and I wanted to feature this Spider Stamp and Die set from InkStamper to mark the occasion! Using sparkle and googly eyes, I think the treat box and dimensional spider turned out super cute. What do you think? 

**I receive products from InkyStamper and Scrapbook Adhesives by 3L® for use in my projects. The opinions are completely my own based on my experience and doing so I can share what I personally love to use.**


Treat Box Steps 

First stamp on piece of orange cardstock. I used the treat box die as a guide to determine placement of the web. Then die-cut the box in your manual die-cutting machine.

Creepin' It Real Treat Box Step 1

Creepin' It Real Treat Box by Margie Higuchi Step 2
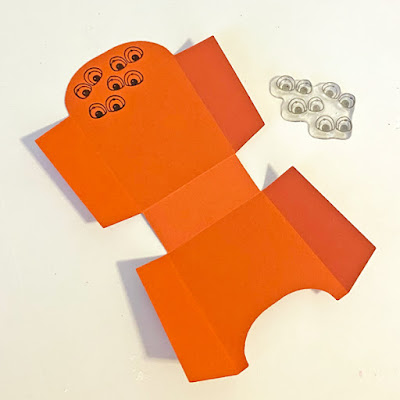
On the inside back area, I stamped eyes stamp with black ink. To give them sparkle and a little interest, I applied glitter glue to the eyeballs. Set aside to dry.
Creepin' It Real Treat Box by Margie Higuchi Step 3

Creepin' It Real Treat Box by Margie Higuchi Step 4
On vellum, I stamped the Creepin' It Real sentiment in black ink and cut into a strip with a ribbon tail on one end. Adhere with E-Z Runner Permanent Fine (perfect for vellum) on the box front.
Creepin' It Real Treat Box by Margie Higuchi Step 5

Creepin' It Real Treat Box by Margie Higuchi Step 6
Assemble the treat box with E-Z Runner Grand Ultra Strong. Done!
Creepin' It Real Treat Box by Margie Higuchi Step 7

Here Comes the Spider

Stamp one spider image with VersaMark Ink. Cover with white embossing powder, tap off the excess, and melt with a heating tool. Die-cut with its coordinating die. Then die-cut another one in black cardstock.


Score the black spider about 0.25-inches from the top. Add adhesive in the scored area and line up the embossed spider in the front to make one shape. Press the adhesive to secure. Now you have a dimensional spider that stands!


Put them together and you have an ensemble!


Add a little treat and you're done!


As always, thanks for stopping in!
MargieH

Skill Level: Beginner
Creative Time: 35 minutes

Materials Needed: 
Stamps and Craft Dies: InkyStamper (Spider Stamp and Die Set, and Small Fry Box Die)
Adhesives: Scrapbook Adhesives by 3L (E-Z Runner Ultra Strong, E-Z Runner Permanent Fine)
Ink: Tonic Studio (Nuvo Hybrid in Black Shadow) and Tsukineko (VersaMark)
Embossing Powder: Stampendous (Detail White)
Glitter Glue: Ranger Ink (Stickles in Black Diamond)
Other: Stamp Positioner; Scissors; Orange and Black Cardstock; White Vellum Paper; Manual Die-Cutting Machine; Googly Eyes


Save It on Pinterest!