Showing posts with label 8 x 11.5 Scrapbook Page. Show all posts

Saturday, December 23, 2023

PinkFresh Studio DEC23 Challenge: Winter Greetings Scrapbook Layout


Hi, friends! I'm back with another project created from the recently purchased Folk Snowflake set which I fell in love with. The main component was to create a background using the layering stencil sheets. For the title, I used one of the sentiments from the Folk Snowflake Clear Stamp Set and die-cut it with its coordinating die set.

I'm submitting this page as a part of the PinkFresh Studio December 2023 Holiday Vibes Challenge using the color palette shown.

The picture was from an Alaskan Cruise with the glacier behind us...lots of snow and ice. So this set was perfect to showcase this picture. LOL! Also, I wanted to create a CAS-style (Clean and Simple style) page. I loved how this turned out :)


First I randomly stenciled the snowflakes with different colored inks to create a soft background. Then on a separate piece of white cardstock, I stenciled one more to stamp and die-cut as a stunning accent by the picture.


Next, I die-cut and inked rectangle frames and mat panels. Also, die-cut a vellum snowflake for added interest.


The picture was double-matted with the inked panel and the gold mirror cardstock panel using the E-Z Runner® Permanent Strips Refillable Dispenser. Set aside to work on the rectangle frames.


Apply the E-Z Runner® Micro Refillable Dispenser to the rectangle frames. It has the perfect 1/8" width to cover the narrow areas. I've added an extra strip of adhesive to the corners for extra security.


Using the matted image and the T-ruler as a guide, determine the placement of the rectangle frames. 


The picture was popped up with the Crafty Foam Tape in Black 108ft. for a subtle 1/32" lift (half of 1/16"). The snowflake shape was popped up with a regular size 1/2" 3D Foam Circles White Mix which has a 1/16" height.


Stamp and die-cut the sentiment from white cardstock. This will be the title. Add a combination of 3D Foam Strips in White and 3D Foam Squares Micro White to make it stand out.


Tuck the snowflake vellum shape behind the picture in the upper right corner and secure it with the E-Z Runner® Permanent Fine (aka the Vellum Runner). Then add the title.


Lastly, add the half-back golden nuggets with the Adhesive Dots Mini.


I hope you enjoyed my photo tutorial! Wanna join in? Click PinkFresh Studio December 2023 Holiday Vibes Challenge. Good Luck!

Thanks for stopping by!
MargieH

Skill Level: Intermediate
Creative Time: 40 mins

Materials Needed:
Stamps, Thin Metal Dies, Stencils and Stamping Tool: PinkFresh Studio (Folk Snowflake Clear Stamp SetThin Metal Dies and Stencils and Stamp Press Tool); Inks: Ranger Ink (Distress Oxide Ink in Spun Sugar, Peeled Paint and Broken China); Adhesives: Scrapbook Adhesives by 3L® (E-Z Runner® Permanent Fine, E-Z Runner® Permanent Strips Refillable DispenserE-Z Runner® Micro Refillable Dispenser, 3D Foam Circles White Mix, 3D Foam Squares Micro White, 3D Foam Strips in White, Adhesive Dots Mini, and Crafty Foam Tape in Black 108ft.); Stamp Positioner: MISTI (My Sweet Petunia); Embellishments: Buttons Galore and More; Rectangle Thin Metal Dies; Embellishment Picker Tool; Black Ink; Paper Trimmer; Gold Mirror Cardstock; White Cardstock


Save to Pinterest!


Monday, August 05, 2019

Rita Barakat Designs: Mermaid To Be Friends Scrapbook Page with Aladine

CONTEST HAS ENDED - THANKS FOR PARTICIPATING! 
CONGRATS TO THE WINNER!

This month I am participating with Rita Barakat Designs and Aladine Creations in a fun blog hop featuring Mermaid Tails Die Cuts and Kiss of the Fairy Embossing Powder with different color and texture products from Aladine to make a scrapbook page!


**I receive products from Rita Barakat Designs, Aladine Creations, Spellbinders® Paper Arts, and Scrapbook Adhesives by 3L® for use in my projects. The opinions are completely my own based on my experience and doing so I can share what I personally love to use.**


Mermaid To Be Friends Scrapbook Page Instructions

On a piece of 8.5 x 11-inch white cardstock, I randomly sprayed Menthe, Rosee, and Aurore Izink Dye Sprays.


How do you use leftover foam adhesive sheets? I used them as an embellishment! Simply cut into desired strips, remove the bottom liner to place on the page and then remove the top liner to sprinkle the Kiss of the Fairy Embossing Powder on top. Make sure to press down the powder with your fingers to secure and tap off excess. Melt with a heating tool.


Want to bring more fun texture to your background? Take Japanese Duo Geometric DIY Stencil and spread White Pearl Izink 3D Texture Paste over it (the wave design) for an amazing pearly design. Note: use E-Z Dots Repositionable adhesive to secure your stencil to your paper. When done, just rub off the dots!


While the texture paste dries, I wanted to add washi tape element but to also match the yellow color from the Aurore Izink Dye Spray. I had the same color in their Izink Dye Ink Pad category so I took pieces of paper tape and placed on my craft mat. Next, I swiped the Aurore Izink Dye Ink Pad over the pieces and let it sit overnight.


It was still wet so I wipe off the excess with a paper towel to reveal a beautiful colored washi tape! I cut each strip in half and put one piece over the other for more vibrant color on two opposite sides of the paper.


After looking over my background, I noticed a need for a pop of color. So I grabbed the Topaz Izink 3D Texture Paste and spread it on top of the Japanese Duo Geometric DIY Stencil (the dot + line design) in three areas of the paper. What do you think?


Playing with the Topaz Izink 3D Texture Paste further, I made a skin by spreading the paste on a non-stick craft sheet and letting it dry. Then I spread another layer and let it dry. Dry time varies depending on where you live. I did the first layer and went to make dinner. The second layer, I did and then left overnight.

At the same time, I cover with a thin coat on a piece of white cardstock using the Topaz Izink 3D Texture Paste.


After it dried, I die-cut the paper with the word "mermaid" in my manual die-cutting machine. Note: use wax or parchment paper to get a clean cut.


With the skin, I covered another piece of white cardstock using a strong adhesive like the E-Z Runner Ultra Strong adhesive. This layer will be one of many to be used behind my picture.


For more layers behind the picture, spray and cover the entire piece of white cardstock with Rosee Izink Dye Spray. Take another piece of white cardstock and stay with Aurore Izink Dye Spray. Let dry.


For an accent on top of the page, I decided to do a mermaid tail. So I covered a thin coat on a piece of white cardstock using the Topaz Izink 3D Texture Paste and let dry. Next, I stamped a mermaid tail with Cerise Izink Dye Ink Pad and used its coordinating die to cut the shape. Trim the top for a straight edge.


Afterward, wind natural twine twice around the tail, secure it with the Adhesive Dots Mini.


Then adhere with the E-Z Runner Ultra and place on the top left edge of the scrapbook page.


Adhere the colored layers behind the picture with the E-Z Runner Ultra and secure it to the page. The Mermaid Die Cut is secured with 3D Foam Circle and the E-Z Runner Ultra.


For the title background, I die-cut two mermaid tails in white cardstock and sprayed with Aurore Izink Dye Spray. Let dry. Then I inked edges both die cuts with the Aurore Izink Dye Ink Pad.


I wanted to make sure the die cuts didn't shift while stamping part of the title so I adhered them together with the E-Z Runner Ultra. Note I made one shorter than the other for balance.


Using two different stamp sets, I masked off the words I needed "to be" and "friends." I placed my mermaid tails into the MISTI and stamped my sentiment with Mer du sud Izink Dye Ink Pad.


Use more leftover 3D Foam Circles to place the mermaid tail die cuts to the bottom left edge of the page. Make sure to trim excess.


Apply E-Z Runner Grand with the E-Z Grand Dots Permanent Refill on the back of the "Mermaid" die cut and place across the mermaid tail. Add pearls randomly around the page, I used five for the girls in the photo!


Here's the finished page!


Thanks for stopping by!
MargieH

Creative Time: 45 minutes
Skill Level: Advance

Materials Needed
Rita Barakat Designs

Mermaid Tails Die Cuts
Kiss of the Fairy Embossing Powder

Aladine Creations
Menthe, Rosee, and Aurore Izink Dye Sprays
Japanese Duo Geometric DIY Stencil
White Pearl Izink 3D Texture Paste
Aurore Izink Dye Ink Pad
Topaz Izink 3D Texture Paste
Cerise Izink Dye Ink Pad
Mer du sud Izink Dye Ink Pad

Other
Etched Dies: Spellbinders Paper Arts (Mermaid Tail Swatch Stamp and Die Set); Stamps: Spellbinders Paper Arts (Mermaid Tail Swatch Stamp) and My Favorite Things (BB Polar Bear Pals and LLD Sweet Succulents); Stamp Positioning Tool: My Sweet Petunia (MISTI); Pearls: Want2Scrap (250 Ct. Pearls White); Adhesives: Scrapbook Adhesives by 3L (E-Z Runner Ultra, E-Z Dots Repositionable, E-Z Runner Grand, E-Z Runner Grand Dots Permanent, 3D Foam Circles in Black Regular and Adhesive Dots Mini); Heating Tool; Natural Twine

Pin It!


Giveaway Details

To enter the giveaway, simply do THREE THINGS:

  1. Visit all the participating designer blogs (list below) and leave a comment on each.
  2. Follow Aladine FaceBook Page.
  3. Sign Up for Rita's Newsletter.


Rita will announce the winner during her August 12th Mixed Media Monday at 8PM Central Time on her Rita Barakat FaceBook Page. Make sure to join her page to view. Good Luck!

Your next stop is Yolie Burke.

Visit and be inspired by participating designers:

Margie Higuchi (You are Here!)
Yolie Burke

CONNECT WITH US!


Tuesday, February 14, 2017

Scrapbook Adhesives by 3L: Creating a Woven Heart Valentine Scrapbook Page

Happy Valentine's Day, everyone!! I'm on Scrapbook Adhesives by 3L Blog today :) Excited to share an 8.5 x 11" scrapbook page with a combination of E-Z Runner® Ultra, Creative Photo Corners and 3D Foam Hearts to create this woven heart page!

**As a part of Scrapbook Adhesives by 3L® Design Team and Spellbinders® Paper Arts, I receive products for use in my projects. The opinions are completely my own based on my experience and doing so I can share what I personally love to use :) **


I start by cutting 0.75 x 6.0" of patterned papers. Line eight strips side by side and then weave one strip across (back and forth) to create one row. Repeat until you get to the top for a woven 6.0 x 6.0" piece. Set aside.


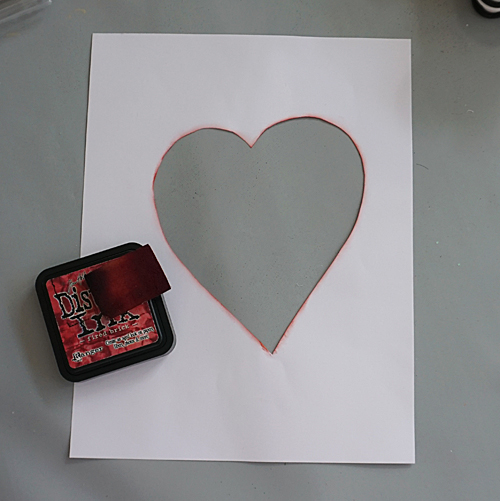
Take a piece of 8.5 x 11" white cardstock and hand drawn a heart shape. Then with a pair of scissors, fussy cut the shape out to create an open heart in the paper. If you used a pen or marker like me, cut outside the line.


With red ink and applicator, ink the edges of the heart to give it depth.


Using the E-Z Runner® Ultra, I followed the curves of the heart to place my woven paper piece on top to adhere. Trim off excess and adhere any loose ends.


I cut pictures from my leftover Happy New Year photo card (it had a collage design). I matted with patterned paper and secured two with Creative Photo Corners White and one with E-Z Runner® Ultra.


To layer the background, I swiped my ink pad across my mat and misted water. Loaded my paint brush and flicked in the areas where I will place my sequins. My cut out heart was used to protect the woven area. Set aside to dry.


For my title, I grabbed my 3D Foam Hearts and foiled a large heart (with the shiny side up). See How to Use 3D Foam Hearts and Other Shapes video below.


Next, for the letters, I placed a patterned paper on top of my 3D Foam Creative Sheet (remove top liner first) and die-cut my dimensional letters. See How to Use 3D Foam Creative Sheets video below.


For the background, I placed my sequins randomly using the new Adhesive Dots Micro. An 1/8 inch clear double-sided adhesive circles, they are PERFECT for my small embellies like these sequins. I also added a couple of small 3D Foam Hearts :)


Lastly, I adhered all my photos on the page with E-Z Runner® Ultra and inked the edges of my page with ink.


Had a blast creating this page - was able to do this in an afternoon.


Skill Level: Intermediate
Creative Time: 45 minutes

Materials Needed
Scrapbook Adhesives by 3L®

E-Z Runner® Ultra Refillable Dispenser
Creative Photo Corners White
3D Foam Hearts
Adhesive Dots Micro

Other
Alpha Steel Rule Die: Spellbinders® Paper Arts (Type-Oh! Contour™ Steel Rule Die)
Patterned Papers: Authentique Paper (6 x 6" Beloved Collection)
Ink: Ranger Inks (Distress Ink Fired Brick by Tim Holtz)
White Cardstock; Paint Brush; Water Mister; Crafting Mat; Sequins

Pin It!