Happy St. Patrick's Day to you all! Today I'm lucky to be Irish for the day and get away with it - HA! To mark the occasion I create a set of St. Patrick's Day cards from one sheet of patterned paper filled with phrases and images from Authentique Paper :) Some of the images were itching to be enhanced with dimensions using 3D Foam Hearts - put them together and they form a shamrock :) Put them together with foil and glitter to WEAR YOUR ADHESIVES ON THE OUTSIDE!
**I receive products from Scrapbook Adhesives by 3L® for use in my projects. The opinions are completely my own based on my experience and doing so I can share what I personally love to use.**
Happy St. Patrick's Day everyone! Today I'm up on Scrapbook Adhesives by 3L® Blog to share a card that has dimension in my background and in my embellishment, using our 3D Foam products. LOVE how it turned out!
**As a part of Scrapbook Adhesives by 3L® Design Team, Spellbinders® Paper Arts and Authentique Paper, I receive products for use in my projects. The opinions are completely my own based on my experience and doing so I can share what I personally love to use :) **
The Emerald Collection from Authentique Paper is the perfect patterns to use for this occasion. I cut about 26 Hexagons from my die and edged them with green ink for a subtle look. I ended up using 24 but I wanted a choice of patterns ;)
Once I cut and inked them up, I placed the die cuts on top of my A2-sized (5.50 x 4.25") card base.
After all were secured them down, trim off the excess and your card base is done.
Now to embellish! I cut a rectangle shape from green patterned paper and cut another a little larger to mat with gold mirror cardstock. I adhered them together with E-Z Runner® Grand.
To create my gold shamrock, I took four 3D Foam Hearts and placed them on top of my matted rectangle. Remove the top liner to sprinkle gold glitter on top. Press firmly to make sure they are stuck on well. Shake off excess.
To anchor my embellished shamrock, I used Extreme Double-Sided Tape 1/2" as a ribbon by adhere right down my card base. After taking off the liner, I sprinkled glitter. press down and dust off the excess.
For these wonderful sequins and gems, I used the Adhesive Dots Small to adhere on to the card front. These adhesive dots are perfect for many sizes of embellishment - we have six sizes of Adhesive Dots!
Happy Valentine's Day, everyone!! I'm on Scrapbook Adhesives by 3L Blog today :) Excited to share an 8.5 x 11" scrapbook page with a combination of E-Z Runner® Ultra, Creative Photo Corners and 3D Foam Hearts to create this woven heart page!
**As a part of Scrapbook Adhesives by 3L® Design Team and Spellbinders® Paper Arts, I receive products for use in my projects. The opinions are completely my own based on my experience and doing so I can share what I personally love to use :) **
I start by cutting 0.75 x 6.0" of patterned papers. Line eight strips side by side and then weave one strip across (back and forth) to create one row. Repeat until you get to the top for a woven 6.0 x 6.0" piece. Set aside.
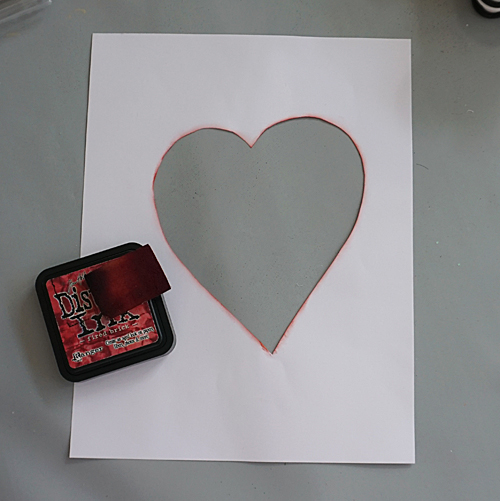
Take a piece of 8.5 x 11" white cardstock and hand drawn a heart shape. Then with a pair of scissors, fussy cut the shape out to create an open heart in the paper. If you used a pen or marker like me, cut outside the line.
With red ink and applicator, ink the edges of the heart to give it depth.
Using the E-Z Runner® Ultra, I followed the curves of the heart to place my woven paper piece on top to adhere. Trim off excess and adhere any loose ends.
I cut pictures from my leftover Happy New Year photo card (it had a collage design). I matted with patterned paper and secured two with Creative Photo Corners White and one with E-Z Runner® Ultra.
To layer the background, I swiped my ink pad across my mat and misted water. Loaded my paint brush and flicked in the areas where I will place my sequins. My cut out heart was used to protect the woven area. Set aside to dry.
For the background, I placed my sequins randomly using the new Adhesive Dots Micro. An 1/8 inch clear double-sided adhesive circles, they are PERFECT for my small embellies like these sequins. I also added a couple of small 3D Foam Hearts :)
Lastly, I adhered all my photos on the page with E-Z Runner® Ultra and inked the edges of my page with ink.
Had a blast creating this page - was able to do this in an afternoon.
Other
Alpha Steel Rule Die: Spellbinders® Paper Arts (Type-Oh! Contour™ Steel Rule Die)
Patterned Papers: Authentique Paper (6 x 6" Beloved Collection)
Ink: Ranger Inks (Distress Ink Fired Brick by Tim Holtz)
White Cardstock; Paint Brush; Water Mister; Crafting Mat; Sequins
**As a part of Scrapbook Adhesives by 3L® Design Team, I receive products for use in my projects. The opinions are completely my own based on my experience and doing so I can share what I personally love to use :) **
I assembled the mechanics and card base with E-Z Runner® Ultra Refillable Dispenser. It is a strong, permanent, clear double-sided adhesive that can handle paper construction like this.
For the pop-up panel: I cut 2.5 x 3.5 inch red paper for each panel. One was layered with stickers and inked edges with Fired Brick ink (all the red papers were inked the same). The second, I added stickers on a 2.25 x 3.25 inch patterned paper panel.
I added a sticker and 3D Foam Key shape. Simply remove the liner and rub in the Pigment Powder Brown to "Wear Your Adhesives on the Outside" for a shimmery effect.
The last panel, I die-cut a heart into the red paper and added a sticker sentiment in the lower right corner. Next fill small flower sequins into the Keepsake Envelopes Mix small size and close the flap. The sequins will fall out as they are TINY so apply E-Z Runner® Micro Refillable Dispenser around the edges of the envelope and (back of) heart window to seal. Place it over the heart window from the back side. Add Thin 3D Foam Squares - Mix Black and center onto the brown panel.
Add the rest of the red panels on the brown pop-up panel using E-Z Runner® Ultra Refillable Dispenser. Then place onto the twist mechanics of the card base.
Repeat the same shaker instructions for the card front with Keepsake Envelopes Mix medium size and a large heart die. Add Creative Photo Corners Gold on each corner of Card Panel. Oh, later I decided to add red glitter to 3D Foam Hearts in the center for some sparkle! LOL!
This is my last project as guest blogger for My Treasured Kutz, a line of detailed dies to use in your manual die cutting and embossing machine. Using Pine Bough and 3D Miniature GrandFlora Rose Flower, I created a sweet and dimensional Christmas Tag.
My inspiration was found in the pattern of my holiday themed paper, I cut them out as the focal point of the tag. Then I die-cut a combination of Pine Bough, and 3D Miniature Grand Flora Rose Flower to frame the focal point.
I first used Craft Power Tape and Pigment Powder Gold to make a three line border.
Then add the cut accents using E-Z Runner Permanent Strips and 3D Foam Squares. Next frame the bottom with Pine Bough and 3D Miniature GrandiFlora Rose Flower secure with Dodz Adhesive Dots Medium. Tie a jingle bell and mini cookie cutter together with Girlie Grunge Twine and tie to the organza bow to finish.
Happy Thanksgiving everyone! Today I'm up on Scrapbook Adhesives by 3L® Blog!! Did you ever have a last minute invitation to a dinner party and had nothing to bake/cook with? I will "sacrifice" my most favorite red wine for the occasion - HA! So into my craft studio I go to create a quick and easy wine tag...
For the tag base, I folded a piece of Kraft cardstock. Before I die-cut a banner shape, I placed the fold line right underneath the cut line to give it a long shape and trimmed the back. I wanted dimension to my tag so I pulled out the 3D Foam Creative Sheets and adhered my patterned paper on it before die-cutting another banner shape. See my step by step photos on how to...
Set the banner aside. Next, I die-cut my leaf and circle (opening for the bottle neck). Take out the tag base and emboss the leaf.
Ink the edge of the 3D Foam Creative Sheet banner shape and through the leaf die to highlight the embossed areas.
Wrap natural jute around the top of the banner, tie a knot and secure with a Dodz Adhesive Dots Mini.
Add 3D Foam Squares Black Mix regular squares on the back of the leaf die cut and center onto the banner.
To finish, peel off the liner in the back of banner and adhere on to the tag base. Now it's ready to hang on the wine bottle and to give! Loved how it turned out : )
Supplies:
Scrapbook Adhesives by 3L®: 3D Foam Creative Sheets Dodz Adhesive Dots Mini 3D Foam Squares Black Mix Others:
Die (Spellbinders® Creative Arts - Three's A Crowd Contour™ Steel Rule Die, Orchard Harvest Tags and Accents Set by Samantha Walker (ret.) and Standard Circle Set); Patterned Papers (Authentique Paper - Thankful Collection); Ink (Clearsnap® Inc. - ColorBox® Fluid Chalk Ink Pad in Butterscotch); Natural Jute; Kraft Cardstock; Red Wine Bottle
I wish you and your family & friends a most wonderful Thanksgiving full of good conversation and laughter!