Showing posts with label Valentine's Day. Show all posts

Sunday, February 03, 2019

You're Awesome Valentine Chocolate Box

Were you ever short on time and had to create something in about 10 minutes? That happened to me recently. Living in the Chicago area, we experienced record low temperatures like -17 and -26 recently! My sons' cars are out in the elements and well, we thought one of the pipes leaked. Off to our local repair shop, Casey's. It was Saturday morning (one of their busiest times)...people line up before 7:30 am! They cleaned and tested to find no leak - phew! So no charge.

But I wanted to do something for the trouble so I quickly picked up a few supplies to create a You're Awesome Valentine Chocolate Box. Using the hinged box project idea, I went to work and created this!

**I receive products from Scrapbook Adhesives by 3L® for use in my projects. The opinions are completely my own based on my experience and doing so I can share what I personally love to use.**

You're Awesome Valentine Chocolate Box by Margie Higuchi

Making a Valentine Box

I cut two 6 x 11-inch strips of light pink cardstock. Put one aside for another project and score the other. On the six inch side, score at 1 and 5 inches. On the 11-inch side, score at 1, 5, 6 and 10 inches. Fold all the score lines. With the 11-inch side up, cut the top and bottom score lines up to the intersecting lines to create your tabs. Refer to the image below. Set aside.

You're Awesome Valentine Chocolate Box by Margie Higuchi

For the box front layers, I cut 3 7/8-inch square patterned paper layer and 3 1/2-inch square patterned paper layer. The sentiment was trimmed to size from a patterned paper cut out and adhered with E-Z Runner® Grand Permanent Strips towards the bottom of the smaller square layer.

You're Awesome Valentine Chocolate Box by Margie Higuchi

Using the Crafty Foam Tape White, I layered the two squares together.


Next, I added a large 3D Foam Heart on the layered squares.

You're Awesome Valentine Chocolate Box by Margie Higuchi

Now for the fun part: foiling! I grabbed a piece of silver glitter foil from the Metallic Transfer Foil Sheets Holographic Colors. These sheets are big - 6 x 12-inch so I cut a piece to cover the heart. Simply pull the top liner off of the heart and place the foil COLOR SIDE UP on top.

You're Awesome Valentine Chocolate Box by Margie Higuchi

Then rub with your finger to transfer the color to the heart. Lift the liner off. If you see any "bald" spots, go over it with the foil to cover. No tool and instant gratification! LOL!

You're Awesome Valentine Chocolate Box by Margie Higuchi

Adhere the embellished square on the hinged box with E-Z Runner® Grand Permanent Strips. Using the same adhesive, apply on all the tabs and assemble the box.

You're Awesome Valentine Chocolate Box by Margie Higuchi

Add your chocolate in and it's ready to give!

You're Awesome Valentine Chocolate Box by Margie Higuchi


If you like this hinged box project, I have another one that is a totally different style with a tutorial - CLICK: Blooming Butterfly Note Cards and Box Ensemble.

Thanks for stopping by!
MargieH

Creative Time: 10 minutes
Skill Level: Intermediate

Materials Needed
Scrapbook Adhesives by 3L®
E-Z Runner® Grand Refillable Dispenser
Crafty Foam Tape White
3D Foam Hearts
Metallic Transfer Foil Sheets Holographic Colors

Other:
Patterned Papers: Be Mine Collection (Pebbles Inc.); Light Pink Cardstock (Bazzill Paper Basics); Score Board and Bone Folder; Chocolate

Pin It!

You're Awesome Valentine Chocolate Box by Margie Higuchi Pinterest

Tuesday, February 14, 2017

Scrapbook Adhesives by 3L: Creating a Woven Heart Valentine Scrapbook Page

Happy Valentine's Day, everyone!! I'm on Scrapbook Adhesives by 3L Blog today :) Excited to share an 8.5 x 11" scrapbook page with a combination of E-Z Runner® Ultra, Creative Photo Corners and 3D Foam Hearts to create this woven heart page!

**As a part of Scrapbook Adhesives by 3L® Design Team and Spellbinders® Paper Arts, I receive products for use in my projects. The opinions are completely my own based on my experience and doing so I can share what I personally love to use :) **


I start by cutting 0.75 x 6.0" of patterned papers. Line eight strips side by side and then weave one strip across (back and forth) to create one row. Repeat until you get to the top for a woven 6.0 x 6.0" piece. Set aside.


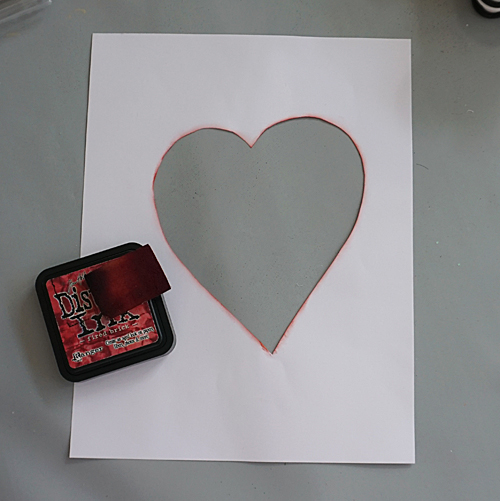
Take a piece of 8.5 x 11" white cardstock and hand drawn a heart shape. Then with a pair of scissors, fussy cut the shape out to create an open heart in the paper. If you used a pen or marker like me, cut outside the line.


With red ink and applicator, ink the edges of the heart to give it depth.


Using the E-Z Runner® Ultra, I followed the curves of the heart to place my woven paper piece on top to adhere. Trim off excess and adhere any loose ends.


I cut pictures from my leftover Happy New Year photo card (it had a collage design). I matted with patterned paper and secured two with Creative Photo Corners White and one with E-Z Runner® Ultra.


To layer the background, I swiped my ink pad across my mat and misted water. Loaded my paint brush and flicked in the areas where I will place my sequins. My cut out heart was used to protect the woven area. Set aside to dry.


For my title, I grabbed my 3D Foam Hearts and foiled a large heart (with the shiny side up). See How to Use 3D Foam Hearts and Other Shapes video below.


Next, for the letters, I placed a patterned paper on top of my 3D Foam Creative Sheet (remove top liner first) and die-cut my dimensional letters. See How to Use 3D Foam Creative Sheets video below.


For the background, I placed my sequins randomly using the new Adhesive Dots Micro. An 1/8 inch clear double-sided adhesive circles, they are PERFECT for my small embellies like these sequins. I also added a couple of small 3D Foam Hearts :)


Lastly, I adhered all my photos on the page with E-Z Runner® Ultra and inked the edges of my page with ink.


Had a blast creating this page - was able to do this in an afternoon.


Skill Level: Intermediate
Creative Time: 45 minutes

Materials Needed
Scrapbook Adhesives by 3L®

E-Z Runner® Ultra Refillable Dispenser
Creative Photo Corners White
3D Foam Hearts
Adhesive Dots Micro

Other
Alpha Steel Rule Die: Spellbinders® Paper Arts (Type-Oh! Contour™ Steel Rule Die)
Patterned Papers: Authentique Paper (6 x 6" Beloved Collection)
Ink: Ranger Inks (Distress Ink Fired Brick by Tim Holtz)
White Cardstock; Paint Brush; Water Mister; Crafting Mat; Sequins

Pin It!


Tuesday, January 17, 2017

Scrapbook Adhesives by 3L: How to Embellish Valentine Twist Pop-Up Card

Today I am on Scrapbook Adhesives by 3L® Blog with this fun card! Using E-Z Runner® Ultra Refillable Dispenser and Thin 3D Foam Squares - Mix Black, I made a Valentine Twist Pop-Up Card. If you search "Twist Pop-Up Card Tutorial" on the internet, there will be a few to choose from. I used: Twist Pop-Up Card Tutorial by SplitCoast Stampers.

**As a part of Scrapbook Adhesives by 3L® Design Team, I receive products for use in my projects. The opinions are completely my own based on my experience and doing so I can share what I personally love to use :) **


I assembled the mechanics and card base with E-Z Runner® Ultra Refillable Dispenser. It is a strong, permanent, clear double-sided adhesive that can handle paper construction like this.


For the pop-up panel: I cut 2.5 x 3.5 inch red paper for each panel. One was layered with stickers and inked edges with Fired Brick ink (all the red papers were inked the same). The second, I added stickers on a 2.25 x 3.25 inch patterned paper panel.


I added a sticker and 3D Foam Key shape. Simply remove the liner and rub in the Pigment Powder Brown to "Wear Your Adhesives on the Outside" for a shimmery effect.


The last panel, I die-cut a heart into the red paper and added a sticker sentiment in the lower right corner. Next fill small flower sequins into the Keepsake Envelopes Mix small size and close the flap. The sequins will fall out as they are TINY so apply E-Z Runner® Micro Refillable Dispenser around the edges of the envelope and (back of) heart window to seal. Place it over the heart window from the back side. Add Thin 3D Foam Squares - Mix Black and center onto the brown panel.


Add the rest of the red panels on the brown pop-up panel using E-Z Runner® Ultra Refillable Dispenser. Then place onto the twist mechanics of the card base.


Repeat the same shaker instructions for the card front with Keepsake Envelopes Mix medium size and a large heart die. Add Creative Photo Corners Gold on each corner of Card Panel. Oh, later I decided to add red glitter to 3D Foam Hearts in the center for some sparkle! LOL!


Here's what it looks on the inside...


Supplies List:
Scrapbook Adhesives by 3L®:

E-Z Runner® Ultra Refillable Dispenser
E-Z Runner® Micro Refillable Dispenser
Thin 3D Foam Squares - Mix Black
3D Foam Hearts
Keepsake Envelopes Mix
Creative Photo Corners Gold
Donna Salazar with Scrapbook Adhesives by 3L®:
3D Foam Key
Pigment Powder Brown
Other:
Patterned Papers and Stickers: Authentique Paper (Lovely & Believe Collection)
Die: Spellbinders® Paper Arts (Classic Hearts)
Ink: Ranger Ink (Distress Ink - Fired Brick)
Flower Tiny Sequins: Mon Ami Gabby

As always, thank you for stopping by!!
MargieH

Sunday, February 14, 2016

Paper Hearts Challenge: My Hearts :)

I have been a fan of Courtney Walsh even BEFORE she authored five books! LOL!! Before committing to become an author, she was also well known in the Craft Industry from being an uber talented designer to authoring an inspirational idea book to a former public relations front person for Webster's Pages. Just love her!

Photo taken from Courtney Walsh Blog

Her last published book Paper Hearts is about...(summary from Amazon.com):

Abigail Pressman would never have guessed that love notes penned on paper hearts by an anonymous couple could restore her belief in love. As a business owner in a quaint town at the base of the Rockies, she’s poured everything into dreams of expansion . . . and resisting the matchmaking efforts of the Valentine Volunteers, who gather in her store to continue Loves Park’s tradition of stamping mail with the city’s romantic postmark.

When Abigail is unwillingly drafted into the Volunteers, she encounters the paper hearts, a distraction that couldn’t come at a worse time. A hard-to-read doctor has become Abigail’s new landlord, and he’s threatening to end her lease to expand his practice.

As she fights a growing attraction to this handsome man crushing her dreams, Abigail is inspired to string the hearts in her store, sparking a citywide infatuation with the artsy trend. But when a new batch of hearts reaches the Volunteers, it appears something tragic has happened to the couple. Will uncovering their story confirm Abigail’s doubts about love, or could it rescue her dreams . . . and her heart?

A couple of weeks ago, Author Courtney challenged people to a Paper Hearts Challenge and how perfect - right before Valentines! Take a look at her Paper Hearts promo video on the book (so cute & quirky!)...


"Maybe you haven't been writing paper hearts all year, like the mystery couple in "Paper Hearts", but today is the PERFECT day to start, leading up to Valentine's Day! And it's so easy:

1. Cut paper or cardstock in to hearts or go to the Target dollar bin and pick up some pre-cut ones.
2. Write one thing you love about your spouse, significant other, child or friend every day leading up to Valentine's Day.
3. On the 14th, bombard your people with LOVE. You can string them up, tape them to the bathroom mirror, hide them around the house or stick them all over their bedroom door... there's no right or wrong here!
4. Share a picture on your FB page or Instagram with the hashtag ‪#‎shareyourheart‬ and you'll be entered to win signed copies of BOTH Paper Hearts and my newest novel Change of Heart!"

So I took her up on the challenge or I should say parts of it (hard to keep up - lol!):

Here's Day 1 of my Paper Hearts Challenge: it's a GOLDen kind of heart! Using Scrapbook Adhesives by 3L® 3D Foam Hearts with Pigment Powder Gold, wrote in Design Memory Craft® Metallic PITT® Artist Pen Gold on top of Spellbinders® Creative Arts Classic Heart die cut #shareyourheart


Day 2: I love our happy hour chats of our day. #IntlBanking #Crafting #HTMLcoding #DrinksBeforeDinnerAtHome Used Spellbinders Tool 'n One™ to take out Fonts One - Uppercase & Pierced Hearts die cuts and adhering with Scrapbook Adhesives by 3L® Adhesive Sheet. Used Pigment Powder Wine mixed with Girlie Grunge Art Medium to colors CHATS


Day 5: you make my heart flutter! Used this beautiful Webster's Pages patterned paper to make a 3D heart using Spellbinders® Classic Heart die and adhered all together with Scrapbook Adhesives by 3L® Dual Tip Glue and Dodz™ Small behind the banner. For a finished edge, I inked them with ClearSnap ColorBox Chalk. I think one of my favorite hearts!


Day 12: how he moves my heart with his smile :) Being clever and using fringe - lol!! Hope it works! Used Donna Salazar with Scrapbook Adhesives by 3L® Girlie Grunge Art Medium to adhere three strips of fringed patterned paper (cut with Martha Stewarts' Fringe Scissors on DoodleBug paper) and then cut with Spellbinders® Classic Heart die template.


Put them all together (the plain hearts have notes in the back) and I created this banner! SO FUN!! Click on images for a closer look. Thanks, Courtney, for the challenge!


Next book for Courtney is Change of Heart - I just got the book a couple of days ago and hope to read it REAL SOON!! Interested click here (not affiliated): Change of Heart by Courtney Walsh to purchase your copy!


Have a HEART-FULL DAY!!
MargieH

Thursday, February 04, 2016

Scrapbook Adhesives by 3L: Make My Heart Smile with 3D Hearts and Pigment Powder Card Tutorial

Hello everyone! I am so excited to show you all my Valentines Day card on Scrapbook Adhesives by 3L® Blog!! It's refreshing to create something girlie when you are a mom of boys! HAHAHAHA!! When I saw these 3D Foam Hearts, balloons came to mind! LOL! This is the card I created...what do you think?


Showing you some sneaks but you'll need to go to the blog for the detailed steps out and full supplies list :)


OK - better stop! LOL!! See what you like?
Meet me over at Scrapbook Adhesives by 3L® Blog!!

Happy (early) Valentine's Day!!
MargieH

Wednesday, February 04, 2015

Scrapbook Adhesives By 3L: Shaped 3D Foam Key To My Heart Canvas Tutorial

Hello! Today is my turn to post on Scrapbook Adhesives by 3L Blog :) It's all about hearts and Valentines - most especially 3D Foam Hearts accented with their newest 3D Foam Keys to create a sweet and fun canvas piece!


Some sneaks from the Blog.....


OOooooo!! Can't show you any more...if you want to know how I created some of the textured background, check out my 3D Foam Key to My Heart Canvas Tutorial. It has detailed step outs and full supplies list.

As always, thanks for stopping by!
MargieH

Tuesday, February 11, 2014

Challenge: SweetHearts Canvas Project

Today, I wanted to share my 12 x 12" canvas project, using Faber-Castell® Design Memory Craft® products, Authentique Paper's Lovely Collection, Spellbinders® dies, Scrapbook Adhesives by 3L® and Stencil Girl stencil. CLICK ON IMAGES to make it larger :)

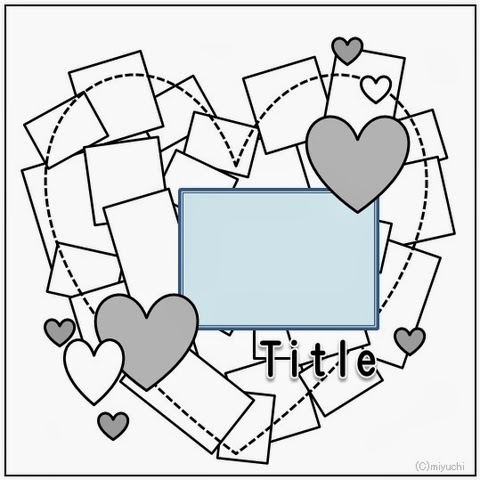
When I first saw Serendipity Feb 2014 Sketch challenge, I HAD to make something with this SUPER CUTE design - thanks, Miyuki-san!!!! BONUS: I saw Take the Challenge with Mou, Feb 2014 Challenge on Faber-Castell Design Memory Craft's Blog - I'm SO IN for that wonderful challenge too!! Thanks, Mou!!

私はmiyuchiさんのサイト、Serendipity 2月のスケッチで作ってみました (めっちゃ可愛いデザイン!)。 ご紹介させて頂きます。Faber-Castell Design Memory Craft, Spellbinders, Scrapbook Adhesive by 3L, Stencil Girl & Authentique Paper等 使いました。Miyuchiさん、ありがとうございます :) スケッチはこちら↓ (拡大するには、Imageをクリクしてね )


Heart・FULLなスケッチで「今回は絶対作る!」と思いました!私の作品は12 x 12" キャンべスです。去年のValentine’s Dayで撮った写真(Selfie)、私と旦那です~!お気に入りのスペルバインダーズのダイ(S2-022 Vines of Passion)は日本にも購入できますよ!是非,クリクしてね。


Add color to the primed canvas with Design Memory Craft Gelatos® 4 ct. - RED in Red Cherry, Bubble Gum and Guava colors for an ombre effect (used fingers and water misted to color). For an even blend, I used baby wipes and added more color along the way until I achieved my desired look.


I hand cut small pieces (squares and rectangles) of patterned papers. I hand cut two open hearts - the large one for adhering the paper pieces and the smaller one for an outline piece. I edged the smaller heart with Red Cherry Gelatos.


The paper pieced heart was covered with Gesso Textural Accent to tone down the busy patterns.


Next is to create a shadowed outline for the smaller heart. I lightly outline with pencil the shape. Then outlined with Guava Gelatos and spread with my fingers and water mister. Next I went over the outline with Red Cherry Gelatos with a fine tip Blending Chisel from the Gelatos Tool Set. Adhere together both hearts and to the canvas.


For accents, I used many Spellbinders die templates from the Die D-Lites line and a new one from the Card Creator series. Here's a couple of them pictured below...LOVE how they add to my project!


After assembling the pieces for my project, I wanted some accents to my black and white chalkboard-inspired title. So I did two things. First, I used Stencil Girl Products 4 x 4" Mini Lines Stencil behind the title by using Stamper's Big White Pen first and blend with baby white for a subtle look. Next I stenciled with Stamper's Big Brush Scarlet Red Pen and blended with my finger through the stencil.


Second, I colored a heart from 3D Foam Hearts by Scrapbook Adhesives by 3L with Stamper's Big Brush Scarlet Red Pen (two coats, dry between coats) and accented with Stamper's Big White Pen. For an extra shine, I added Glaze Textural Accent.


Assemble as shown below and it's ready for display on Valentine's Day...or any day!


Project Supplies:
Faber-Castell Design Memory Craft – Gelatos Color 4ct. - Red (Guava, Bubble Gum & Red Cherry), Gelatos Tool Set (Blending Chisel Tool), Gesso Textural Accent, Glaze Textural Accent, Stamper's Big White Pen and Stamper's Big Brush Scarlet Red Pen
Spellbinders Creative Arts - S2-022 Vines of Passion, S2-050 Corner FlourishS3-208 ATC, S4-354 Splendid Circles , S5-217 A2 Valiant Honor
Cardstock and Card Base - Darice and Core'dinations ColorCore Cardstock®/David Tutera™ For Darice Celebrate Cardmaking System
Patterned Papers and Stickers - Authentique Paper (Lovely Collection)
Ribbon - May Arts Ribbon
Stencil - Stencil Girl Products (4 x 4" Mini Lines Stencil)
Adhesives - Beacon Adhesives (Zip Dry Glue) and SCRAPBOOK ADHESIVES BY 3L® (3D Foam Squares, 12 x 12" Adhesive Sheet and 3D Foam Hearts )
Other - Sequins and Baby Wipes

Thanks for stopping and wish you all a HEART-ful day xo
MargieH