Showing posts with label Donna Salazar Designs. Show all posts

Sunday, June 18, 2017

Scrapbook Adhesives by 3L: DAD ATC Card with Adhesive Sheets

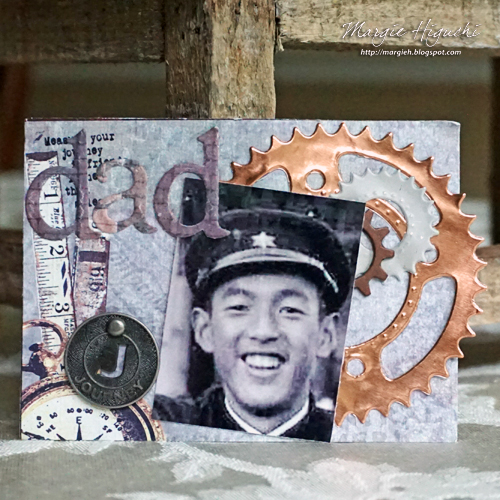
Today on Father's Day, I am up on Scrapbook Adhesives by 3L® Blog. Although my dad is not with me, I am always happy to CELEBRATE HIM :) A card wouldn't do so I decided on an ATC (Artist Trading Card) using mostly Adhesive Sheets to put it all together.

**I receive products from Scrapbook Adhesives by 3L® and Spellbinders® Paper Arts for use in my projects. The opinions are completely my own based on my experience and doing so I can share what I personally love to use :) **
DAD ATC by Margie Higuchi for Scrapbook Adhesives by 3L

Instructions:
  1. Cut patterned paper into a custom ATC size (4.0 x 2.875 inches). Normally they are 3.5 x 2.5 inch - I like to be different ;)
  2. Apply Adhesive Sheets 4 x 6" on the back of patterned paper and copper + white foil paper. See video at the end of instruction on the how to.
  3. Die-cut patterned paper with alpha dies to spell out "DAD."
  4. Die-cut copper and white foil paper with gears steel rule die.
  5. Adhere to the ATC as shown in photo. Excess can either be cut or dust talcum powder to alleviate the stickiness.
  6. Add metal gear piece with Dodz Adhesive Dots 3D (the exposed area will be covered by a photo).
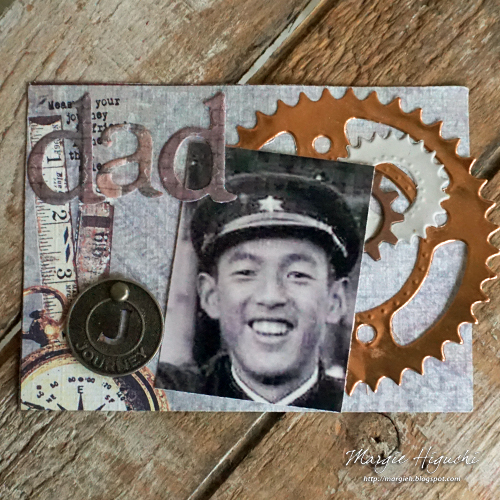
  7. Color copy a photo and cut to 1.625 x 2.125 inches. Adhere with E-Z Runner® Grand Dispenser. The vintage photo is of my dad as a Japanese high schooler :)
  8. Punch a hole with a paper piercer in the ATC and add metal embellishment with matching brad.


DAD ATC 2 by Margie Higuchi for Scrapbook Adhesives by 3L

Scrapbook Adhesives by 3L® Supplies:
Adhesive Sheets 4 x 6"
E-Z Runner® Grand Dispenser
Dodz Adhesive Dots 3D
Other:
Etched Dies and Tool: Spellbinders® Paper Arts (Sprightly Sprockets Set, Font One - Lowercase Set and Tool 'n One™); Patterned Papers; Foil Papers; Metal Embellishments; Brad; Talcum Powder; Photo

Wednesday, January 04, 2017

Scrapbook Adhesives by 3L: Snowy Kisses Gift Bag Tutorial

Today I'm up on Scrapbook Adhesives by 3L Blog :) I wanted to create a "sweet" gift bag of kisses leftover from the holidays, using Bo Bunny's Winter Wishes Collection with our E-Z Runner® Permanent Fine Adhesives Dispenser for my vellum accent pieces. I'm also using Thin 3D Foam Squares - Mix Black and E-Z Runner® Permanent Strips to put everything else together.


Gathering up my materials, this is what I will be using...


With a 5.0 x 5.5 in. piece of Icicles paper, I adhered a strip of vellum that I cut from the Winter Wishes Foil Vellum Paper with E-Z Runner® Permanent Fine Adhesives Dispenser - seriously cannot see the adhesive on this vellum! Using the same adhesive, I ran a strip across (and a little on the back) and placed my Lace Ribbon on top and folded the ends in the back. Set aside.


I wanted a subtle dimension to my panel so I pulled out my Thin 3D Foam Squares - Mix Black and placed a few in the back of my die cuts. Set aside.


Now to work on the layers, first the tree die cut was adhered by E-Z Runner® Permanent Strips and placed over the frame on the right side. Then add the foamed girl die cut on the left with a little overlap.


I adhered a vellum accent (cut from the same vellum as the foiled strip) with E-Z Runner® Permanent Fine Adhesives Dispenser and placed on top of the tree die cut.


Taking the liner off the Thin 3D Foam Squares - Mix Black, adhere the embellished frame die cut on top of the panel.


Using E-Z Runner® Permanent Strips, adhere the panel to the Glasine bag. Add chocolate kisses in the bag and fold 0.50 in. from top with scoring tool. Seal with E-Z Runner® Permanent Fine Adhesives Dispenser (so the seal looks invisible).


Now to give it away...if you can! LOL! Here's another look...


Supplies:
Scrapbook Adhesives by 3L®:

E-Z Runner® Permanent Fine Adhesives Dispenser
Thin 3D Foam Squares - Mix Black
E-Z Runner® Permanent Strips
Donna Salazar with Scrapbook Adhesives by 3L®:
Lace Ribbons
Other:
Patterned Paper, Die Cuts & Vellum Paper (Bo Bunny Press: Winter Wishes Collection); Glasine Bag; Chocolate Kisses; Scoring Tool

Thanks for stopping by!
MargieH


Monday, October 31, 2016

Scrapbook Adhesives by 3L: Creating a Book Of Magic with Pigment Powders

Come in for a spell...I have a Boo(!)k of Magic for you! I am thrilled to show you what I created with Pigment Powder Brown and Pigment Silver from Donna Salazar with Scrapbook Adhesives by 3L® line. What do you think?


I painted the paper mache book box with black chalkboard paint (three coats with dry time in between coats) on the outside and inside of the box.


Then I added crackle paint to give it interest and age it a bit. Realized that this particular product dries white! LOL! So I painted another coat of black chalkboard paint but it brought beautiful cracks. It helps to read the instructions! LOL!


While the paint dries, I trimmed cute patterned paper to fit inside the box. Before I adhered with my E-Z Runner® Ultra Refillable Dispenser, I edge the papers with the same black chalkboard paint.


I repeated the same process with the chipboard letters as I did with the book box, except the first coat was crackle paint and then black chalkboard paint. Lesson learned...HA!


Now for the fun part! I mixed Pigment Powder Brown and Pigment Powder Silver together with the Girlie Grunge Art Medium. To make it more of a paint, I added a little bit of water.


With a foam brush and a wet towel, I applied my paint to the book box and wiped away with the wet towel until I liked the look. The narrow areas between the letters, I applied cotton tip swabs. Let dry. Re-apply paint if needed until you get your desired look.


For the final touch, I applied a pair of googly eyes with the Dual Tip Glue Pen for a fun element.


Now to add candy or fun treat boxes like the ones here :)


Supplies:
Scrapbook Adhesives by 3L®:
E-Z Runner® Ultra Refillable Dispenser
Home Hobby Dual Tip Glue Pen
Donna Salazar with Scrapbook Adhesives by 3L®:
Pigment Powder Brown
Pigment Powder Silver
Girlie Grunge Art Medium
Others:
Black Chalkboard Paint: Faber-Castell® Design Memory Craft®
Crackle Paint: Viva
Chipboard Letters: American Craft (Thickers)
Patterned Papers and Treat Boxes: Lawn Fawn
Googly Eyes; Paper Mache Book Box; Foam Brush

Looking for more Halloween inspiration, check out Halloween ideas with Scrapbook Adhesives by 3L.

Thanks for stopping by! Happy Halloween and be safe out there!
Margie Higuchi


Friday, October 28, 2016

Scrapbook Adhesives by 3L and Graphic 45 Blog Hop - Day 5: Tri-Fold Scrapbook Page Tutorial

Can't get enough of Graphic 45! So today I'm back on Day 5 with a tri-fold scrapbook page using a 12 x 12" patterned papers from their Cityscapes Collection. Loved how it turned out...


First I google searched tri-fold card and found many video tutorials on it. I basically used the same measurements on the score lines (2", 4", 8" and 10"). Cut from 2" score line to the 10" score line (with 3" from the top and bottom). Accordion fold the outer edges the same way and folded opposite way for the inside portion to get my page base. The grey cardstock is a better view of the cuts/folds.


Next I cut patterned papers for the outside edges of my page. The two long sides are 1.75 x 11.75" strips. The insides are 1.75 x 2.75"(4 pcs) and 3.75 x 2.75" (2 pcs).


The middle sections were two strips of 1.75 x 5.75" and all were adhered down with the E-Z Runner® Grand Refillable Dispenser.


For the focal point, I picked out two sheets of patterned paper with an image of the Eiffel Tower. One as the base and the other to fussy cut and then layer with 3D Foam Square - White, Mix.


After that was done, I added 3D Foam Swirl Shapes as accents in the center. Pull the liner off and gently rubbed Pigment Powder Silver for a bit of shimmer and interest.


Since I don't like to waste what's left of the 3D Foam Swirl Shapes sheet. I cut the used areas and adhered it to the back of the focal point for dimension.


Now it's ready for display and I am so happy how it turned out! Here's a close up look...


Supplies:
Scrapbook Adhesives by 3L®:
E-Z Runner® Grand Refillable Dispenser
3D Foam Square - White, Mix
Donna Salazar with Scrapbook Adhesives by 3L:
3D Foam Swirl Shapes
Pigment Powder Silver
Graphic 45:
Cityscapes Collection

If you like what you see, I have more on my blog (most with tutorials). Please consider following me, would love to have you!

Thanks for stopping by! Today is Day 5 (and last day) so enter while you can - Good Luck!
MargieH

Monday, October 17, 2016

Scrapbook Adhesives by 3L: How to Create a Girlie Grunge Monogram Tag


Today on Scrapbook Adhesives by 3L® Blog: I had a tag that was pink...now I like pink but this color did not speak to me. LOL! So I covered it with Girlie Grunge Tissue Tape in Denim - who doesn't love denim? It would be the perfect background to what I had in mind.

This tag is dedicated to my sweet friend, Ellen, who I will always remember her wearing blue jeans, boots and a cowgirl hat...she was my hip friend. We lost her this past weekend to a tragic house fire. Love ya, girlie!


I covered this tag with Girlie Grunge Tissue Tape in Denim from Donna Salazar with Scrapbook Adhesives by 3L collection. This tape is forgiving....if you missed a spot, you can pick up the tape and re-do.


Next I tint Girlie Grunge Art Medium with Pigment Powder Gold. Add a little water to make a little more liquidity (is that a word? lol!). Then I painted over a piece of 6" strip of Texture Ribbons in White Burlap - this will not only stiffen the ribbon but it gives it a beautiful golden color. Let dry (I let it dry overnite).


When the gold burlap dried, I die-cut a letter "E" using my steel rule die and manual die-cutting machine. I also die-cut two different sizes of my labels die to frame the initial. I used the Dual Tip Glue Pen to adhere the letter to the small label and for the small label, 3D Foam Squares - White, Regular.


Set the die cuts aside to work on the bottom of the tag to create a layered border using Lace Ribbons and Girlie Grunge Twine in Navy. I used Extreme Double-Sided Tape 1/8" Permanent and Dodz Adhesive Dots Mini to secure all on the tag.


Using the bottom border as a guide, I adhered the layered die cut with E-Z Runner® Permanent Strips Refillable Dispenser to the center of the tag. Then I tied a knot with the Lace Ribbons in Crocheted Lace Trim to finish.


Supplies:
Scrapbook Adhesives by 3L®:

3D Foam Squares - White, Regular
Dodz Adhesive Dots Mini
E-Z Runner® Permanent Strips Refillable Dispenser
Home Hobby Dual Tip Glue Pen
Home Hobby Extreme Double-Sided Tape 1/8" Permanent
Donna Salazar with Scrapbook Adhesives by 3L®:
Girlie Grunge Tissue Tape in Denim
Girlie Grunge Art Medium
Pigment Powder Gold
Texture Ribbons
Lace Ribbons
Girlie Grunge Twine
Other:
Dies and Die Cutting & Embossing Machine: Spellbinders® Creative Arts
Patterned Paper: Bo Bunny Press
Tag

Hug your friends today - consider yourself hugged!

Thanks for stopping by!
MargieH


Sunday, July 17, 2016

Scrapbook Adhesives by 3L: Always Remember Card with Girlie Grunge Tissue Tape Background

Happy Sunday! Today is my turn on Scrapbook Adhesives by 3L® Blog :) I am featuring the Girlie Grunge Tissue Tape Ash and Oak Set from Donna Salazar with Scrapbook Adhesives by 3L® line. Can you see where it is?


Using Girlie Grunge Tissue Tape Ash and Oak set, I covered a piece of white cardstock with Oak tape. Then cut it with Spellbinders® Matting Basics A Die #6 (the smallest size die is #1), using my Platinum™ Die Cutting Machine to create a card panel.


To adhere my piece of 5.25" Textured Ribbons White Burlap, I used Premium Double-Sided Tape 1" Permanent and placed it horizontally across the card panel.


Next I stamped an image from Spellbinders Always Remember Stamp and Die Set over a light patterned paper. To die cut, I placed the coordinating die from the same set and went through my machine. Adhere on top of the ribbon on the card panel with E-Z Runner® Ultra Refillable Dispenser.


With the leaf die templates, I cut with patterned paper to use as accents. Place them on the left side of the stamped die cut on the card panel with a Dodz™ Adhesive Dots Medium.


Using Dodz™ Adhesive Dots XL, I rolled Crocheted Scalloped Eyelet Trim from the Lace Ribbons round and round until I got the desired look. Just place on top of the leaf accent die cuts on the card panel.


With the Crafty Foam Tape White, adhere the card panel on top of a 6 x 5" card base.


Now it's ready to be sent to someone special!


I hope you enjoyed my tutorial!
Thanks for stopping by :)
MargieH


Supplies:
Scrapbook Adhesives by 3L®:
Crafty Foam Tape White
E-Z Runner® Ultra Refillable Dispenser
Dodz™ Adhesive Dots Medium
Donna Salazar with Scrapbook Adhesives by 3L®:
Girlie Grunge Tissue Tape Ash and Oak
Textured Ribbons
Dodz Adhesive Dots XL
Lace Ribbons
Home Hobby:
Premium Double-Sided Tape 1" Permanent
Other: Dies/Stamps (Spellbinders® Creative Arts); Score Tool (Scor-Pal); White Cardstock; Patterned Papers