Showing posts with label ATC. Show all posts

Saturday, December 05, 2020

InkyStamper: Snowman Mixed Media ATC Card

Hello Paper Crafters! I am sharing a cardmaking idea today featuring the NEW Snowman Stamp and Die Set from Inky Stamper. Do you create ATC (Artist Trading Cards)? This snowman design was so cute that I was inspired to make a card around a mixed media ATC design in my head. Let me share with you my idea.

**I receive products from InkyStamper and Scrapbook Adhesives by 3L® for use in my projects. The opinions are completely my own based on my experience and doing so I can share what I personally love to use.**


Making the ATC Background

I used a piece of 2.5 x 3.5-inch mixed media paper to create my ATC. The background was colored with three Gelatos and then blended with a baby wipe. Keep layering colors until you get the desired look. Let dry.


Next, stencil with a dotted pattern stencil and molding paste - just around the top like snowflakes falling. Set aside to dry. Let's work on stamping.


Stamping the Snowman

Stamp the Snowman from the Snowman Stamp and Die Set out of white cardstock and cut with its matching die.

Color the Snowman with a combination of Gelatos and watercolor pencils.


Stamp the snowflake with black ink randomly on the ATC. Designer's Note: Using the snowman die cut as a guide, it would help how to figure out where to stamp the snowflake. Adhere the snowman die cut with the E-Z Runner Ultra Strong. 


Layering Up and Final Assemble

After I created a top-fold A2 size purple card base, it was embossed with a dot design embossing folder. It kind of matches my dot stencil. LOL! The ATC needed to be matted so I cut a piece of white cardstock to 3 x 4-inch. Center and lift it onto the embossed card base with leftover scraps of 3D Foam Creative Sheets.


Finally, I added my Snowman Mixed Media ATC on top of the layered card base. If the recipient wanted to take out the ATC, it won't be a problem because I used Adhesive Dots Large Repositionable! You can take it off and on many times without damage to your ATC. Clever, no? LOL!


I hope you enjoyed this card. If you create ATCs, try this idea to frame out your art and give it to someone special!

Would love it if you follow me on the blog or my ILscraps Instagram!

Thanks for stopping by!
MargieH

Skill Level: Intermediate
Creative Time: 40 minutes

Materials Needed:
Stamps and Craft Dies: InkyStamper (Snowman Stamp and Die Set)
Black Ink: Tonic Studio (Nuvo Hybrid Ink in Black Shadow)
Adhesives: Scrapbook Adhesives by 3L (E-Z Runner Ultra Strong, 3D Foam Creative Sheet White Small, Adhesive Dots Large Repositionable)
Colors: Faber-Castell (Gelatos: Amethyst, Aquamarine, Tanzanite, Red Cherry, Orange Soda and Ear Grey; Art Grip Aquarelle WaterColor Pencils: 175,176 and 199)
Stencil: Art Anthology (6 x 9 Stencil)
Molding Paste: Golden
Embossing Folder and Machine: Spellbinders Paper Arts
Other: Scoreboard and Tool; Lavendar and White Cardstock; Mixed Media Paper; Acrylic Block

Pin It!


Friday, July 17, 2020

InkyStamper: Trust Your Wings ATC & Announcement!

Hello! I am so excited to share the news that I've joined the InkStamper's Design Team for the rest of the year! YAY! Looking forward to sharing some fun stamp sets that my sweet friend, Chelsea Comer, will design.


To commemorate the occasion, I am showing off her Dragonfly Stamp Set in an ATC format. Let's get started!

**I receive products from Scrapbook Adhesives by 3L® for use in my projects. The opinions are completely my own based on my experience and doing so I can share what I personally love to use.**


Trust Your Wings ATC Step Outs

Stamp the dragonfly image with black ink on a piece of white cardstock.


Place its matching die over the image, secure it with washi tape and die-cut.


Next, using a combination of Gelatos in Blueberry and Spearmint, paint the dragonfly's body with a watercolor brush and water.


Then use Gelatos in a combination of Bubble Gum, Metallic Melon, Lemon and Mango, to color the wings with the brush and water. I also used a watercolor pencil to outline and shade the dragonfly.


Designer's Tip: If the color goes over the line, use a white Gelly Roll Pen to cover the spots.


ATC Background

While the dragonfly is drying, let's work on the ATC background. Randomly add the Gelatos in Blueberry, Spearmint, Lemon, and Metallic Blueberry on the ATC. Use a piece of baby wipe to blend the colors until you get your desired look. Set aside.


ATC Details

Stamp the clouds with black ink on a piece of white cardstock.


Using a small pair of scissors, fussy cut the shapes. I used two clouds for this project. With my finger tip, I applied Glitterfic in Clear onto the clouds for some sparkle! Set aside to dry.


I chose the Trust Your Wings sentiment. Stamp it with black ink on white cardstock. Cut it into a strip with a fishtail on one end.


Secure the clouds and sentiment with the E-Z Runner Ultra Strong adhesives. It works well against a painted surface.


Lastly, add the dragonfly with 3D Foam Circles Black in Small Size to lift and adhere onto the ATC.


Another look...


As always, thanks for stopping in!
MargieH

Skill Level: Intermediate
Creative Time: 25 minutes

Materials Needed:
Stamps and Craft Dies: InkyStamper (Dragonfly Stamp and Die Set)

Colors: Faber-Castell (Gelatos in Blueberry, Spearmint, Lemon, Metallic Blueberry, Mango, Bubble Gum, and Metallic Melon & WaterColor Pencil #156)
White Pen: Sakura (Gelly Pen in White)
Adhesives: Scrapbook Adhesives by 3L (E-Z Runner Ultra Strong and 3D Foam Circles Black in Small Size)
Ink: Tsukineko (StazOn in Jet Black)
Glitter Paint: Plaid® (FolkArt® Glitterific™ Acrylic Paint in Clear Hologram)

Other: Stamp Positioner; Scissors; Acrylic Block; White Cardstock; White Acrylic Paint; Burlap Ribbon and Twine; Scissors; Watercolor Brush; Water Mister; Small Manual Die-Cutting Machine


Save It on Pinterest!


Friday, June 26, 2020

Sunset Fairy ATC Tutorial

Are you familiar with an Artist Trading Card (ATC)? It is a small original piece of artwork created on a standard trading card size (2.5 x 3.5-inch) with the intention of swapping or trading it with another person/artist.

Every Monday at 8 pm Central, my talented mixed media friend, Rita Barakat, hosts a FaceBook Live called Mixed Media Monday. This week she inspired me with her ATC creations so I made one with some of her products.

**I receive products from Rita Barakat Designs, Scrapbook Adhesives by 3L®, and Mudd Puddle for use in my projects. The opinions are completely my own based on my experience and doing so I can share what I personally love to use.**


Sunset Fairy ATC Background

I had this not so pretty pink shipping tag so I cut it down to 2.5 x 3.5-inches to create an ATC shape.


I painted three coats of white acrylic paint (let dry between coats) on the front and the back.


Then I used three Gelatos colors (Tangerine, Melon, and Bubble Gum) and later a fourth color (Limoncello) to create a pink-ish sunset background. I used wipes to blend the colors. Set aside to dry.


Embellishment and Texture

Grab the smallest star from the Canvas Die Cuts Mini Stars Set and color with Limoncello Gelatos. For sparkle, I used the FolkArt® Glitterific™ Acrylic Paint in Clear Hologram with a palette knife.


For the textured ground, I applied a strip of Extreme Double-Sided Tape 1/2-inch on the bottom edge. Then covered with Bermuda Dry Sand...perfect for the sunset background! Make sure to press the sand with your fingertips to secure before tapping off the excess.


Finishing the ATC

The pink fairy shape from the Veil of the Fairies Paper Ephemera Pack was used. I lifted her up with a combination of 3D Foam Squares White Regular and 3D Foam Squares White Small.


The colored smallest star from the Canvas Die Cuts Mini Stars Set was placed on the ATC with an Adhesive Dots Medium.


I hope you enjoyed the ATC process. Have you made one before? Show me by linking in the comments on this post!

Thanks for stopping by!
MargieH

Materials Needed:
Rita Barakat Designs
Veil of the Fairies Paper Ephemera Pack
Canvas Die Cuts Mini Stars Set

Scrapbook Adhesives by 3L®
Extreme Double-Sided Tape 1/2-inch
3D Foam Squares White Regular
3D Foam Squares White Small
Adhesive Dots Medium

Mudd Puddles
Bermuda Dry Sand

Other
Color Medium: Faber-Castell (Gelatos in Limoncello, Tangerine, Melon and Bubble Gum); Paints: Plaid® (FolkArt® Glitterific™ Acrylic Paint in Clear Hologram and Apple Barrel® Acrylic Color in White); Pink Shipping Tag; Paint Brush; Wipes


Save It to Pinterest!


Sunday, December 31, 2017

Seasons Givings Holiday Blog Hop 2018 - Year 6: Margie's 2017 FAVORITES

HAPPY NEW YEAR~!!
明けましておめでとうございます~!
This blog hop post is now CLOSED...
THANK YOU so much for visiting and leaving comment.

It's Year 6 of this amazing Seasons Givings Blog Hop 2018!! I am so thrilled and honored to be a part and BIG THANKS to YOU for following the creative journey on my blog! A HUGE THANK YOU to Latisha Yoast for hosting this FABULOUS event!!


I am sharing my favorite projects during 2017 (one from each season), I have linked the tutorials (Pin them on Pinterest & recreate them later). I will be sharing more tutorials in the new year so I hope you follow me :) Here we go! P.S. Giveaway Details will be at the end.

Winter 2017 - Uchi's Design: Hello Friend Animation Card Tutorial


Spring 2017 - Happy Birthday Card with Adhesive Dots Flower Centers


Summer 2017 - DAD ATC Card with Adhesive Sheets
For a tutorial, click DAD ATC Card with Adhesive Sheets


Fall 2017 - Dimensional Pumpkin Bags Tutorial
For a tutorial, click Dimensional Pumpkin Bags Tutorial


Giveaway Details!

As a way to thank you all for always visiting my blog, I have TWO fun assortments to give away (some are gently used and some are new).

To enter:
  • Follow my Blog OR
  • Follow my Instagram Account, CLICK: ILscraps
  • Comment on this blog post which art or prize you like and how you are following my blog OR your Instagram handle name (to verify).
Contest ends on Sun, 1/7/18 at 11:59pm CST. Winner will be announced on Tue, 1/9/18. International entries are welcome!

Prize Pack 1


Prize Pack 2


Your next stop is: Laurel Beard

Visit Season’s Givings Blog Hop Participants:

Margie Higuchi (YOU ARE HERE!)

Sunday, June 18, 2017

Scrapbook Adhesives by 3L: DAD ATC Card with Adhesive Sheets

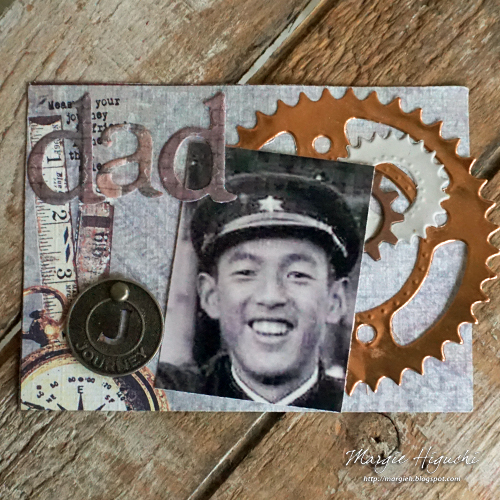
Today on Father's Day, I am up on Scrapbook Adhesives by 3L® Blog. Although my dad is not with me, I am always happy to CELEBRATE HIM :) A card wouldn't do so I decided on an ATC (Artist Trading Card) using mostly Adhesive Sheets to put it all together.

**I receive products from Scrapbook Adhesives by 3L® and Spellbinders® Paper Arts for use in my projects. The opinions are completely my own based on my experience and doing so I can share what I personally love to use :) **

DAD ATC by Margie Higuchi for Scrapbook Adhesives by 3L

Instructions:
  1. Cut patterned paper into a custom ATC size (4.0 x 2.875 inches). Normally they are 3.5 x 2.5 inch - I like to be different ;)
  2. Apply Adhesive Sheets 4 x 6" on the back of patterned paper and copper + white foil paper. See video at the end of instruction on the how to.
  3. Die-cut patterned paper with alpha dies to spell out "DAD."
  4. Die-cut copper and white foil paper with gears steel rule die.
  5. Adhere to the ATC as shown in photo. Excess can either be cut or dust talcum powder to alleviate the stickiness.
  6. Add metal gear piece with Dodz Adhesive Dots 3D (the exposed area will be covered by a photo).
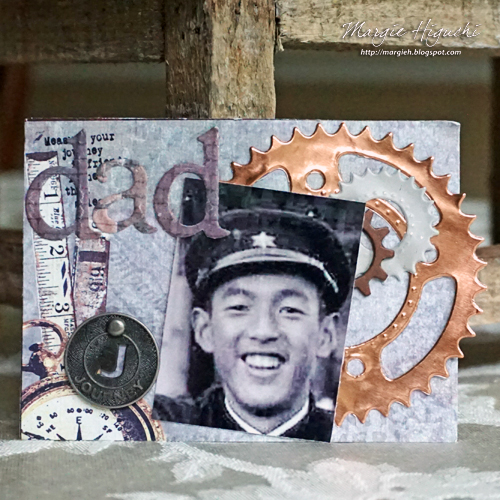
  7. Color copy a photo and cut to 1.625 x 2.125 inches. Adhere with E-Z Runner® Grand Dispenser. The vintage photo is of my dad as a Japanese high schooler :)
  8. Punch a hole with a paper piercer in the ATC and add metal embellishment with matching brad.


DAD ATC 2 by Margie Higuchi for Scrapbook Adhesives by 3L

Scrapbook Adhesives by 3L® Supplies:
Adhesive Sheets 4 x 6"
E-Z Runner® Grand Dispenser
Dodz Adhesive Dots 3D
Other:
Etched Dies and Tool: Spellbinders® Paper Arts (Sprightly Sprockets Set, Font One - Lowercase Set and Tool 'n One™); Patterned Papers; Foil Papers; Metal Embellishments; Brad; Talcum Powder; Photo