Thursday, October 22, 2020

Kawaii Paper Goods: Celebrate Tea & Treat Holder

This Celebrate Tea & Treat Holder is part of the Kawaii Paper Goods Subscription Box Volume 2 Challenge!


What is Kawaii Paper Goods? They are a NEW paper company from Japan and have the most kawaii (cute/adorable in Jpn) designs. The paper is about 80+ lbs and of good quality. They have retailers in the U.S. carrying their collections like my favorite online store, The Button Farm, where I purchased mine.

The subscription box is a quarterly kit full of exclusive papers and embellishments that will not be sold outside the kit. The challenge is open to those who purchased the kit and is worldwide. The winner receives a $30 Kawaii Paper Goods gift certificate and highlighted on their social media.

There five-category challenges (deadline: 10/29) and this is my DIY entry. Are you interested? Click Kawaii Paper Goods Subscription Bx Vol 2 Challenge (Public FB Post)!

**I receive products from Scrapbook Adhesives by 3L® for use in my projects. The opinions are completely my own based on my experience and doing so I can share what I personally love to use.**

Tea & Treat Holder Base

Start with a 3 x 10-inch patterned paper piece. On the long side (10-inch side), score at 4.25-inch and 5.75-inch. Set aside.


Cut a 4 x 6-inch piece of patterned paper. On the long side (6-inch), score every half-inch. Turn the paper on the short side (4-inches) and cut in half to create two 2 x 6-inch strips. These are the side walls of the holder.


Apply Extreme Double-Sided Tape 1/4-inch to the first inside scored panel, skip a panel, and apply to the third panel. Repeat this on every other panel to the end. See the right side piece. I did the same on the left and turned it around. So that they are the opposite.


Next cut seven 3 x 2-inch cardstock dividers. Adhere one divider from the two ends. You will see how the divider was adhered in the second image.


Repeat with all six dividers. For the seventh divider, apply the Extreme Double-Sided Tape 1/4-inch on the outside flap on the ends. Then adhere accordingly. Set aside.


Making the Rosette

The fun part is to decorate the front. I thought a rosette would be a perfect accent. So I used the Origami paper pack and cut into three strips of 1.5 x 6-inches.


Then I scored each on the long side (6-inches) at every 1/4-inch. The accordion-fold starting with a mountain-fold.


I connect the three strips with Premium Double-Sided Tape 1/8-inch and made a circle. Lastly, I adhered the ends together and secured the rosette with an Adhesive Dots 3D on the back to a piece of scrap paper as its base.


I grabbed a coffee ephemera piece from the Ephemera Pack and centered it on top of the rosette with an Adhesive Dot 3D.


The Details

Going back to the holder base, I punched a decorative corner rounder to each corner, front and back. Also, on the top middle, I punched a hole to thread a ribbon to close the holder.


Using the clear stamp in the Subscription Kit, I stamped Celebrate on a 3.5 x 1-inch strip of patterned paper.


Add the sentiment to the bottom of the ephemera using an Adhesive Line.


With my E-Z Runner Grand and Ultra Strong Refill, I secured the Rosette to the front of the holder and adhered the divider section on the inside of my holder.


Add small flowers to the front with Adhesive Dots Medium and Light Pink Bubble gems in the centers.


Inside add tea bags and a couple of thin chocolate treats. Tie the ribbon into the bow on top and it's ready to give!


I hope you enjoyed this project. Give it a try! If you haven't already, please follow me on the blog or my ILscraps Instagram

Thank you so much for stopping by!
MargieH

Creative Time: 35 minutes
Skill Level: Intermediate

Materials Needed:
Kawaii Paper Goods
Subscription Box Volume 2 (Time to Celebrate 03 patterned paper, Origami Paper, Clear Stamp Set and Ephemera Die Cuts)
Sparkling Bubble Rhinestones in Light Pink

Scrapbook Adhesives by 3L®
E-Z Runner® Grand Refillable Dispenser
E-Z Runner® Grand Ultra Strong Refill
Adhesive Dots Medium
Adhesive Dots 3D
Adhesive Lines

HomeHobby by 3L
Extreme Double-Sided Tape 1/8-inch
Premium Double-Sided Tape 1/4-inch

Other
White Cardstock; Small Paper Flowers; Black Ink; Acrylic Stamping Block; Purple Ribbon; Scoring Tools; Decorative Corner Rounder

Save It to Pinterest!


Saturday, October 03, 2020

InkyStamper: OWL You Do Shaker Panel Card

One of my favorite interactive cards is the shaker card. There are many ways to create one but I love how Chelsea of InkyStamper made with the entire card panel - WoW! So I decided to make one and LOVE how it looks! Give it a try.

**I receive products from InkyStamper, PhotoPlay Paper, and Scrapbook Adhesives by 3L® for use in my projects. The opinions are completely my own based on my experience and doing so I can share what I personally love to use.**


Shaker Panel Card Steps

Score 1/4-inch each side of a piece of Clear Card Panel and miter all four corners to a snug fit around a 3 3/4 x 5-inch patterned paper card panel. Apply Extreme Double-Sided Tape 1/4-inch (red line tape) on all sides of the patterned paper panel (the backside).

Take off three sides of the red line tape and place it on top of the Clear Card Panel. The clear tabs should hug into the tape on the patterned paper panel. This should create a pocket with the top open to fill sequins.


Fill with sequins but before closing the shake panel, I die-cut about six leaves from the Owl Stamp and Die Set with the same cardstock used for the card base. Take off the liner and close the panel.


Card Layers

Create a top-fold card base and adhere a piece of 4 x 5 1/4-inch patterned paper card panel with E-Z Runner Ultra Strong adhesive. Then add the shaker panel on top using the red line tape for a strong hold.


Card Details

Stamp the sentiment, the owl, and the leaf images from the Owl Stamp and Die Set with black ink. Die-cut the owl and the leaf with its coordinating die. Note I changed the owl to Kraft cardstock and added another Kraft color leaf to the card.


On the upper right corner, add the two leaves. Adhere one flat and the other lift with a 3D Foam Strip.


If you haven't already, please follow me on the blog or my ILscraps Instagram!

As always, thanks for stopping in!
MargieH

Skill Level: Intermediate
Creative Time: 35 minutes

Materials Needed:
Stamps, Craft Dies and Acetate: InkyStamper (Owl Stamp and Die Set, and Clear Card Panel)
Patterned Papers: PhotoPlay Paper (Gnome for the Holiday Thanksgiving Collection)
Sequins: Buttons Galore (28 Lilac Lane in Neutral)
Adhesives: Scrapbook Adhesives by 3L (E-Z Runner Ultra Strong, Extreme Double-Sided Tape 1/4in., and 3D Foam Strips)
Other: Stamp Positioner; Scissors; Orange and Kraft Cardstock; Manual Die-Cutting Machine


Pin It!


Saturday, September 26, 2020

Amazing Paper Grace: Glimmer Snow Wreath Card


Hello! Are you getting ready to create some holiday cards? I made this beauty with Spellbinders' Filigree Glimmer Wreaths Glimmer Hot Foil Plates from the Amazing Paper Grace by Becca Feeken. I love how it turned out! Let me show you how I created this.

**I receive products from Amazing Paper Grace by Becca Feeken, Spellbinders® Paper Arts, and Scrapbook Adhesives by 3L® for use in my projects. The opinions are completely my own based on my experience and doing so I can share what I personally love to use.**

Glimmer Snow Wreath Card Panels

The card base was die-cut with two Large Square from the S4-1047 Richelieu Square Etched Dies from Becca's Flourished Fretwork Collection. Die-cut one in white cardstock and the other with silver mirror cardstock.

Score 0.25-inch from the top on the white cardstock square and applied adhesive in the scored area to make a hinge. Place the silver mirror square on top to create one square-shaped card base.

Apply Adhesive Sheet on the back of a piece of white cardstock and die-cut with the following nested together and secured with washi tape: Large Square, Large Square Edge Inlay, and Small Square Inlay. Peel off the backing and adhere on top of the card base.


Foil the Octagon Filigree Wreath Glimmer Hot Foil Plate from the Filigree Glimmer Wreaths Hot Foil Plate Set in the Christmas Cascade Collection onto a piece of purple cardstock. Then place a Standard Circle LG Die #5 (#1 die being the smallest) to cut the wreath and in the center, place the Circle Inlay die from the Richelieu Square. Die-cut to create a stunning centerpiece. Adhere to the card front.


Next, foil the small snowflake from the Filigree Glimmer Wreaths on the same purple cardstock, and die-cut it with Standard Circle SM Die #2. Lift and adhere with 3D Foam Circle. Add pearls and done!

Thanks for stopping in!
MargieH

Skill Level: Intermediate 
Creative Time: 30 minutes

Materials Needed:
Thin Metal Dies and Hot Foil Plates: Amazing Paper Grace by Becca Feeken for Spellbinders Paper Arts (Filigree Glimmer Wreaths Glimmer Hot Foil Plates, and S4-1047 Richelieu Square Etched Dies) and Spellbinders Paper Arts (S4-114 Standard Circles LG and S4-116 Standard Circles SM)
Adhesives and Foils: Scrapbook Adhesives by 3L® (Metallic Transfer Foil Sheets in Holographic, E-Z Runner Grand Dots Permanent, Adhesive Sheets 6 x 12-inch, and 3D Foam Circles White Mix); White, Silver Mirror and Purple Cardstock; Self-Adhesives Pearls

Pin It!


Thursday, September 24, 2020

InkyStamper: Creepin' It Real Treat Box and Friend

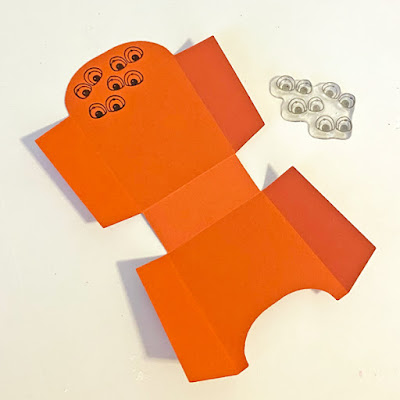
Halloween is next month and I wanted to feature this Spider Stamp and Die set from InkStamper to mark the occasion! Using sparkle and googly eyes, I think the treat box and dimensional spider turned out super cute. What do you think? 
**I receive products from InkyStamper and Scrapbook Adhesives by 3L® for use in my projects. The opinions are completely my own based on my experience and doing so I can share what I personally love to use.**


Treat Box Steps 

First stamp on piece of orange cardstock. I used the treat box die as a guide to determine placement of the web. Then die-cut the box in your manual die-cutting machine.

Creepin' It Real Treat Box Step 1

Creepin' It Real Treat Box by Margie Higuchi Step 2
On the inside back area, I stamped eyes stamp with black ink. To give them sparkle and a little interest, I applied glitter glue to the eyeballs. Set aside to dry.
Creepin' It Real Treat Box by Margie Higuchi Step 3

Creepin' It Real Treat Box by Margie Higuchi Step 4
On vellum, I stamped the Creepin' It Real sentiment in black ink and cut into a strip with a ribbon tail on one end. Adhere with E-Z Runner Permanent Fine (perfect for vellum) on the box front.
Creepin' It Real Treat Box by Margie Higuchi Step 5

Creepin' It Real Treat Box by Margie Higuchi Step 6
Assemble the treat box with E-Z Runner Grand Ultra Strong. Done!
Creepin' It Real Treat Box by Margie Higuchi Step 7

Here Comes the Spider

Stamp one spider image with VersaMark Ink. Cover with white embossing powder, tap off the excess, and melt with a heating tool. Die-cut with its coordinating die. Then die-cut another one in black cardstock.


Score the black spider about 0.25-inches from the top. Add adhesive in the scored area and line up the embossed spider in the front to make one shape. Press the adhesive to secure. Now you have a dimensional spider that stands!


Put them together and you have an ensemble!


Add a little treat and you're done!


As always, thanks for stopping in!
MargieH

Skill Level: Beginner
Creative Time: 35 minutes

Materials Needed: 
Stamps and Craft Dies: InkyStamper (Spider Stamp and Die Set, and Small Fry Box Die)
Adhesives: Scrapbook Adhesives by 3L (E-Z Runner Ultra Strong, E-Z Runner Permanent Fine)
Ink: Tonic Studio (Nuvo Hybrid in Black Shadow) and Tsukineko (VersaMark)
Embossing Powder: Stampendous (Detail White)
Glitter Glue: Ranger Ink (Stickles in Black Diamond)
Other: Stamp Positioner; Scissors; Orange and Black Cardstock; White Vellum Paper; Manual Die-Cutting Machine; Googly Eyes


Save It on Pinterest!


Saturday, September 19, 2020

InkyStamper: Find My Happy Place Card

Out of all the Ralph and Rosie series stamps, Paper Airplane Stamp and Die set speaks to me the most. Before the pandemic, I traveled a lot. So this set would be perfect to document my travels and make cards for other traveling friends. Don't you love this card?

**I receive products from InkyStamper and Scrapbook Adhesives by 3L® for use in my projects. The opinions are completely my own based on my experience and doing so I can share what I personally love to use.**

Happy Place Card Panels

Cut the map paper to 3.75 x 5-inches, and 4 x 5.25-inches for the light khaki cardstock. Ink both papers' edges with blue ink to tie into the map colors.


Next, adhere the panels together. The map paper was adhered with E-Z Runner Grand Ultra Strong to the khaki cardstock. Then the layered panel was lifted and secured to the Kraft A2 (4.25 x 5.5-inches) Size card base with Crafty Foam Tape.


Stamping Ralph

Stamp Ralph on his paper airplane onto white cardstock. I like to stamp two or three of the image and keep the extras in the packaging for future use. I also stamped two small paper airplanes with blue ink. Cut both with their coordinating die.


On Kraft cardstock, I stamped and die-cut Ralph on his paper airplane. Then I hand cut Ralph out of the image and adhered the kraft airplane to the white die cut. Color Ralph with watercolor pencils.


For the sentiment, I wanted to use both blue and black ink so I stamped in blue first. Then I purposely double stamp with the black ink. Again, I wanted to tie in the blue from the map pattern. I bookend the paper airplane die cuts on each side.


I hope you enjoyed my Find My Happy Place Card tutorial! Thanks for stopping by!
MargieH

Skill Level: Beginner
Time: 35 minutes

Materials Needed:
Stamps: InkyStamper (Paper Airplane Stamp and Die Set)
Map Paper: Hazel and Ruby (ret.)
WaterColors: Faber-Castell
Adhesives: Scrapbook Adhesives by 3L (E-Z Runner Grand Ultra Strong, E-Z Runner Petite Permanent Dots, and Crafty Foam Tape)
Ink: Tonic Studio (Nuvo Hybrid in Black Shadow) and Ranger Ink (Distress Oxide Ink in Speckled Egg)
Other: White, Kraft, and Khaki Cardstock; Bone Folder; Paper Trimmer


Save to Pinterest!