Sunday, September 24, 2017

Fun Stampers Journey: Fluttering Hearts Happy Anniversary Vellum Card

I'm back with another project, Fluttering Hearts Happy Anniversary Vellum Card, for Fun Stampers Journey! It was great fun using their Journey Media line featuring their exclusive Fluttering Hearts Gel Impressions Plate, among other products. Stick with me till the end for some fun news!


For those of you who are not familiar with Fun Stampers Journey (FSJ), they're a fun-loving direct sales company based out of Arizona (USA) under the leadership of husband/wife duo, Richard and Gabby Garay. FSJ has an amazing variety of products from paper crafts to planners to mixed media to jewelry!

My project materials are exclusive to FSJ and can be ordered through their Journey coaches. Don't have one? Click: Find a Fun Stampers Journey Coach.

**I receive products from Fun Stampers Journey for use in my projects. The opinions are completely my own based on my experience and doing so I can share what I personally love to use :) **


For this project, I used leftovers from my Fluttering Hearts Happy Anniversary Scrapbook Page that I created using FSJ products.

CREATE BACKGROUND

Let's start with my background. In my previous project, the Fluttering Hearts Gel Impressions Plate had Bubble Gum Acrylic Paint leftover (after I pulled a print). So I took another sheet of Whip Cream Cardstock, placed it over the impressions plate and gentle burnished with the palm of my hand. Then pull the cardstock off to get a ghost print.


Leaving the impressions plate with leftover paint, I applied Sweet Berry Acrylic Paint over the Fluttering Hearts Gel Impressions Plate with the TO-0087 Brayer to cover the surface.


Place the ghost print cardstock over the painted Fluttering Hearts Gel Impressions Plate and gently burnish the back of the cardstock. Pull the cardstock away for a second printed layer. There were still leftover paint so I lightly misted the impressions plate with water. With the same cardstock, I pulled another print off.


The end result of creating my desired background. Now I can clean my Fluttering Hearts Gel Impressions Plate. It was bothering me - LOL!


Assemble Card

Trim both the printed cardstock and vellum paper to 4 1/8 x 5 3/8". Stamp "Happy Anniversary" sentiment from the Peony Blooms Stamp Set on the bottom of vellum paper.


From the previous project, I took one of the large bloom die cuts to use as an embellishment for my card front. It was stamped from the Peony Blooms Stamp Set and die-cut with the Peony Blooms Die Set.


After adhering the vellum to the printed cardstock, adhere the layers to an A2-sized card base created from the Whip Cream Cardstock. Center the large Peony Bloom die cut on top of the card front with 3D Foam Squares to finish.


Here's another look at the finished card...


It goes with the 8 x 8" scrapbook page Fluttering Hearts Happy Anniversary Scrapbook Page as an ensemble.


FUN NEWS

Fun Stampers Journey's Promotion of the Month is 20% off select Journey Media items! Dare to try new products and play with different combinations (available between September 1 - 30, 2017). For more details, CLICK: September 2017 Promotion of the Month.


I hope you give these fun Journey Media products a try! As always, thank you for stopping by!
MargieH

Fun Stampers Journey Supplies List:
JM-0108 Fluttering Hearts Gel Impressions Plate
JM-0025 Sweet Berry Acrylic Paint
JM-0104 Bubble Gum Acrylic Paint
CSC-0040 Whip Cream 8.5 x 11 Cardstock
TO-0087 Brayer
SS-0464 Peony Blooms Stamp Set
DI-0330 Peony Blooms Die Set

Thursday, September 14, 2017

Fun Stampers Journey: Journey Media to Make Happy Anniversary Scrapbook Page

Hello! I am THRILLED to be guest designing for Fun Stampers Journey today! I will be using their Journey Media line featuring their Journey Gel Press 8.5 x 11" (this size is exclusive only to FSJ) and another exclusive, Fluttering Hearts Gel Impressions Plate, among other products. Stay with me till the end because I have some great news!


What is Fun Stampers Journey (FSJ)? They are a fun-loving direct sales company based out of Arizona (USA) under the leadership of husband/wife team, Richard and Gabby Garay. FSJ has an amazing variety of products from paper crafts to planners to mixed media to jewelry! WOW!

My project materials are exclusive to FSJ and can be ordered through their Journey coaches. Don't have one? Click: Find a Fun Stampers Journey Coach.

**I receive products from Fun Stampers Journey for use in my projects. The opinions are completely my own based on my experience and doing so I can share what I personally love to use :) **

Journey Media to Make Happy Anniversary Scrapbook Page by Margie Higuchi

LAYER 1

Let's start with my background. On the Journey Gel Press 8.5 x 11" plate, apply dots of Candy Apple (top), Citrus Cooler (middle) and Sweet Berry (bottom). Spread each color across with the TO-0087 Brayer. NOTE: I roll off the excess paint on to a sheet of Whip Cream Cardstock and roll the next color. Keep that cardstock - you never know what you'll use it for (think a background design for other projects).


Place a sheet of Whip Cream Cardstock over the painted Journey Gel Press plate and gently burnish the back with the palm of your hand. Pull the sheet off to make your first print.


LAYER 2

Next apply Bubble Gum Acrylic Paint on to the Journey Gel Press plate and roll to cover the entire surface. Don't forget to roll excess paint off the brayer on a piece of cardstock. Then use the Fluttering Hearts Gel Impressions Plate to press into the gel press plate like a stamp.


The heart impressions had some air bubbles which I like so I kept it as is. For the left over paint on the Fluttering Hearts Gel Impressions Plate, I pressed a sheet of Whip Cream Cardstock for a ghost impression. Plus I misted with water and pulled with the same cardstock to get another ghost impression. Hint: I will be using this for another upcoming project :)


I pulled a print using the trio colored cardstock from Layer 1. LOVED how it turned out! You can still see Layer 1 through the heart designs.


EMBELLISH PAGE

Using this as a background, I cut it to 8 x 7" to fit my 8 x 8" scrapbook page and adhered it down. I stamped "Happy Anniversary" sentiment from the Peony Blooms Stamp Set on a 8 x 1" vellum strip.


With Creative Photo Corners - Silver, I adhered my photo. Love this picture of us taken on our trip to Cape Cod for an early 25th anniversary trip.


Remember about saving your excess painted cardstock? I am using this one from another project that has a combination of Sweet Berry Acrylic Paint and Bubble Gum Acrylic Paint on it. Stamped Peony blooms from the Peony Blooms Stamp Set and die-cut with the DI-0330 Peony Blooms Die Set to create my embellishments for my page.


Hmm...someone always says "when in doubt, pop it out!" (COUGHrgCOUGH) so that's what I did! LOL!! Stacked two on one of the small bloom die cuts and one layer on the other small bloom. Adhere the big bloom die cut on the page and layer the others...see my close up on how I placed mine.


Since it's our 25th anniversary (in November), I wanted to add touches of silver so I pulled out the Fashion Silver Metallic Dots and added three mid-size dots to the top corner and bottom corner.


There you have it...ready to frame and display!


GOOD NEWS

Fun Stampers Journey's Promotion of the Month is 20% off select Journey Media items! Dare to try new products and play with different combinations (available between September 1 - 30, 2017). For more details, CLICK: September 2017 Promotion of the Month.


Come back as I share another gel press printing project soon! As always, thank you for stopping by!
MargieH

Fun Stampers Journey Supplies List:
Journey Gel Press 8.5 x 11"
JM-0108 Fluttering Hearts Gel Impressions Plate
JM-0100 Candy Apple Acrylic Paint
JM-0099 Citrus Cooler Acrylic Paint
JM-0025 Sweet Berry Acrylic Paint
JM-0104 Bubble Gum Acrylic Paint
CSC-0040 Whip Cream 8.5 x 11 Cardstock
TO-0087 Brayer
SS-0464 Peony Blooms Stamp Set
DI-0330 Peony Blooms Die Set
AC-0293 Fashion Silver Metallic Dots

Tuesday, August 15, 2017

A Little Book Review: Just Look Up by Courtney Walsh

Off topic of my creative journey but are you looking for a good book to read? I'd like to suggest Just Look Up by Courtney Walsh. I look forward to reading her stories and hope she never stops! No pressure, Courtney! LOL! I've read all SIX of them and each time the story gets better and better :)

**I receive a complimentary advanced reader copy from Tyndale Publishing. The opinions are completely my own**

A little review I wrote on Goodreads.com...

Just Look UpJust Look Up by Courtney Walsh

My rating: 5 of 5 stars


Thought CHANGE OF HEART (Courtney Walsh's last novel) couldn't be beat but JUST LOOK UP was even better! Could not put the book down - read it in one day.

Tug at the heart strings a bit because I can relate to the main character's childhood. Made me laugh and shed a little tear too. This story makes you think about job demands, family, love and how to balance it all. Loved that the locations are near me - Chicago and (small town) Michigan.

Well written and if you enjoy this book, you will love her other books as well.

Thanks for letting me make a suggestion :)

Pssst, she's coming out with another book - HOMETOWN GIRL which is now up for pre-order on Amazon. #CANNOTwait

Have a great rest of the week,
MargieH


Sunday, August 13, 2017

Scrapbook Adhesives by 3L: Sweet 16 Treat Box Banner Tutorial using E-Z Runner Grand Ultra Strong

Today I'm on Scrapbook Adhesives by 3L® Blog and am excited to share my literally "outside the box" project using Spellbinders® Paper Arts Surprise Me Box Etched Dies from the Special Occasions Collection by Marisa Job. It's a Sweet 16 banner with a Bohemian vibe - what do you think?

**I receive products from Scrapbook Adhesives by 3L® and Spellbinders® Paper Arts for use in my projects. The opinions are completely my own based on my experience and doing so I can share what I personally love to use :) **


Let me show you how to create this dimensional banner!


First I need to change out my E-Z Runner® Grand Permanent with my E-Z Runner® Grand Ultra Strong Refill. I use this type of adhesive when I am doing paper construction projects like these boxes.


These Grand Refills are so easy to change out - just drop it in. See the quick How to Use and Refill the E-Z Runner® Grand Dispenser video below...


Next I cut the Surprise Me Box Etched Dies Base Die for a total of six with patterned papers. Assemble each box with E-Z Runner® Grand Ultra Strong by applying adhesive on the tabs and put the ends together.


For the letters, I took off the top liner of 3D Foam Creative Sheets (determine how much you want to use and trim first) and placed patterned paper over it. Cut the desired letter with Spellbinders® Platinum™ 6 Die Cutting and Embossing Machine. Repeat the process until you spell out SWEET.


For a visual, see How to Use 3D Foam Creative Sheets video below...


For 16, repeat above step but without adding patterned paper. Once cut, you will add glitter to the front side by removing top liner and then pressing glitter over the exposed area. Tap off excess and set aside.


Cut Surprise Me Box Etched Dies Tag Die for a total of 12 with white cardstock. Apply a line of E-Z Runner® Grand Ultra Strong in the middle of two tags per box and center them together on top to form one shape. Remove the bottom liner of a letter and place on top of the two tags. Repeat for all letters and "16."


Close each end of box with an Adhesive Dots Large. Place one in the inside and squeeze all four sides to adhere (sometimes I used two Adhesive Dots if one didn't work).


Thread jute through the top of each box and it's ready to displayed!


Go visit Special Occasions Collection by Marisa Job over at Spellbinders® Paper Arts.

Thanks for stopping by!
MargieH

Scrapbook Adhesives by 3L® Supplies:
E-Z Runner® Grand Permanent
E-Z Runner® Grand Ultra Strong Refill
3D Foam Creative Sheets
Adhesive Dots Large
Spellbinders® Paper Arts:
S6-105 Surprise Me Box Etched Dies from the Special Occasions Collection by Marisa Job
Spellbinders® Platinum™ 6 Die Cutting and Embossing Machine
Others:
Patterned Paper: Graphic45 (Bohemian Bazaar Collection)
Glitter: Stampendous
White Cardstock; Jute


Sunday, June 18, 2017

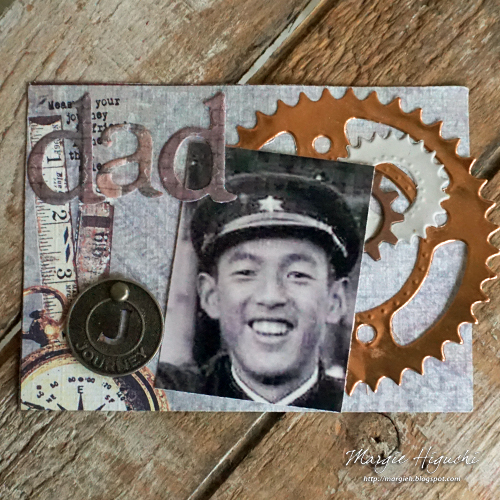
Scrapbook Adhesives by 3L: DAD ATC Card with Adhesive Sheets

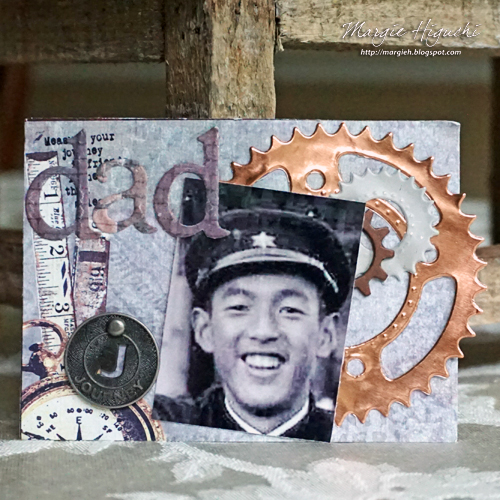
Today on Father's Day, I am up on Scrapbook Adhesives by 3L® Blog. Although my dad is not with me, I am always happy to CELEBRATE HIM :) A card wouldn't do so I decided on an ATC (Artist Trading Card) using mostly Adhesive Sheets to put it all together.

**I receive products from Scrapbook Adhesives by 3L® and Spellbinders® Paper Arts for use in my projects. The opinions are completely my own based on my experience and doing so I can share what I personally love to use :) **

DAD ATC by Margie Higuchi for Scrapbook Adhesives by 3L

Instructions:
  1. Cut patterned paper into a custom ATC size (4.0 x 2.875 inches). Normally they are 3.5 x 2.5 inch - I like to be different ;)
  2. Apply Adhesive Sheets 4 x 6" on the back of patterned paper and copper + white foil paper. See video at the end of instruction on the how to.
  3. Die-cut patterned paper with alpha dies to spell out "DAD."
  4. Die-cut copper and white foil paper with gears steel rule die.
  5. Adhere to the ATC as shown in photo. Excess can either be cut or dust talcum powder to alleviate the stickiness.
  6. Add metal gear piece with Dodz Adhesive Dots 3D (the exposed area will be covered by a photo).
  7. Color copy a photo and cut to 1.625 x 2.125 inches. Adhere with E-Z Runner® Grand Dispenser. The vintage photo is of my dad as a Japanese high schooler :)
  8. Punch a hole with a paper piercer in the ATC and add metal embellishment with matching brad.


DAD ATC 2 by Margie Higuchi for Scrapbook Adhesives by 3L

Scrapbook Adhesives by 3L® Supplies:
Adhesive Sheets 4 x 6"
E-Z Runner® Grand Dispenser
Dodz Adhesive Dots 3D
Other:
Etched Dies and Tool: Spellbinders® Paper Arts (Sprightly Sprockets Set, Font One - Lowercase Set and Tool 'n One™); Patterned Papers; Foil Papers; Metal Embellishments; Brad; Talcum Powder; Photo

Monday, June 12, 2017

Rita Barakat Brand Ambassador!!

So this happened this morning! Didn't realize it was going to be announced today but what a way to bust the Monday Blues!! SO EXCITED to be a Brand Ambassador for Rita Barakat Designs!


What does that mean? It means I will be spread the good news about anything RITA BARAKAT!! She has products, in person and online classes, and social media events so there's something for everyone. To see her products, CLICK: Products - Rita Barakat.

I've known her for years and trust her integrity, creativity and SO MUCH HARD WORK behind everything she does.

See her blog post on details/introduction of the rest of the team (Design Team + Brand Ambassador Team) by CLICKING: First Ever Design Team!

I hope you all join all her social media platforms so you don't miss all the fun! To get you started, CLICK: LINKS! to Rita Barakat.

Wanted to edit to add a project I did with her first design (First Fairy Stencil from The Crafters Workshop), CLICK for its tutorial: An Elegant Door Knob Hanger Tutorial.


Thanks Rita for the trust you have in me!!
MargieH

Sunday, May 14, 2017

Happy Mother's Day!

Happy Mother's Day to all especially MY MOM!! I know I don't see you everyday and don't call as often as I can...will do better in that department. So while I was at a crop for mom crafters (and some young daughters came to craft with them - how sweet to witness!), I created a card for my mom...

**I receive products from Scrapbook Adhesives by 3L®, Spellbinders® Paper Arts and JustRite PaperCraft for use in my projects. The opinions are completely my own based on my experience and doing so I can share what I personally love to use :) **


This shaped card came together fairly quick by using just one etched die set (Diamond Effect - retired). The pink die cut was kinda of boring so I embossed it with Rose TableCloth Embossing Folder by Tammy Tutterow. Stamped a sentiment from Enjoy the Day Vintage Labels Four Clear Stamp Set by JustRite PaperCraft. Adhered everything with Scrapbook Adhesives by 3L® and added a May Arts Ribbon bow to finish. A sweet card to give as a Mother's Day or a birthday card.


Yesterday I attended the Mom's A Scrapping crop event and surprisingly got a lot done! I usually (maybe) complete ONE PROJECT because I'm talking or eating too much! LOL!! Made a couple of new friends and got to see friends who were first timers at my friend, Kristin's event :) Isn't this front so SPRING?! Love the light box touch, Kristin! LOL!!


View from my table...fellow mom crafters at work. LOVE my Spellbinders® Platinum™ 6 Die Cutting and Embossing Machine!! SO MUCH easier to bring - I used to bring my "work horse" and bigger Platinum™ Machine! LOL!


Since this was a no frill crop, lunch was on your own. I purchased this ADORABLE strawberry lunch box (bento box) from my local Japanese supermarket and BONUS: on sale for $2.50!!! I grabbed it while my husband rolled his eyes until he heard the price - HA! Leftovers from last night's dinner with salmon flakes on top of the rice.


These sweet ladies I've known from other events and was their first time at this one. LOVE unexpected surprises! Great to see them!

Edit to add my Mother's Day Lunch I had with both boys in town at Yu's Restaurant :) VERY PROUD of these two young men...one is almost done and the other is about to transfer into DePaul University in Chicago IL. #GoDemons


Hope you have a FABULOUS DAY!! As always THANK YOU for taking time to visit me on the blog :)
MargieH