Showing posts with label Fall. Show all posts

Wednesday, October 27, 2021

Scrapbook Adhesives by 3L: Fall Slimline Gatefold Card

Hello! I cannot believe it's the end of October and we're into the fall season! WoW! Just for the occasion, I have a Fall Slimline Gatefold Card project up on Scrapbook Adhesives by 3L®'s blog today.


The split is not even cut which is done on purpose. It's cut on the 3.5-inch mark but I love how it turned out. Just a touch of color on the card front with a muted background of the stamp. What do you think?


A couple of sneak peeks here but please visit the Fall Slimline Gatefold Card tutorial over at Scrapbook Adhesives by 3L® Blog for more details and a full supplies list.


See you there!
MargieH

Sunday, October 22, 2017

Scrapbook Adhesives by 3L: Dimensional Pumpkin Bags Tutorial

Created a sweet fall project full of dimension and it's featured on the Scrapbook Adhesives by 3L® Blog today! Fall is in the air and I had PUMPKIN on my mind so I pulled out 3D Foam Creative Sheets and my stash of etched dies from the Market Fresh Collection by Debi Adams to create my dimensional pumpkin bags!

Paper piecing a pumpkin from Apple a Day Etched Dies set with fall plaid papers was SO EASY! Equally easy was assembling sweet paper bags from Bag It n Tag It Etched Dies set. What do you think?

**I receive products from Scrapbook Adhesives by 3L® and Spellbinders® Paper Arts for use in my projects. The opinions are completely my own based on my experience and doing so I can share what I personally love to use :) **


Create these fun + sweet pumpkin bags.

1. Cut two bag shapes from Bag It n Tag It Etched Dies set with my Platinum machine. If you are using patterned papers, make sure both cuts have patterns going the same way. I stacked my two papers together and cut...less confusion! LOL!


2. Next, let's assemble the box. After scoring the folds, I inked the edges with Distress Ink in Walnut Stain and then adhered the tabs together with E-Z Runner® Ultra Refillable Dispenser...great for paper construction :)


Paper piecing a pumpkin.

1. Cover your patterned paper with Adhesive Sheet 4 x 6" and trim excess using your etched die as a guide. Cut with Apple a Day Etched Dies Pumpkin Front Die with my Platinum machine. Set aside.


2. For the pumpkin sides, I wanted dimension so I grabbed a scrap piece of patterned paper and covered with 3D Foam Creative Sheets. Cut with Apple a Day Etched Dies Pumpkin Side Die twice and Apple/Pumpkin Center Die once with my Platinum machine.


3. Ink all of the die cut edges with Distress Ink in Spiced Marmalade. Then peel the bottom liner off and place on top of the Pumpkin Front die cut to make your dimensional pumpkin.


Making pumpkin details.

1. Using the leftover from the Adhesive Sheet 4 x 6", adhere a piece of patterned scrap to cut your Apple a Day Etched Dies Stem Die. From the same set, cut Leaf Die from patterned paper, and ink the edges with Distress Ink in Spruce. Using a covered wire, I created a vine accent by wrapping around a paintbrush handle.


2. Adhere all on bag front in the following order:

  • Peel off the bottom liner of the stem (using the pumpkin front die cut as a guide) and adhere.
  • With a Dodz Adhesive Dots Mini, secure the vine accent down.
  • Peel off the bottom liner of the pumpkin front die cut and center to the bag.
  • Tuck the leaf die cut into the Dodz Adhesive Dots Mini, and then add an adhesive dot to the tip of leaf and press to adhere.


Here's another look at the finished bags...


Do you have a fall themed project? Share link in comments - would love to see + visit!

Thanks for stopping by!
MargieH

Scrapbook Adhesives by 3L® Supplies:
E-Z Runner® Ultra Refillable Dispenser
Adhesive Sheet 4 x 6"
3D Foam Creative Sheets
Dodz Adhesive Dots Mini
Others:
Etched Dies: Spellbinders Paper Arts® (Apple a Day Etched Dies from the Market Fresh Collection by Debi Adams, Bag It n Tag It Etched Dies from the Market Fresh Collection by Debi Adams, and PL-001 Spellbinders® Platinum Die Cutting and Embossing Machine
Patterned Paper: Lawn Fawn (Perfectly Plaid Fall Collection)
Ink: Ranger Inks (Distress Ink)
Covered Wire: Prima Marketing Inc.

Thursday, November 10, 2016

My Treasured Kutz: Guest Blogging with Fall is Here Card

Today I am guest blogging on My Treasured Kutz for a series of three cards. My fall card is being featured :)


For a detailed tutorial on this card, please visit Fall is Here Pinecone Card and if you like what you see, please comment! Would LOVE to hear from you!!

As always, thanks for stopping by!
MargieH


Friday, November 04, 2016

Scrapbook Adhesives by 3L: Creating a Hoot of a Card with Adhesive Sheets!

I am on Scrapbook Adhesives by 3L® Blog today! Been wanting to use this adorable die for a long time! One would shy away from all the little pieces but with Adhesive Sheets 6 x 12" from Scrapbook Adhesives by 3L®, this was SO EASY to create. Let me show you how - best part, no extra tools required to use these adhesive sheets.


All you have to do is apply the Adhesive Sheet to the back of your material. Just remove the liner, place your cardstock, rub to make sure it's secured (trim excess if needed) and cut with your die. It's that simple...


I used three mats as my card panel for my 5.5 x 5.5 inch card base. The bottom mat was adhered to the card base with the E-Z Runner® Grand Refillable Dispenser as well as the dark brown to the smaller mat. The latter mat will be adhered with Crafty Foam Tape White.


Now for the fun part, assembling the owl pieces. Just peel the liner off and place on the card panel. I HAD to use the HUGE googly eyes so I used Dodz Adhesive Dots XL from Donna Salazar with Scrapbook Adhesives by 3L® line. Can you say PERFECT! LOL!


Center the card panel on the card base and it's ready to be given away...if you can, he's so cute!! Solution: make two! LOL!


Supplies:
Scrapbook Adhesives by 3L®:

Adhesive Sheets 6 x 12"
E-Z Runner® Grand Refillable Dispenser
Crafty Foam Tape White
Donna Salazar with Scrapbook Adhesives by 3L®:
Dodz Adhesive Dots XL
Other:
Owl Die: Spellbinders® Paper Arts (Who's There? Contour™ Steel Rule Die); Patterned Paper: Authentique Paper (Nestled Collection); Dark Brown, Kraft and Light Brown Cardstock; Googly Eyes

Thanks for stopping by!
MargieH

Monday, October 03, 2016

Scrapbook Adhesives by 3L: Fall Is Here Card using E-Z Runners and Dodz Adhesive Dots

**As a part of Scrapbook Adhesives by 3L® Design Team, I receive products for use in my projects. The opinions are completely my own based on my experience and doing so I can share what I personally love to use :) **

Today I am on the Scrapbook Adhesives by 3L® Blog :) Fall is here in Chicago and I am excited!! So why not create a card just for the occasion? The newest release (E-Z Runner® Ultra Refillable Dispenser and E-Z Runner® Micro Refillable Dispenser) is perfect to hold my layered card and in assembling my small envelope element.


These are the supplies I used in addition to my Scrapbook Adhesives by 3L® items...click on images for a larger view :)


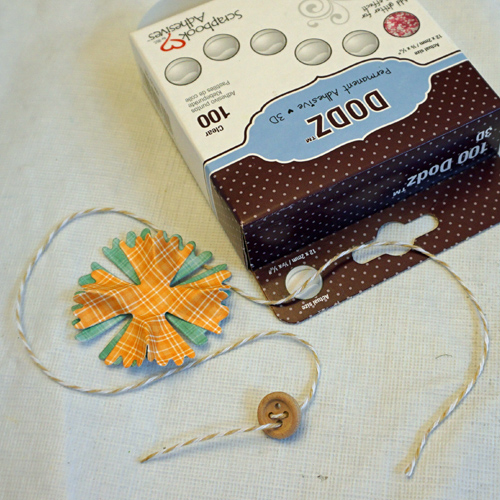
My flower embellishment, I layered two die cuts with Dodz Adhesive Dots 3D in the center. Next I took each petal on top (orange) and pinch to create a mountain. Underneath I placed a 3D dot to support.


To add interest and dimension, I embossed both the card base and my envelope element - turned out cool!


I assembled the envelope with my E-Z Runner® Micro Refillable Dispenser - perfect to apply adhesive on narrow tabs. Later I inked the edges to the envelope.


Going back to the flower, I threaded Girlie Grunge Twine in Natural through the wooden button and placed on the flower center with a Dodz Adhesive Dots 3D. Then placed another 3D dot on the back of the finished flower and adhered to the envelope.

I had a fall leaf eyelet which I had to use! Next I stamped a sentiment on the top half of a rectangle die cut, edge it with ink and placed a Dodz Adhesive Dots Medium on the front and back to secure inside the envelope.


This is how it turned out - LOVE!!


To give a subtle edge/finish to my layers I inked the edges of all (including the card base). Wanted a playful look so I tilted the layers and adhered all with E-Z Runner® Ultra Refillable Dispenser for a strong and secure hold.


For the finishing touch, I added sequins to the card front using Dodz Adhesive Dots Mini which is perfect for small embellishments like these!


Hope you are enjoying the fall season wherever you are Northern Hemisphere!


Thanks for joining me!
Margie Higuchi

Supplies:
Scrapbook Adhesives by 3L®:
E-Z Runner® Ultra Refillable Dispenser
E-Z Runner® Micro Refillable Dispenser
Dodz Adhesive Dots 3D
Dodz Adhesive Dots Medium
Dodz Adhesive Dots Mini
Donna Salazar with Scrapbook Adhesives by 3L®:
Girlie Grunge Twine
Others:
Spellbinders® Creative Arts: A-2 Matting Basics A & B Dies, Notched Mini Envelope Dies, Pinked Posies Dies, Horsehair Embossing Folder
Lawn Fawn: Jump For Joy Stamp Set, Perfectly Plaid Fall Petite Paper Pack and Into the Woods Mixed Sequins (retired)
Maya Road: Wooden Button
Ranger Inks: Distressed Ink by Tim Holtz (Gathered Twigs), Foam Applicator and Round Foam
Darice: White Cardstock
Leaf Eyelet and Eyelet Setter


Thursday, September 29, 2016

Scrapbook Adhesives by 3L and Lawn Fawn Blog Hop - Day 4: Happy Harvest Card

**As a part of Scrapbook Adhesives by 3L® Design Team, I receive products for use in my projects. The opinions are completely my own based on my experience and doing so I can share what I personally love to use :) **

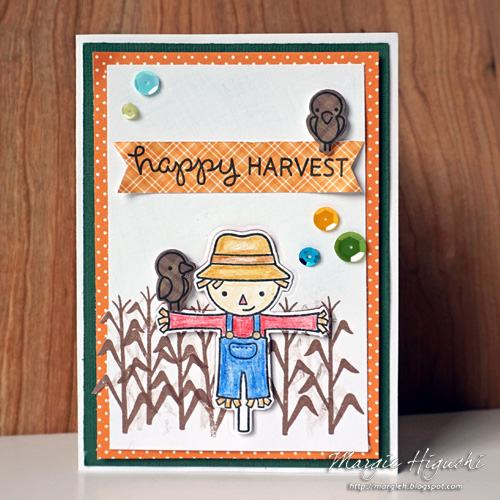
Hey everyone! So excited that fall is here and that Lawn Fawn had Happy Harvest stamp set that fits the occasion. Isn’t the scarecrow cute…and the crows too! LOL! There is a coordinating die set, Happy Harvest Lawn Cuts. AND it isn’t complete without some fabulous fall themed patterned papers, I used both Perfectly Plaid Fall Petite Paper Pack and Lets Polka in the Meadow Petite Paper Pack {{BIG GRIN}}
Happy Harvest Card by Margie Higuchi for Scrapbook Adhesives by 3L w Lawn Fawn Blog Hop SEPT 2016
To assemble the layers of card panels on the white card base, I used E-Z Runner® Ultra Refillable Dispenser (green cardstock and later, white cardstock) and 3D Foam Squares- White, Regular (patterned paper). I stamped the scarecrow and cornstalk onto a white cardstock panel. Colored the scarecrow die cut and applied it (and crow die cuts) with 3D Foam Squares- White, Regular for dimension. Lastly, I used Dodz Adhesive Dots Mini to add sequins to the card.
Supplies:
Scrapbook Adhesives by 3L®:

E-Z Runner® Ultra Refillable Dispenser
3D Foam Squares- White, Regular
Dodz Adhesive Dots Mini
Lawn Fawn:
Happy Harvest
Happy Harvest Lawn Cuts
Into the Woods Mixed Sequins (retired)
Perfectly Plaid Fall Petite Paper Pack
Lets Polka in the Meadow Petite Paper Pack
Others:
Watercolor Pencils (Faber-Castell® Design Memory Crafts®); Inks (Tsukineko Crafts® – Momento Inks); Cardstock (Bazzill Basics Paper and Darice/Core’dinations)

Thanks for taking a look!
MargieH

Wednesday, September 21, 2016

Scrapbook Adhesives by 3L: How to Create a So Thankful Pillow Box with 3D Foam Creative Sheets

**As a part of Scrapbook Adhesives by 3L® Design Team, I receive products for use in my projects. The opinions are completely my own based on my experience and doing so I can share what I personally love to use :) **

One of my favorite products is the 3D Foam Creative Sheets from Scrapbook Adhesives by 3L®! They cover my entire medium to small sized die cuts with dimension. See my sweet fall pillow box with a handmade wreath from Lawn Fawn? SO CUTE!!


I stamped my pile of leaves images in different patterned papers from the Perfectly Plaid Fall Petite Paper Pack. Then trimmed them down to a small size (don't want to waste the 3D Foam Creative Sheets :) ).


Move the liner back and place the stamped image on top. Replace the liner on top and rub to apply adhesive. Trim to your image size with scissors. Die cut the piece and VOILA!


Repeat with the single leaf image to create dimension, using scraps.


To make my leaves wreath, I cut up parts of the pile of leaves images...


Next I hand cut a ring with scissors - to use a guide for my wreath. It can be ugly - LOL!!


I pre-determined the placement before adhering them down. This part is FUN - just pile it on!


I stamped my sentiment on a piece of patterned paper, trimmed to make a double ribbon tail banner and adhered with E-Z Runner® Ultra Refillable Dispenser on top of the wreath.


Now place the wreath on the flattened box. For the finishing touch, add sequins on the wreath with Dodz Adhesive Dots Mini. Tip: Flip the box over and rub baby powder on the exposed adhesive of the 3D Foam Creative Sheets to prevent it from sticking to anything.


Assemble your box and add your favorite treat! Me? Hmm....maybe not candy corn (lol!) but a coffee gift card would be PERFECT! HA!


As always, thank you for stopping by!!
MargieH

Supplies:
Scrapbook Adhesives by 3L®:
3D Foam Creative Sheets
E-Z Runner® Ultra Refillable Dispenser
Dodz Adhesive Dots Mini
Other:
Lawn Fawn (Jump For Joy Stamp Set, Jump For Joy Lawn Cuts, Let's Polka In The Dark Petite Paper Pack and Perfectly Plaid Fall Petite Paper Pack); Sequins; Baby Powder; MISTI Stamping Tool, Memento Ink (Tuxedo Black)

Saturday, September 17, 2016

Scrapbook Adhesives by 3L: Using Adhesives Sheets on Intricate Die Cuts for my Autumn Hello Card

Today I am sharing my autumn themed card and how Scrapbook Adhesives by 3L® Adhesive Sheets 4 x 6" saved me time and frustration on placing my intricate die cuts. Let me show you how!


Recently I have been addicted to mono printing using a gel plate and ink pads (paint are the usual medium but I had to be different! LOL!) to make my own patterned papers. Here's what I did...
  1. Mist the gel plate with water and then pounced Orange Blossom Ink, Potting Soil Ink and Fern Green Ink in desired areas.
  2. Then lightly mist with water over the inked area to give it texture (think water droplets).
  3. Wait a few moments and then place a piece of white cardstock over the plate.
  4. Gently rub across the back of the cardstock evenly for good coverage.
  5. Then pull the paper away and enjoy the results!


I am showing one of the patterns that will be used below...


For the die cuts, I first trimmed my paper to size and applied the Adhesive Sheets 4 x 6" on the back. I took off the thin border liner and used it as my guide to place my paper. Then took off the liner little by little and rubbed it to cover the back the patterned paper. Perfect coverage!


Next I die cut my intricate die designs and "hello" word (repeat the same process with green cardstock in a small size).


Trim the green cardstock and other patterned paper to created a matted card panel to fit an A7-sized card base. I used E-Z Runner® Ultra Refillable Dispenser as my patterned paper was warped. I love that it adheres down flat :)


Figure out the placement of the die cuts and then take off the liner to adhere...I started with "Hello" and worked on the edge.


I used Dual Tip Glue Pen to adhere my cute acorn die cuts and used E-Z Runner® Ultra Refillable Dispenser to center the embellished card panel onto my card base.


Isn't it adorable?! Loved how it turned out and without fighting with the adhesive = EASY!!


Got intricate dies?! Use Adhesive Sheets - they have different sizes. NO STICKY MESS on dies and CUTS LIKE BUTAH! LOL!

Thanks for stopping by!
MargieH

Supplies:
Scrapbook Adhesives by 3L:
Adhesive Sheets 4 x 6"
E-Z Runner® Ultra Refillable Dispenser
Home Hobby
Dual Tip Glue Pen
Others:
Dies: Memory Box: (Acorn Trio & Oak Flourish - Craft Fancy exclusive); JustRite PaperCrafts (Hello Decorative Oval Frame Dies)
Cardstock/Card Base: Darice/Core'dinations
Gel Plate: Gel Press (8 x 10" Gel Plate)
Inks: Ranger Ink (Archival Inks by Wendy Vecchi - Orange Blossom, Potting Soil & Fern Green)