Showing posts with label Darice. Show all posts

Monday, October 03, 2016

Scrapbook Adhesives by 3L: Fall Is Here Card using E-Z Runners and Dodz Adhesive Dots

**As a part of Scrapbook Adhesives by 3L® Design Team, I receive products for use in my projects. The opinions are completely my own based on my experience and doing so I can share what I personally love to use :) **

Today I am on the Scrapbook Adhesives by 3L® Blog :) Fall is here in Chicago and I am excited!! So why not create a card just for the occasion? The newest release (E-Z Runner® Ultra Refillable Dispenser and E-Z Runner® Micro Refillable Dispenser) is perfect to hold my layered card and in assembling my small envelope element.


These are the supplies I used in addition to my Scrapbook Adhesives by 3L® items...click on images for a larger view :)


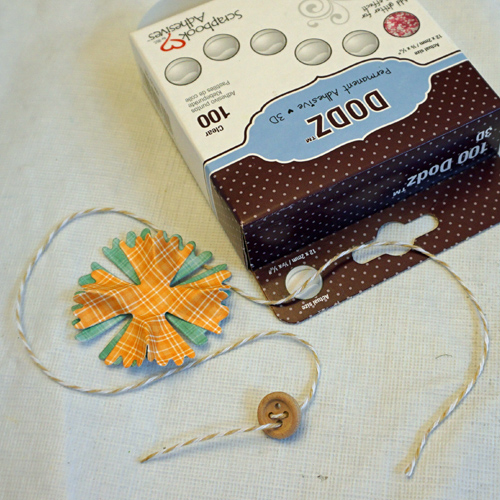
My flower embellishment, I layered two die cuts with Dodz Adhesive Dots 3D in the center. Next I took each petal on top (orange) and pinch to create a mountain. Underneath I placed a 3D dot to support.


To add interest and dimension, I embossed both the card base and my envelope element - turned out cool!


I assembled the envelope with my E-Z Runner® Micro Refillable Dispenser - perfect to apply adhesive on narrow tabs. Later I inked the edges to the envelope.


Going back to the flower, I threaded Girlie Grunge Twine in Natural through the wooden button and placed on the flower center with a Dodz Adhesive Dots 3D. Then placed another 3D dot on the back of the finished flower and adhered to the envelope.

I had a fall leaf eyelet which I had to use! Next I stamped a sentiment on the top half of a rectangle die cut, edge it with ink and placed a Dodz Adhesive Dots Medium on the front and back to secure inside the envelope.


This is how it turned out - LOVE!!


To give a subtle edge/finish to my layers I inked the edges of all (including the card base). Wanted a playful look so I tilted the layers and adhered all with E-Z Runner® Ultra Refillable Dispenser for a strong and secure hold.


For the finishing touch, I added sequins to the card front using Dodz Adhesive Dots Mini which is perfect for small embellishments like these!


Hope you are enjoying the fall season wherever you are Northern Hemisphere!


Thanks for joining me!
Margie Higuchi

Supplies:
Scrapbook Adhesives by 3L®:
E-Z Runner® Ultra Refillable Dispenser
E-Z Runner® Micro Refillable Dispenser
Dodz Adhesive Dots 3D
Dodz Adhesive Dots Medium
Dodz Adhesive Dots Mini
Donna Salazar with Scrapbook Adhesives by 3L®:
Girlie Grunge Twine
Others:
Spellbinders® Creative Arts: A-2 Matting Basics A & B Dies, Notched Mini Envelope Dies, Pinked Posies Dies, Horsehair Embossing Folder
Lawn Fawn: Jump For Joy Stamp Set, Perfectly Plaid Fall Petite Paper Pack and Into the Woods Mixed Sequins (retired)
Maya Road: Wooden Button
Ranger Inks: Distressed Ink by Tim Holtz (Gathered Twigs), Foam Applicator and Round Foam
Darice: White Cardstock
Leaf Eyelet and Eyelet Setter


Wednesday, August 17, 2016

Scrapbook Adhesives by 3L: Many Birthday Blessings Card featuring Adhesive Sheets

I'm on Scrapbook Adhesives by 3L®'s Blog! Sending many birthday blessings through this layered card I created featuring their Adhesives Sheets. Not only can you die cut with these sheets but you can easily carry them to your craft gatherings without the bulk of a machine or tool (LOVE that!!).


First I die cut my pieces with patterned paper (card panel and frame) and cardstock (background accent piece and sentiment).


I applied my background accent piece with Adhesive Sheets 4 x 6" by pulling the liner back, placing the die cut on the sticky white surface and then placing back the liner to rub the die cut between the two sheets. Remove the liner and pull off the die cut (with its back covered in adhesive). Center the die cut on top of the card panel.


Next apply the E-Z Runner® Permanent Strips Refillable Dispenser on the back of card panel and adhere to A2 size card base.


Add adhesive on the back of the frame die cut using the process as background accent piece with the Adhesive Sheets 4 x 6" and center the die cut onto the card panel.


Stamp the sentiment onto the die cut and add 3D Foam Squares - Black, Regular on the back. Center onto the frame die cut on card panel.


Add trinket butterfly pin on an angle behind on the lower left side of frame die cut (the adhesive sheet adhesive will secure it as well as the Dodz Adhesive Dots 3D as explained below).


For the finishing touch, place a Dodz Adhesive Dots 3D on the back of a flower embellishment and place on top of the trinket butterfly pin.


Here's another look at the finished card!


Supplies List
Scrapbook Adhesives by 3L®:
Adhesive Sheets 4 x 6"
E-Z Runner® Permanent Strips Refillable Dispenser
3D Foam Squares - Black, Regular
Dodz Adhesive Dots 3D

Others:
Dies: Spellbinders® Creative Arts
Patterned Papers & Flower Embellishment: Prima Marketing Inc.
Cardstock and A2 Card Base: Darice/Core'dinations
Trinket Pin: Maya Road
Stamp: JustRite PaperCraft®
Ink: Stampin' Up
Rhinestone: Want2Scrap©

I hope you consider using Adhesive Sheets for your next intricate or not so intricate die cuts ;)

As always, many thanks for stopping by!!
Margie H

Thursday, May 28, 2015

Scrapbook Adhesives by 3L: Elegant and Simple 50th Anniversary Card Tutorial

Today I am on the Scrapbook Adhesives by 3L® Blog! It is wedding season which also means that anniversaries are coming up! I was asked to create a 50th wedding anniversary card - what an honor!

Come visit Scrapbook Adhesives by 3L® Blog for steps and FULL supplies list :) But I'll share some peeks here...


You want to see more?! Got to visit Scrapbook Adhesives by 3L® Blog!

Thanks for stopping by and SEE you over THERE!
MargieH

Monday, May 04, 2015

Scrapbook Adhesives by 3L: Easy Steps to Create 3D Foam Pennant Mother's Day Card

Today is my turn on the Scrapbook Adhesives by 3L® Blog! With Mother's Day just around the corner, I thought I'd share a card to celebrate her using 3D Foam Pennants as an accent and how I embellished them.


First I embellished the 3D Foam Pennants with an embossing folder for design and dimension. I used waxed paper to place them (with the top liner on) in the folder embossing in my manual die cutting machine.


Here are some other peeks...


For more detailed step outs, visit my 3D Foam Pennant Mother's Day Card post!

Thanks for stopping by!
MargieH

Tuesday, February 17, 2015

Scrapbook Adhesives by 3L: Whimsy Ribbon Flower Hello Card Tutorial

Today I am up on the Scrapbook Adhesives by 3L® Blog with a cheerful grouping of Donna Salazar with Scrapbook Adhesives by 3L® products. Using her ribbons, I made a series of flower embellishments to accent the card.


Here are some steps on how I created this card....


Oops! Can't show you any more :) For detailed step outs and entire supplies list, visit Whimsy Ribbon Flower Hello Card Tutorial post and let me know what you think!

I appreciate you stopping by and taking time to comment xo
MargieH

Saturday, January 17, 2015

Scrapbook Adhesives by 3L: Donna Salazar Denim Friendship Book Cover Tutorial

I am up on Scrapbook Adhesives by 3L® Blog using their newest release introduced at the 2015 Winter CHA (Craft & Hobby Assoc.) Mega Show, an annual trade only show in Anaheim CA last weekend.

Girly Grunge Guru, Donna Salazar and Scrapbook Adhesives by 3L® joins forces to create a line of mixed media products. Using her Denim Book, I created a Friendship Book Cover. This book measures 8 x 10" and has two denim material covers. There is a total of five medium weight chipboard pages to withstand layers of mediums.


Here are some sneaky peeks from the post I did...


OK...no more! LOL! You'll have to come visit Donna Salazar Denim Friendship Book Cover post for full tutorial and supplies list. Let them know what you think too!

Thanks for stopping by!!
MargieH

Wednesday, December 31, 2014

Seasons Givings Holiday Blog Hop 2014: Year 3!

THANK YOU SO SO MUCH FOR COMMENTING!!
~BLOG HOP IS NOW CLOSED FOR ENTRIES~

HAPPY NEW YEAR~!!
明けましておめでとうございます~!

I am so thrilled and honored to be a part of this blog hop to THANK YOU for following me through my blog on my creative journey!


Today I'd like to share a layered and textured Happy New Year card. I was inspired by a card that Designer Christina Griffiths shared on Spellbinders® Blog recently. By adding gold mirror and white cardstock, it creates a festive new year celebration - don't you think?


I cut/embossed Spellbinders Card Card Creator series as the foundation for my card panel: 5 x 7 Matting Basics B Die #7 (the smallest size die is #1) with gold mirror cardstock and 5 x 7 Matting Basics A Die #6 with white cardstock. With the latter die cut, I embossed Venetian M-Bossabilities™ Folder through the Grand Calibur Die Cutting and Embossing Machine.


Labels Forty Dies #6 and #7 were cut/embossed with the gold mirror cardstock and Labels Forty Decorative Elements Dies #3 and #4 were cut/embossed with white cardstock. Nest the die cuts together to their corresponding sizes and they fit perfectly! I adhere them together with E-Z Runner® Permanent Strips.


To give the smaller Labels Forty/Forty Decorative Elements die cut dimension, I placed 3D Foam Squares - Regular to the back and adhered.


For more sparkle, I heat embossed gold embossing powder to the sentiment on white cardstock and hand cut a ribbon tail on both side.


I wanted to layer a little more gold behind the sentiment so I cut/embossed JustRite Papercraft's exclusive Vintage Filigree Layer die with gold mirror cardstock. So beautiful! To adhere this intricate design, I used 4 x 6" Adhesive Sheet (just the center part).


Just add pearls and place on a 5 x 7" white card base and it's ready to send out!


Project Supplies:
Cardstock and Card Base: WorldWin Papers (Gold Mirror Cardstock) and Darice/Core'dinations ColorCore Cardstock®/David Tutera™ Celebrate Cardmaking System (110 lb.White Cardstock Pack and 5 x 7" card base)
Die Templates, Embossing Folder and Tool: Spellbinders® Creative Arts (5 x 7 Matting Basics A & B, Labels Forty, Labels Forty Decorative Elements, Venetian M-Bossabilities Folder, Tool 'N One™, Grand Calibur Die Cutting and Embossing Machine) and JustRite® Papercraft (Vintage Filigree Layer Die)
Stamp: JustRite® Papercraft (Extra Grand Holiday Sentiments Clear Stamps Set)
Ink: IMAGINE Craft®/TSUKINEKO® (VersaMark Watermark Ink)
Embossing Powder: Reflections (Gold)
Pearls: Want2Scrap©
Adhesives: SCRAPBOOK ADHESIVES BY 3L® (E-Z Runner® Permanent Strips, 3D Foam Squares – Black, Regular and 4 x 6" Adhesive Sheet)
Other: Heating Tool

Last year's winner, Nance Carroll, was kind enough of share her birthday card that she made using the prize package I sent:


Now to the goodies! As a way to thank you all for always visiting my blog (if you're new, please become a follower on FaceBook, Twitter, Pinterest or Instagram), I have a fun assortment to give away (some you can't see but let's just say you won't be disappointed! LOL!). Simply leave me a comment on this post and I will announce the winner on Tuesday, January 6th. International entries are welcome!


Here is the list of my fellow hoppers - ENJOY THE INSPIRATION!! Your next stop is Lee Ann Barrett!

Margie Higuchi = YOU ARE HERE!!