Monday, October 01, 2018

Happiness Grand Cabinet 3D Card

Today I wanted to share a card project that I have been wanting to do for a long time. When my local craft store, Craft Fancy (Arlington Hts, IL), had Spellbinders® Grand Cabinet 3D Card Etched Dies by Becca Feeken in stock, I grabbed one! LOL! You will agree with me that it is one you have to make!

**I receive products from Scrapbook Adhesives by 3L® and Memory Palette Co. for use in my projects. The opinions are completely my own based on my experience and doing so I can share what I personally love to use.**

Also in my stash, I had a bunch of items that I purchased in Japan (and some were gifted to me) created by a sweet friend of mine, Asuka Miyamoto. It might look complicated but trust me, Becca made it so easy to make!

How to Create Happiness

Nest the following three etched dies from outside in: Grand Cabinet Outline, Grand Cabinet Inlay and Inner Cabinet Outline as shown in the image below. You will need to cut a total of five pieces. The light grey die cuts will be the inside layers. The white die cut is the front layer.


For the back panel of the card, take out the Grand Cabinet Inlay and Inner Cabinet Outline from the Grand Cabinet Outline. Die cut with your choice of patterned paper. Nest the Side Panel Etched Die with the Side Panel Insert die. Then die cut two pieces in white cardstock. Fold the side score lines.


Aren't these Cut-Outs by Asuka Studios adorable? These sweet designs were fussy cut and will embellish the front of the card.


The tabs must be trimmed off of the front and back of a card. They will adhere to the side panels so tabs aren't needed.


On the score lines, I applied a line of adhesive from my E-Z Runner® Micro Refillable Dispenser. This tape adhesive is about a 1/8-inch in width - perfect for narrow areas.


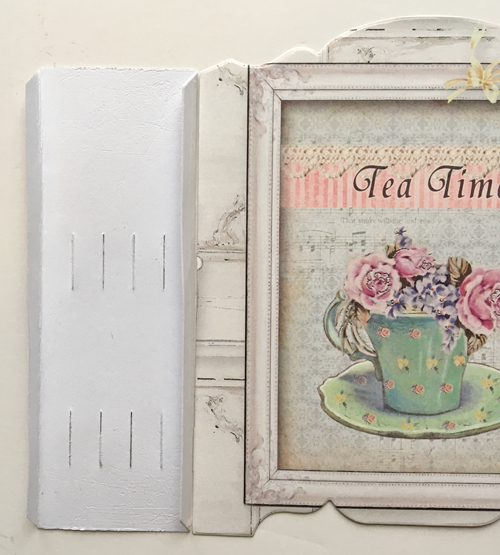
Make sure the slits are located at the bottom before lining up your card front to attach.


Repeat on the other side with the back card panel. The pattern you want showing should be facing up like the Tea Time design.


Now to add in your first layer (start from the back and work your way to the front) by threading the tab through the slit.


Once it goes through make sure to give the layer a gentle tug to "lock" into place. See the "before" and "after" position.


So when you're done, they should like this. Neat, huh?


These are the layers that you'll be working with. Cool! Almost done :)


I applied Adhesive Dots Micro to my fussy cut pieces. But my little squirrel will have dimension by adding a 3D Foam Circle White Mix in regular size.


To get rid of the stickiness from the exposed adhesives between the intricate cut, I dusted a bit of powder and it works like a charm!


To close up the card to complete the dimensional tunnel effect, apply a line of adhesive from my E-Z Runner® Micro Refillable Dispenser to the second side panel die cut. Remember to make sure the slits are at the bottom before connecting to the back card panel.

Then place all the layer panel tabs into the side panel and add the last line of adhesive from the E-Z Runner® Micro Refillable Dispenser to line up against the front card panel edge.


The finishing touch was to add the Sparkly Bubbles in Light Pink to the card front. Just loved how this card turned out!


View this Assembling APG 3D Vignettes Grand Cards video tutorial by Becca Feeken below.


Give a try! She has other shapes as well in an arch and circle (dome) format. Hope you enjoyed this tutorial as much as I have made it! Thanks for stopping by!!
MargieH

Creative Time: 40 minutes
Skill Level: Advanced

Materials Needed:
Spellbinders® Paper Arts: Grand Cabinet 3D Card Etched Dies from Amazing Paper Grace by Becca Feeken, Platinum™ 6 Die Cutting and Embossing Machine, and Tool 'n One™
Asuka Miyamoto Designs: Happiness (Forest Friends Cut-Outs), Pink Ribbon and Berry (Forest Friends 2 Cut-Outs), Blooming Everyday Envelope Patterned Paper (Blooming Everyday Collection) and Sparkly Bubbles in Light Pink
Scrapbook Adhesives by 3L®: E-Z Runner® Micro Refillable Dispenser, Adhesive Dots Micro, and 3D Foam Circles White Mix

Monday, September 24, 2018

Scrapbook Adhesives by 3L + Stampendous Blog Hop: Loads of Christmas Wishes Card

Today I am participating in the Scrapbook Adhesives by 3L and Stampendous 2018 Holiday Blog Hop! Using 3D Foam Squares and the NEW 3D Foam Circles, I made a dimensional card tutorial.

**I receive products from Stampendous and Scrapbook Adhesives by 3L® for use in my projects. The opinions are completely my own based on my experience and doing so I can share what I personally love to use.**


Using Loads of Layers

Stamp images from the Truck Tidings Cling Stamps and Die Set on white cardstock with a positioning tool.


Place the corresponding etched dies over the images and die cut with a manual machine. Next, using watercolor pencils, color in the images as desired. Set aside.


Cut your card panels: 5 1/4 x 4 1/8-inches in patterned paper and 5 x 4-inches in white cardstock. Adhere all the card panels using E-Z Runner Permanent Strips Dispenser on top of an A2 sized (4-1/4 x 5-1/2 inches) red card base.


Do you remember those decorative edge scissors? Well, take out the pinking edge and cut a rolling hill design in the middle of a 5 x 1-inch patterned paper strip. With an ink applicator, ink the edges for interest and depth.

Adhere one of the cut strips about 1/2 inch from the bottom of the white card panel with E-Z Runner Permanent Strips Dispenser. Then adhere the second strip at the bottom of the white card panel with 3D Foam Squares for dimension.


Adhere the colored truck die cut on top of the green hill with E-Z Runner Permanent Strips Dispenser. Place 3D Foam Circles Small Size on top of the circle design of the tree die cut and apply different color foils from the 3D Foam Holiday Embellishment Kit.


When finished, adhere with 3D Foam Squares White Regular and place on the back of the truck. Stamp your sentiment in black ink on the upper right corner of the white card panel.


  • Creative Time: 45 minutes
  • Skill Level: Intermediate
Materials Needed:
Scrapbook Adhesives by 3L®:
E-Z Runner Permanent Strips Dispenser
3D Foam Squares and 3D Foam Circles
3D Foam Holiday Embellishment Kit

Stampendous:
Truck Tidings Cling Stamps and Die Set

Other:
Patterned Papers: Authenque Papers; Watercolor Pencils: Faber-Castell Design Memory Crafts; White Cardstock: Neenah Papers; Stamp Positioning Tool: MISTI; Green Ink and Ink Applicator: Ranger Inks; Black Ink: Jet Black StazOn Ink; Decorative Edge Scissors: Fiskars

Saturday, September 01, 2018

Craft Fancy: Happy Holidays Card using Craft Fancy Exclusive Dies From Memory Box

On several occasions, I have been asked to design a make 'n take project for either a retailer or manufacturer. This card project was for a stamp consumer show in Madison, Wisconsin. The challenge (more to myself) was to use these etched dies in a unique and interesting way without being overwhelming.

This is what I came up with...a Happy Holidays Card using Craft Fancy's exclusive dies from Memory Box. When completed, you will have a layered and dimensional holiday card.

**I receive products from Craft Fancy and Scrapbook Adhesives by 3L® for use in my projects. The opinions are completely my own based on my experience and doing so I can share what I personally love to use.**

Craft Fancy: Happy Holidays Card using Craft Fancy Exclusive Dies From Memory Box by Margie Higuchi

Creating the Holiday Card Front

Use the Forest Landscape die to cut with a piece of 5 5/8 x 4" white cardstock. On the long side, place die on the top edge (making sure the tallest tree tip is just below the edge). NOTE: place wax paper between the die and cardstock for easy separation. Cut with manual die cutting machine. Remove die and flip the cardstock to repeat the same cutting steps.

Craft Fancy: Happy Holidays Card using Craft Fancy Exclusive Dies From Memory Box by Margie Higuchi

When done, it should look like the piece on the left. Cut in half to create two borders like the pieces on the right.

Craft Fancy: Happy Holidays Card using Craft Fancy Exclusive Dies From Memory Box by Margie Higuchi

Put the two borders together and shift a little to the desired look. NOTE: keep the top border steady and shift the back order. The top border will be the one showing up on the card front. Trim any harsh corner shown (think rolling slopes).

Craft Fancy: Happy Holidays Card using Craft Fancy Exclusive Dies From Memory Box by Margie Higuchi

Use the Snowman Landscape die to cut with a piece of 5 1/2 x 3" white glitter cardstock. On the long side, place die on the top edge (making sure the snowman's head is just below the edge). Cut with manual die cutting machine. Remove die and flip the cardstock to repeat the same cutting steps.

Craft Fancy: Happy Holidays Card using Craft Fancy Exclusive Dies From Memory Box by Margie Higuchi

When done, it should look like the piece on the left. Cut in half to create two borders like the pieces on the right. For this project, we only use one but you can either set aside for another project or place inside your card for an accent.

Craft Fancy: Happy Holidays Card using Craft Fancy Exclusive Dies From Memory Box by Margie Higuchi

Placing the Pieces Together

Place your Forest Landscape border die cut about 1/2" from the bottom of your black glitter A2 size (5.5 x 4.14") card base, aligning the left edge of the border to the edge of the card base. Trim excess on the right side.

Craft Fancy: Happy Holidays Card using Craft Fancy Exclusive Dies From Memory Box by Margie Higuchi

Use your Snowman Landscape border die cut as a guide and determine the placement of sentiment stamp. Remove Snowman border, ink the stamp and stamp onto the Forest border.

Craft Fancy: Happy Holidays Card using Craft Fancy Exclusive Dies From Memory Box by Margie Higuchi

Craft Fancy: Happy Holidays Card using Craft Fancy Exclusive Dies From Memory Box by Margie Higuchi

Next, add four 3D Foam Squares on the back of the Snowman border die cut. Place at the bottom edge of the card base and you're done!

Craft Fancy: Happy Holidays Card using Craft Fancy Exclusive Dies From Memory Box by Margie Higuchi

Here's another look at the finished card.

Craft Fancy: Happy Holidays Card using Craft Fancy Exclusive Dies From Memory Box by Margie Higuchi


  • Creative Time: less than an hour
  • Skill Level: Intermediate


Materials Needed:
Craft Fancy Exclusive Dies made by Memory Box Co.: Forest Landscape and Snowman Landscape
White Cardstock: Neenah
Black and White Glitter Paper: Best Creations
Stamp: Lawn Fawn (Plan On It: Holidays Set)
Ink: Clearsnap
Tool: MISTI (My Sweet Petunia); Platinum Die Cutting and Embossing Machine (Spellbinders® Paper Arts)
Adhesives: Scrapbook Adhesives by 3L® (E-Z Runner Grand Refillable Dispenser and 3D Foam Squares - White, Regular)


Tuesday, June 19, 2018

Scrapbook Adhesives by 3L + Hero Arts Blog Hop: Happy New Home

Today I am thrilled to be on Scrapbook Adhesives by 3L® and Hero Arts One-Day Blog Hop and Giveaway! Welcome to my blog :) Be sure to read all the way to the end!


**I receive products from Hero Arts and Scrapbook Adhesives by 3L® for use in my projects. The opinions are completely my own based on my experience and doing so I can share what I personally love to use.**

With Hero Arts' Home Stamp and Cut Set, I have created a Happy New Home Wine Shaker Tag using a combination of  SAby3L products from Crafty Power Tape to Keepsake Envelopes to Creative Photo Corners :) What do you think?


Happy New Home Die Cut

Using a stamp positioning tool, I stamped the image with permanent black ink on mixed media paper. I used colored pencil to color to the image. Since the die cut was going to handled often, I added a heavy coat of Dual Tip Glue Pen over the die cut for protection. Let it dry overnight before die-cutting with its coordinating die from the Home Stamp and Cut Set.


Lastly, I double stacked the three strips of Craft Foam Tape Black behind the die cut. You will see why later - set aside to work on the next stage...the wine tag base.


Wine Tag Base

On a 5 x 10 1/2" strip of patterned paper, score at 4 1/2" on the long side and punch out a 2 3/8" circle for the bottle neck opening on the top section above the score line. Place a line of Crafty Power Tape Dispenser 81 ft. across the top and bottom of the bottom section below the score line. Remove the liner, pour gold glitter and tap off excess to create a beautiful sparkly glitter border/tape! Set aside for the shaker feature.


Keepsake Envelope Shaker Feature

I cut 4 x 3 1/2" white patterned paper (for inside of the envelope), and 4 3/8 x 4" green patterned paper (for the window layer). Using the medium size Keepsake Envelope Mix, I added my white patterned paper and sequins and closed the flap. Then I removed the liner from back of the envelope and centered it to the tag front.


Punch out a 2 7/8" circle in the center of the green patterned paper and add s strip of Crafty Foam Tape Black on the top and bottom of the paper (backside). I forgot to add the Creative Photo Corners Gold on the four corners so do that BEFORE adding the Crafty Foam Tape = Oops! LOL!


Final Touches

Center the house die cut by taking off the liner and placing on top of the shaker feature. Stamp the sentiment from the Home Stamp and Cut Set with black permanent ink onto a strip of vellum. Trim and create fish tail ends, and secure with E-Z Runner Permanent Fine Adhesive Dispenser.


And now to be given with a bottle of celebration!


Creative Time: 45 mins/Beginner to Intermediate Level

Materials Needed:
Scrapbook Adhesives by 3L®:
Crafty Foam Tape Black
Crafty Power Tape Dispenser 81 Ft.
Keepsake Envelope Mix
E-Z Runner Permanent Fine Adhesive Dispenser

HomeHobby by 3L®:
Dual Tip Glue Pen

Hero Arts:
Home Stamp and Cut Set

Giveaway Details

For a chance to win one of two prizes, enter through the Rafflecopter App. International entries are welcome :) Good Luck!

Note: After you click the "Enter Here" button and sign in, you need to comment on the blog post and then hit the "I comment" prompt. It will take you to the next prompts of Follow Scrapbook Adhesives by 3L and Hero Arts' Instagram.


If the ENTER HERE button doesn't take you to an entry page, please CLICK: Scrapbook Adhesives by 3L + Hero Arts One Day Blog Hop + Giveaway.

Blog Hop List

Visit the others for more blog hop inspiration and chances to win!
Margie Higuchi (YOU ARE HERE!)

Your Next Stop is MICHELLE SHORT!


Friday, June 15, 2018

Paper House Productions: Giveaway Winners + Life Happenings!

First of all, apologize for being late on announcing winners for my giveaways...I had graduation, birthday and work hangover! It's been a busy week or so! LOL! My mom reads my posts so this is especially for her (she's not on FaceBook - lol!).

DePaul Graduate

My son graduated last weekend and we couldn't be prouder or relieved! HA! He was done in March but wanted to walk the stage to experience a milestone. I don't blame him. So we drove downtown to the McCormick Place campus into the new Wintrust Arena - I used to work in those buildings 31 years ago! YIKES! Pictures to share :)


Birthday Girl

The next day I met up with some greek Bradley Univ. peeps - some whom I haven't seen in over 30+ years (the two Sigma Chi boys - lol!)!! We had two birthday girls in the group this week so we started it off right with a yummy lunch at WildFire in Schaumburg. First time for me and it was a beautiful place :)


Paper House Productions Winners

Last but not least! Announcing the winners...


U.S. Winners are: Terre and Sue D!!
International Winner is: Giorgia Rossini

Thank you to all who participated and congratulations to the winners! Email me at mhiguchi @ comcast{dot}net with your mailing address.

BTW interested in another giveaway? Come back next Tuesday (6/19) for a blog hop with Scrapbook Adhesives by 3L and another manufacturer!! You don't want to miss it - just sayin' :)

MargieH


Tuesday, June 05, 2018

Paper House Productions: Paper Craft Projects, Planner and Giveaway!

Dusting off my blog - YIKES! It's been TWO MONTHS since I last posted...UGH! Sorry! LOL!! To make it up, I have something fun to share...keep reading...to the end :)

**I receive products from Paper House Productions and Scrapbook Adhesives by 3L® for use in my projects. The opinions are completely my own based on my experience and doing so I can share what I personally love to use.**

I'm almost finished with my Paper House Productions (PHP) PR Team (aka Planner Team) at the end of the month. Such a FUN team to be on - ENJOYED my TIME with them!! They are such a generous company and great people! Can't say enough good things about them. With that said, they are having a PR Team Call which is ending today (6/5) midnite Eastern. Sorry for the last second notice.


Thought I would share some of my projects I created using their products...

Washi Tape Flower Card by Margie Higuchi w Paper House Productions


Giveaway:

OK - so do you want to hear about the GIVEAWAY?! PHP has been generous to me so I am passing some goodies on to you. I created a couple of loaded envelopes and filled them with summer-themed PHP products! Some will be split into two like the two clips you see (watermelon and lemon) - aren't they cute and puffy too! I may add more along the way into these envies (wink wink!)!!


Details:


  • TWO Loaded Envelopes are opened to U.S. + territories only (sorry - postage is killer!)
  • BUT for international entries, I will send ONE business envelope full of PHP products that I can fill without going over the First Class Mail limit.
  • Follow one of the following: Blog (Hit Blue Follow Button on my side bar), Instagram or Pinterest.
  • Comment with your handle name so I can verify or tell me you're already a follower in which social media AND tell me your summer plans! I need vacation ideas :) 
  • Contest ends Tuesday, June 12, 2018 at 11:59PM US Central Time.
  • Unsuspecting husband will pick names out of a bowl because I don't have a hat. LOL!
Hope that was clear as mud! If not, please ask :)

If you are interested in ordering their items, I am sharing my 15% discount code to use on their website. It expires 12/31/18...told you they are generous! LOL! CLICK: PHP Website.

As always, BIG THANK YOU for stopping by and Good Luck!
MargieH