**I receive products from Scrapbook Adhesives by 3L® and Memory Palette Co. for use in my projects. The opinions are completely my own based on my experience and doing so I can share what I personally love to use.**
Also in my stash, I had a bunch of items that I purchased in Japan (and some were gifted to me) created by a sweet friend of mine, Asuka Miyamoto. It might look complicated but trust me, Becca made it so easy to make!
How to Create Happiness
Nest the following three etched dies from outside in: Grand Cabinet Outline, Grand Cabinet Inlay and Inner Cabinet Outline as shown in the image below. You will need to cut a total of five pieces. The light grey die cuts will be the inside layers. The white die cut is the front layer.For the back panel of the card, take out the Grand Cabinet Inlay and Inner Cabinet Outline from the Grand Cabinet Outline. Die cut with your choice of patterned paper. Nest the Side Panel Etched Die with the Side Panel Insert die. Then die cut two pieces in white cardstock. Fold the side score lines.
Aren't these Cut-Outs by Asuka Studios adorable? These sweet designs were fussy cut and will embellish the front of the card.
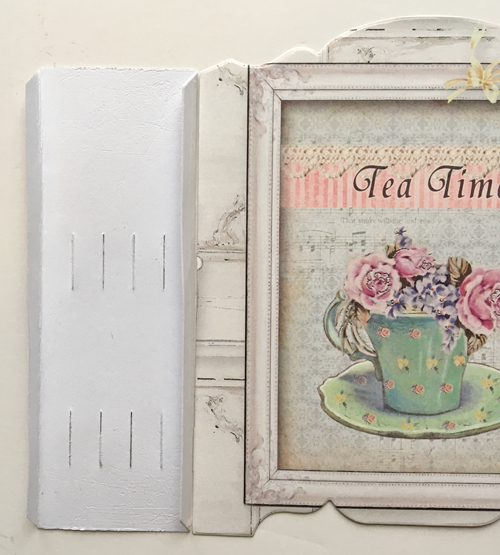
The tabs must be trimmed off of the front and back of a card. They will adhere to the side panels so tabs aren't needed.
On the score lines, I applied a line of adhesive from my E-Z Runner® Micro Refillable Dispenser. This tape adhesive is about a 1/8-inch in width - perfect for narrow areas.
Make sure the slits are located at the bottom before lining up your card front to attach.
Repeat on the other side with the back card panel. The pattern you want showing should be facing up like the Tea Time design.
Now to add in your first layer (start from the back and work your way to the front) by threading the tab through the slit.
Once it goes through make sure to give the layer a gentle tug to "lock" into place. See the "before" and "after" position.
So when you're done, they should like this. Neat, huh?
These are the layers that you'll be working with. Cool! Almost done :)
I applied Adhesive Dots Micro to my fussy cut pieces. But my little squirrel will have dimension by adding a 3D Foam Circle White Mix in regular size.
To get rid of the stickiness from the exposed adhesives between the intricate cut, I dusted a bit of powder and it works like a charm!
To close up the card to complete the dimensional tunnel effect, apply a line of adhesive from my E-Z Runner® Micro Refillable Dispenser to the second side panel die cut. Remember to make sure the slits are at the bottom before connecting to the back card panel.
Then place all the layer panel tabs into the side panel and add the last line of adhesive from the E-Z Runner® Micro Refillable Dispenser to line up against the front card panel edge.
The finishing touch was to add the Sparkly Bubbles in Light Pink to the card front. Just loved how this card turned out!
View this Assembling APG 3D Vignettes Grand Cards video tutorial by Becca Feeken below.
Give a try! She has other shapes as well in an arch and circle (dome) format. Hope you enjoyed this tutorial as much as I have made it! Thanks for stopping by!!
MargieH
Creative Time: 40 minutes
Skill Level: Advanced
Materials Needed:
Spellbinders® Paper Arts: Grand Cabinet 3D Card Etched Dies from Amazing Paper Grace by Becca Feeken, Platinum™ 6 Die Cutting and Embossing Machine, and Tool 'n One™
Asuka Miyamoto Designs: Happiness (Forest Friends Cut-Outs), Pink Ribbon and Berry (Forest Friends 2 Cut-Outs), Blooming Everyday Envelope Patterned Paper (Blooming Everyday Collection) and Sparkly Bubbles in Light Pink
Scrapbook Adhesives by 3L®: E-Z Runner® Micro Refillable Dispenser, Adhesive Dots Micro, and 3D Foam Circles White Mix


3 comments:
So much work went into this gorgeous design but it sure did result in a beauty! You have more ambition then I do as this looks to be quite complicated to do. But I totally love it!
Wow Margie, what a beautifully stunning card! Looks like a lot of work but well worth the end results!
ty for the tut. I made one last week out of mirror card stock for my granddaughter's wedding in May. The only tough part was getting the tabs in at the end to close it up. it kept opening up on me but the results are beautiful!!!
Post a Comment