Pages

Saturday, November 20, 2021

StencilGirl: Mushroom Gills Cloud Canvas

Hello Friends! Wonderful mixed media artist friend, Tina Walker, called out to makers interested in contributing to her article over at StencilGirl earlier this year. Well, I ended up creating two projects. One for Tina's article, Woodland Mushroom Canvas, and this one, Mushroom Gills Cloud Canvas. As a fan girl of Debi Adams' style and design, I had to showcase this stencil because I LOVE how it turned out! LOL! 

When I researched more about mushrooms, I had no idea the different colors there are! Inspired by the unique coloring, I grabbed my Gelatos and stencil paste to go to work! What do you think?

**I receive products from Faber-Castell for use in my projects. The opinions are completely my own based on my experience and doing so I can share what I personally love to use.**


Making the Background

I used a piece of 2.5 x 3.5-inch mixed media paper to create my ATC. The background was colored with three Gelatos and then blended with a baby wipe. Keep layering colors until you get the desired look. Let dry.


The Focal Point

Using wide washi tape, I centered and secured the Mushroom Gills Stencil to the painted canvas. Apply the modeling paste across the stencil for full coverage. I let it sit for a moment and then gently took off the stencil.


LOVE! I could've left it the way it was - black and white are always stunning! LOL! But it's fall and I want color! Let this dry completely.


Adding Colors

Before adding colors, I placed the Mushroom Gills Stencil back on the dried paste. It would serve as a guide when I wanted precise coloring. 


Using the same wide washi tape, I secured the stencil. There are three full mushrooms in the center. I concentrated on those as my focal shapes. 

The first one, I colored with Strawberry Gelatos which I knew had a more creamy consistency so I taped around the mushroom to control the coloring. I used my fingers to spread the color...no need for anything else.


For the other two mushrooms, I had help with coloring using water and a paintbrush. There are signs of seepage but I didn't care - it's mixed media! LOL! Color the rest of the mushroom designs.


I hope you enjoyed this Mushroom Gills Cloud Canvas. Would love it if you follow me on the blog or my ILscraps Instagram!

Thanks for stopping by!
MargieH

Skill Level: Intermediate
Creative Time: 40 minutes

Materials Needed:
Stencil: StencilGirl (Mushroom Gills 6 x 6 Stencil by Debi Adams)
Colors: Faber-Castell (Gelatos: Amethyst, Aquamarine, Tanzanite, Red Cherry, Orange Soda, and Earl Grey)
Molding Paste: Golden
Other: Canvas; Black Acrylic Paint; Foam Brush; Paint Brush; Baby Wipe; Washi Tape

Pin It!


Sunday, November 14, 2021

Craft Fancy: Wickerwork Hello Card

Hello! What I created with this wonderful background die from Craft Fancy. I've always wanted a plaid-inspired design and this contemporary motif fits the bill! Let me show you how I made this card so you can recreate one too!

**I receive products from Scrapbook Adhesives by 3L® for use in my projects. The opinions are completely my own based on my experience and doing so I can share what I personally love to use.**


Wickerwork Card Panel

For the card panel, I cut a black, red, and white cardstock with the Wickerwork die to make the background. Slightly shift each color to peek through for interest. Secure each layer with the Dual Tip Glue Pen.


Place 3D Foam Strips on each side, and adhere to an A2 (4.25 x 5.5-inch) Kraft card base.


Hello Sentiment

Stamp the HELLO sentiment from the Sentiments #1 Stamp Set with black ink on vellum paper. Then cut into a double ribbon tail banner. Mat a piece of red cardstock, adhere with E-Z Runner Permanent Fine and cut the red cardstock in the same banner shape with a 1/8-inch border. Adhere the sentiment on to the card front.


Butterfly Embellishments

Lastly, I added butterflies on the sentiment banner by die-cutting the Butterfly Triptych dies with white cardstock. Then centered Crystal Glass Rhinestones with the Adhesive Dots Micro on the butterfly for sparkle.


I hope you enjoyed this project. If you haven't already, please follow me on the blog or my ILscraps Instagram.

I appreciate you stopping by! Thank You!
MargieH

Creative Time: 40 minutes
Skill Level: Intermediate

Materials Needed:
Crafty Fancy:

Wickerwork
Sentiments #1 Stamp Set
Butterfly Triptych
Crystal Glass Rhinestones
Scrapbook Adhesives by 3L®: E-Z Runner® Permanent Fine, 3D Foam Strips White, Adhesive Dots Micro and Home Hobby by 3L® Dual Tip Glue Pen
Other: Black Permanent Ink: Hero Arts; My Sweet Petunia (MISTI); Vellum; Scissors; Die-Cutting Machine

Saturday, November 06, 2021

Amazing Paper Grace: November Die of the Month with Christmas Tree Gatefold Card


Although there are many ways to create with this wonderful Pop Up 3D Vignette Christmas Tree set, I made mine as a gatefold card with the split between the two larger trees. This was so much FUN to create especially using papers like silver mirror cardstock and red glitter paper, and the perfect bling (Christmas Lights Bling) to decorate the tree! Let's get started.

Dies for my creations today were supplied by Amazing Paper Grace.

There are 21 dies included in the Pop Up 3D Vignette Christmas Tree.


My Project Today using Pop Up 3D Vignette Christmas Tree.
On a piece of 8.5 x 5.5-inch cream cardstock, score on the long side at 2 1/8-inch and 6 3/8-inch and burnish the score lines to create your A2-size (4.25 x 5.5-inch) gatefold card base.


Cut two pieces of 2 1/8 x 5.5-inches patterned paper and cover/adhere it to each side of the gatefold panels with the E-Z Runner Grand Ultra Strong adhesive. Set Aside.


Let's work on the embellishments. Die-cut the smallest tree in green for the outline die and nest with the insert die to cut the silver mirror cardstock. Die-cut the medium tree in silver mirror cardstock for the outline die and nest the insert die to cut the green cardstock. You should have a total of four tree shapes. Adhere the matching shapes together to form two trees.


For the base of the presents and bows, I die-cut with silver mirror cardstock. Using various scraps of patterned paper, I die-cut the different boxes and lids. Not shown here but I die-cut the ornaments in cream cardstock and red glitter paper. Assemble everything together and set aside to work on the sentiment.


I decided to place the sentiment over the pile of presents. With the busy patterns, I chose to use cream cardstock for my sentiment strip, nest the banner, and insert dies together to die-cut. Then die-cut the banner outline die in silver mirror cardstock. Add bling to accent. Use 3D Foam Strips to adhere it on top of the presents.


Assemble the card front with all the embellishments, starting with the trees. The medium tree goes on the right gatefold panel. Use the other tree and present sentiment as a guide when determining placement. Both trees overhung the middle edge (mark with a pencil, if needed as you can erase later). I used the E-Z Runner Grand Ultra Strong adhesive. It is perfect for paper construction projects like this.


Lastly, I added the Christmas Lights Bling, it was perfect for my tree because it needed something! LOL! It is self-adhesive and easy to cut so I can place them where I wanted.


And that's it! All done and ready to send out. I hope you enjoyed my Christmas Tree Gatefold Card tutorial.

Thanks for stopping in!
MargieH

Supplies:Amazing Paper Grace November 2021 Die of the Month – Pop Up 3D Vignette Christmas Tree; Patterned Papers: Kraft 'n Creativity (Colors of Life Collection), Bling: Want2Scrap© Adhesives: Scrapbook Adhesives by 3L® (E-Z Runner® Grand Ultra, E-Z Runner® Petite Permanent Dots, 3D Foam Strips, and Adhesive Dots Small); Silver Mirror, Green and Cream Cardstock

The Amazing Paper Grace Die of the Month is available exclusively at Spellbinders Paper Arts until November 24, 2021. Pop Up 3D Vignette Christmas Tree at the special kit club price, along with other membership perks.

View this month's Amazing Paper Grace Die of the Month!

Would love to hear from you! Comment on how will you use the dies - a card, home decor, mixed media piece?!


Wednesday, October 27, 2021

Scrapbook Adhesives by 3L: Fall Slimline Gatefold Card

Hello! I cannot believe it's the end of October and we're into the fall season! WoW! Just for the occasion, I have a Fall Slimline Gatefold Card project up on Scrapbook Adhesives by 3L®'s blog today.


The split is not even cut which is done on purpose. It's cut on the 3.5-inch mark but I love how it turned out. Just a touch of color on the card front with a muted background of the stamp. What do you think?


A couple of sneak peeks here but please visit the Fall Slimline Gatefold Card tutorial over at Scrapbook Adhesives by 3L® Blog for more details and a full supplies list.


See you there!
MargieH

Wednesday, October 13, 2021

OOAK Pop Up Event: Whimsical Holiday Card Creations Class

On the weekend of October 22 and 23, I will be at a pop-up event in Schaumburg IL, hosted by One of a Kind Paper Craft Show. It will be my first in-person class since the Pandemic started. My class, Whimsical Holiday Card Creations, will be three holiday cards in different card formats to help get you started with your seasonal card making.


The Gnome is an interactive card because he dances by swinging his legs back and forth. I will show how this can be achieved. Oh, and he sparkles too! LOL!


The Silver Bell Dimensional Doily square card is easy to assemble and brings that WoW! factor to your card. Tuck in between the bells is another layer of silver bells for a touch of shine. 


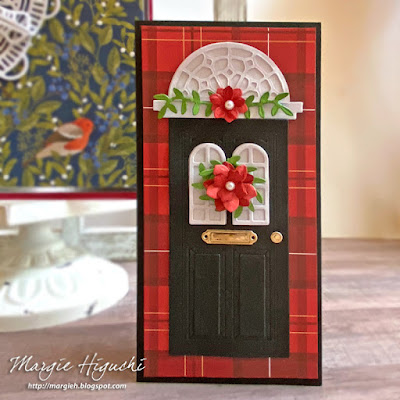
Put out the welcome mat for this mini slimline card with this holiday-themed front door! Lots of layers to create this wonderful card!


If you are interested in my class and can attend in person, click: Whimsical Holiday Card Creations Class to sign up and for more details. It will be held at the event on Saturday, Oct 23 from 10:30 to 11:30 AM for $28.00.

There are other classes offered as well. Did you just want to shop? No problem, we have about five vendors that have unique papercraft items. There is no admission to shop so I hope to see you there! 

Thanks for stopping by!
MargieH


Tuesday, September 07, 2021

Amazing Paper Grace September Die of the Month Blog Hop – Pop Up 3D Vignette Vintage Cash Register


Cha-ching! Is there any living person that hasn't absolutely been intrigued by a Cash Register and all of its compartments and treasure it holds inside? As kids, it's one of the first grown up toys we played with. The sound of a cash register ringing means prosperity and so many good things. Say welcome to the Amazing Paper Grace September 2021 Die of the Month – Pop Up 3D Vignette Vintage Cash Register.

The light-hearted, pun-filled sentiments are perfect for any occasion, to send this 3D Fold Flat card. Want to let someone know how valuable they are to you? Then the "Priceless" sentiment will say that loud and clear. Want to express your opinion? Then actually you're looking for the "Just My .02" sentiment. It's so cute, there's even a front drawer where you can actually fold and put in some currency.

Here are some ideas that might inspire you to create:
1. Make the traditional cash register and stock it with gift cards.
2. Make a basket from both facades for donations or as a friendly tip jar.
3. Are you in the middle of a fundraiser? Use it as a table favor to break the ice.
4. Create a mini album with a cash register on the front and back for kids to record their savings.


**Dies for my creations today were supplied by Amazing Paper Grace.**

There are 16 dies included in the Pop Up 3D Vignette Vintage Cash Register.


My Project Today using Pop Up 3D Vignette Vintage Cash Register.

The card is a gatefold card base and its cover is the Pop Up 3D Vignette Vintage Cash Register. The cash register is created with soft colors to match the patterned paper I had just gotten. I lifted up some of the machine parts with 3D Foam adhesive and small pearls for interest.


Designer Tip: Take advantage of the beautiful embossing design on the cash register body by lightly misting with water on the cardstock before die-cutting. It will loosen the paper fibers for a better imprint. Also, lightly sand the die cut shape to bring out the raised areas.

For my second project, I created a gift pocket and embellished the front with the vintage cash register. I kept it simple and with no layers but accented with flowers from  Love how it turned out. I'm thinking about filling it with goodies and a gift card or two.


How cute would this be if was a door hanger decoration? So many options with this Die of the Month set from Amazing Paper Grace! 


I hope you enjoyed my Priceless Gift Ensemble. Pictured below are my projects together. It was fun to assemble and even more fun to giveaway! Thanks for stopping by!


Supplies:
Accessories: Amazing Paper Grace September 2021 Die of the Month – Pop Up 3D Vignette Vintage Cash Register and S4-867 Cinch and Go Flowers III

Patterned Papers: Kraft 'n Creativity (Romance Collection), Bling: Want2Scrap; Ink and Water Mister: Ranger Ink; Adhesives: Scrapbook Adhesives by 3L (E-Z Runner Grand Ultra, Adhesive Sheets, Adhesive Dots Small, Lines & 3D, and Dual Tip Glue Pen); Light Green, Pink and Kraft Cardstock; Sandpaper; Satin Ribbon

Visit each Creative Team blog linked below for their take on creative paper crafting ideas with Pop Up 3D Vignette Vintage Cash Register, the Amazing Paper Grace September 2021 Die of the Month!

The Amazing Paper Grace Die of the Month is available exclusively at Spellbinders Paper Arts during September 2021. Pop Up 3D Vignette Vintage Cash Register at the special kit club price, along with other membership perks.

View this month's Amazing Paper Grace Die of the Month!

How will you use the Pop Up 3D Vignette Vintage Cash Register dies? Share with me and comment below!

Follow me on Instagram ILscraps!

Wednesday, August 25, 2021

Amazing Paper Grace | Holiday Medley Intro Blog Hop


This magical menagerie of dies helps celebrate one of the most festive times of the year through paper crafting! The Holiday Medley Collection consists of eight die sets and a Glimmer Hot Foil Plate Set that coordinates with one of the die sets. The array of dies can be mixed within existing die sets to offer more creative options. These include the Make a Scene Card Base and 3D Vignettes. The versatile new Merry Filigree Card Builder, Celebrate Scrollwork Card Builder and Joy Crescent Card Builder sets create different card formats from A2, A7, Mini Slimline, to Slimline. In addition, you can remove the Christmas Motifs and use them year-round. Visit each of the designers’ blogs for inspiration and ideas from the Holiday Medley Collection!

Today's projects were created with dies provided by Amazing Paper Grace.

My Projects for Today

Featuring the S4-1130 Silver Bells Dimensional Doily set, I created three bell shapes to better show off this sweet set. Like Becca's other Dimensional Doily series, you just die-cut, fold each side, and slide into the slits to lock them into place.


My 5x7-inch card features a vellum shaker card panel which I accented the upper right corner with the three Bells Dimensional Doily. See the gold backing? I die-cut with gold mirror cardstock to show off the intricate design of the bells.

The other card is a 6-inch square card which I added half of a round dimensional doily. Both cards have the S4-960 Cinch and Go Poinsettia flower. Just love this flower die set! I hope these cards get you into the holiday spirit!


Designer's Tip: You can cut three bell shapes at the same time. Make sure to secure the insert die with washi tape to avoid slippage when die-cutting.


Supplies List: Etched Dies and Tools: Spellbinders® Paper Arts (S4-1130 Silver Bells Dimensional Doily Etched Dies Set fm Amazing Paper Grace by Becca Feeken, S4-960 Cinch and Go Poinsettia Etched Dies Set fm Amazing Paper Grace by Becca Feeken and Platinum 6 Die-Cutting and Embossing Machine)

Other: Patterned Papers: PhotoPlay Paper Co.; Adhesives: Scrapbook Adhesives by 3L® (Crafty Foam Tape 108ft., 3D Foam Circles White, Metallic Transfer Foil Sheets in Holographic, Creative Photo Corners in Gold, E-Z Runner® Permanent Fine, Adhesive Lines, and Adhesive Dots Small); Scoring Tools: ScorPal (Scoreboard and Creasing Tool); Stick Pin Leaves: Maya Road; Vellum Paper; Red, Gold Mirror and White Cardstock; Gold Ribbon; Beaded Sprigs
Holiday Medley Availability:

These dies and plates are available from Spellbinders right now! Click here: Holiday Medley Collection.

Holiday Medley Collection Blog Hop!

Click on the links to each member, they're waiting to inspire you to create something beautiful:

Visit Anita Kejriwal
Visit Kate Skonieczna
Visit Joanna Wisniewska
Visit Patricia Manhire
Visit Elena Olinevich
Visit Agnieszka Posluszny
Visit Beth Pingry
Visit Margie Higuchi (You are HERE!)
Visit Becca Feeken at Amazing Paper Grace

Giveaway!

You could win an Amazing Paper Grace Die of the Month! Enter to win on our @AmazingPaperGrace_Creates Instagram Account. All of the entry details are in this image below:


Please comment: Which Holiday Medley set speaks to you?

Would love for you to follow me on ILscraps Instagram!